We’re upgrading your documentation experience!
The new doc website is live at docs.openit.com. This website is now in maintenance-only mode (only critical issues will be addressed).
Explore the new website and send us your feedback!
#
Bentley Cloud
#
Introduction
Open iT supports Bentley Cloud usage reporting. The following sections will guide you on the required configuration for
Apply the configurations shown in the Open iT client.
#
Configuring License Manager Utility Polling
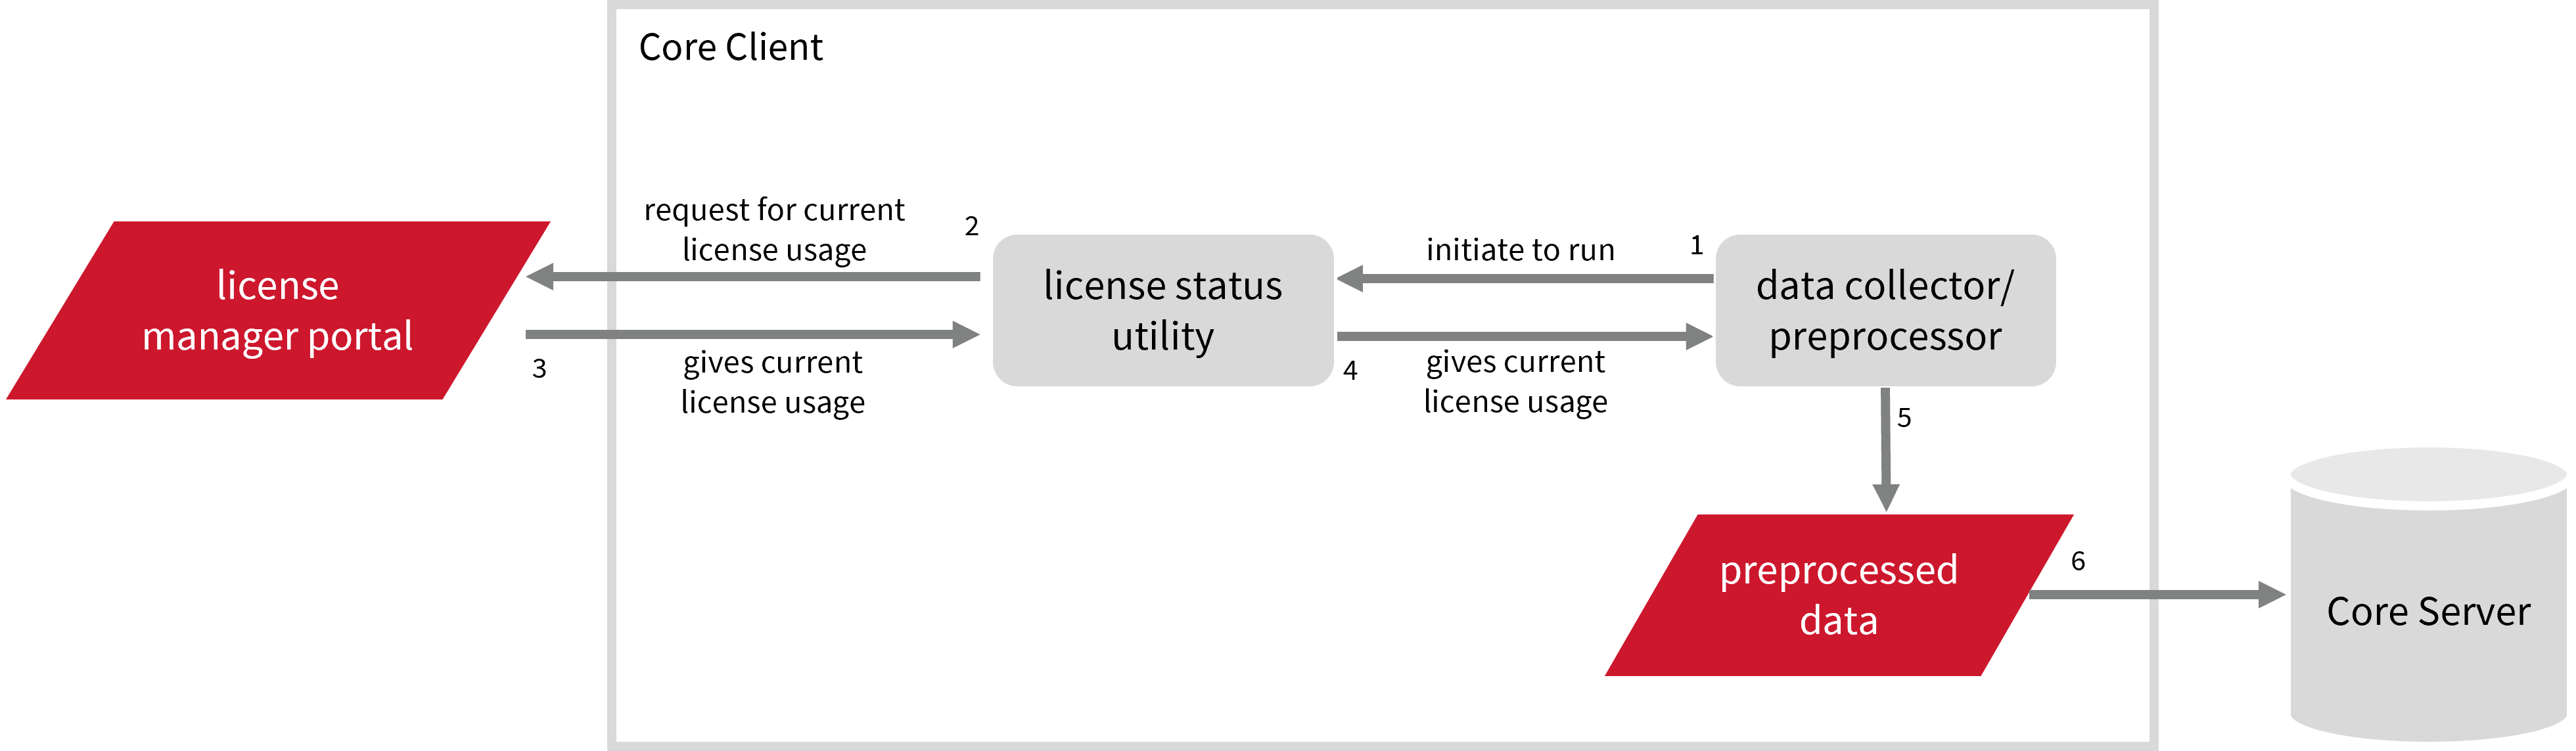
Open iT polls the license servers at regular intervals to get the current status of its license use and availability. This data collection utilizes the license server's built-in license administration utility, which collects and processes license statuses for reporting.
For this collection, the data source is through an API. The data collector/preprocessor initiates the license status utility every hour using a 5-minute sample interval, triggering the data collection process. The license status utility requests the current license usage data from the license manager portal. After the license manager portal provides the requested data, the license status utility passes this information to the data collector/preprocessor. The data collector/preprocessor processes the data, preparing it for transmission. Finally, the preprocessed data is sent to the Core Server every night, according to the client's timezone, for further storage, completing the license usage data collection and processing.
This will produce the following aggregated data types used for reporting in Power BI:
- (49) Host User License Use
- (93) OLAP Raw Hourly
- (94) OLAP User Concurrency
- (95) Usergroup License Use v3.0
- (102) OLAP Total Use
#
Requirements
- An Open iT Client connected to an Open iT Server or a coexistent Open iT setup
- Activated LicenseAnalyzer collection and license poller
- Non-SSO Bentley cloud account with Administrator access to the Bentley Portal
#
Initializing Bentley Cloud Data Collection
Before configuring data collection, it is necessary to follow the steps below:
Open a command prompt with Administrator level privileges.
Go to the bin directory, which is by default in
C:\Program Files\OpeniT\Core\bin, run the command:Command Syntaxcd $BIN_DIRExamplecd C:\Program Files\OpeniT\Core\binRun the command:
Command Syntaxopenit_bentleycloud -c <bentley_admin_email> <bentley_admin_password> -swhere:
Parameters for Initializing Bentley Cloud Data Collection
Exampleopenit_bentleycloud -c jsmith@email.com <bentley_password> -sThis example initializes Bentley Cloud data collection using the administrator account jsmith@email.com.
Open iT saves the hashed Bentley Cloud credential file in
C:\ProgramData\OpeniT\Data\var\Bentley.Optional Parameters Optional Parameters
#
Configuring Data Collection
These are the required steps to activate and configure collection of Bentley Cloud usage data.
Go to the Components directory, which is by default in
C:\Program Files\OpeniT\Core\Configuration\Components, and back up thelicpoll.xmlconfiguration file.Open a command prompt with Administrator level privileges.
Go to the bin directory, which is by default in
C:\Program Files\OpeniT\Core\bin, run the command:Command Syntaxcd $BIN_DIRExamplecd C:\Program Files\OpeniT\Core\binOnce in the directory, activate the collection of Bentley Cloud data, run the command:
Command Syntaxopenit_confinit -c "licpoll.license-types.genericlicense-bentleycloud-sample.active=true"Set any preferred argument for the openit_bentleycloud binary, run the command:
Command Syntaxopenit_confinit -c "licpoll.license-types.genericlicense-bentleycloud-sample.status-command.arguments=<argument>"Optional Parameters Optional ParametersExampleopenit_confinit -c "licpoll.license-types.genericlicense-bentleycloud-sample.status-command.arguments=-t C:\ProgramData\OpeniT\Data\temp\Bentley"Run the following command to update the configuration files:
Command Syntaxopenit_confbuilder --clientMake sure no errors are encountered.
Refer to the Bentley Cloud Data Collection Configuration table to learn more about Bentley Cloud configuration in licpoll.xml.
#
Verifying Data Collection
After configuration, you can verify that the data is collected by following these steps:
Open a command prompt with Administrator level privileges.
Go to the bin directory, which is by default in
C:\Program Files\OpeniT\Core\bin, run the command:Command Syntaxcd $BIN_DIRExamplecd C:\Program Files\OpeniT\Core\binRun the command:
Command Syntaxopenit_licpoll -# 1Verify that the temp directory, which is by default in
C:\ProgramData\OpeniT\Data\temp, contains aLicPolldirectory containing.dataandstatus-*.logfiles.
#
Next Step?
Continue reading if you need to configure log file parsing. If not, proceed to configuring Power BI. Power BI Connection Configuration
#
Configuring Log File Parsing
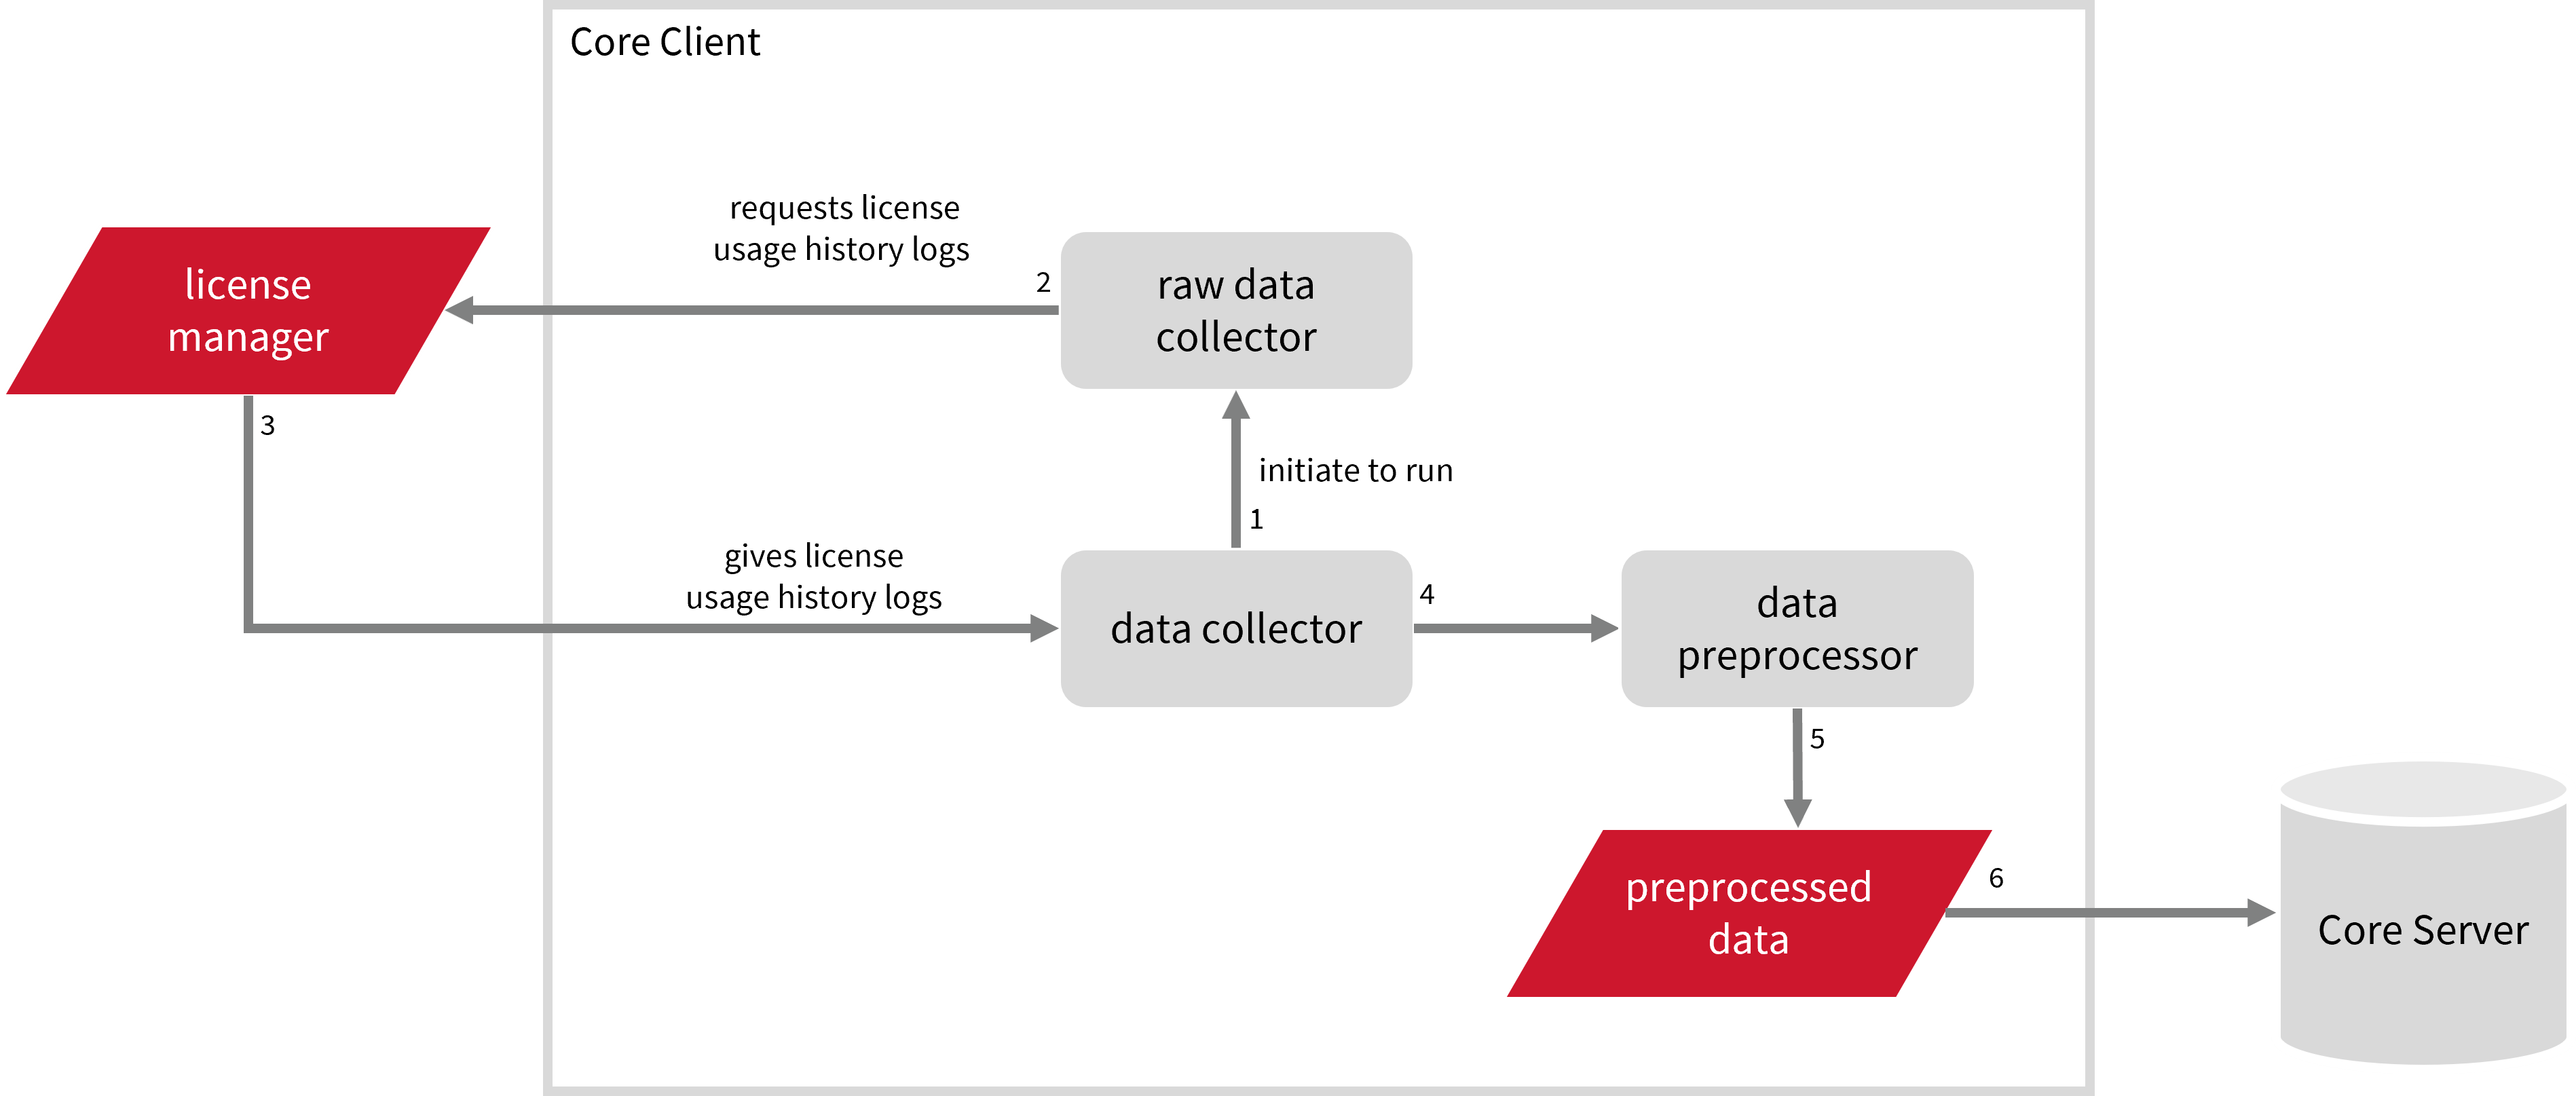
Open iT collects log files and converts them to Open iT format.
For this collection, the data collector initiates the raw data collector to request license usage history logs from the license manager every 5 minutes, triggering the data collection process. Once the logs are received, the raw data collector passes them to the data collector. The collected data is then sent to a data preprocessor for processing. After preprocessing, the final preprocessed data is stored in the Core Server.
This will produce the following aggregated data types used for historical reporting:
- (89) Total License Use Licenseevents
- (90) Individual License Use Licenseevents
- (91) Usergroup License Use Licenseevents
- (108) Host License Use Licenseevents
- (109) Hostgroup License Use Licenseevents
- (137) License Token Individual Usage
- (138) License Token Total Usage
#
Requirements
- An Open iT Client connected to an Open iT Server or a coexistent Open iT setup
- Non-SSO Bentley cloud account with Administrator access to the Bentley Portal
- Chromium must not be blocked or restricted by endpoint security policies, firewalls, or application whitelisting tools in the company’s environment
#
Setting up Bentley Cloud Data Collection
These are the required steps to set up data collection from the Bentley portal.
Open a command prompt with Administrator level privileges.
Go to the bin directory, which is by default in
C:\Program Files\OpeniT\Core\bin, run the command:Command Syntaxcd $BIN_DIRExamplecd C:\Program Files\OpeniT\Core\binRun the command:
Command Syntaxopenit_bentleycloudstat init --username <bentley_username> --password <bentley_password>where:
Parameters for Setting Up Bentley Cloud Data Collection
Optional Parameters for initSubcommandOptional ParametersExampleopenit_bentleycloudstat init --username jsmith@email.com --password <bentley_password>This example sets up Bentley Cloud data collection using the administrator account jsmith@email.com.
Open iT saves the hashed Bentley Cloud credential file,
bentleycloudhistorical.ini, in the OpeniT directory, which is by default inC:\ProgramData\OpeniT.Optional openit_bentleycloudstatSubcommandsexport- use this to export Bentley Cloud data from the portal.Exampleopenit_bentleycloudstat export <param 1> <param 2> ... <param n>Parameters for Exporting Bentley Cloud Data
query- use this to query Bentley Cloud data from the portal.Exampleopenit_bentleycloudstat query <param 1> ... <param n>Parameters for Querying Bentley Cloud Data
parse- use this to parse the exported Bentley Cloud data from the portal.Exampleopenit_bentleycloudstat parse <param 1> <param 2> ... <param n>Parameters for Parsing Extracted Bentley Cloud Data
collect- use this to collect Bentley Cloud data from the portal.Exampleopenit_bentleycloudstat collect <param 1> <param 2> ... <param n>Parameters for Collecting Bentley Cloud Data
recollect- use this to recollect Bentley Cloud data from the portal.Exampleopenit_bentleycloudstat recollect <param 1> <param 2> ... <param n>Parameters for Recollecting Bentley Cloud Data
remove- use this to remove Bentley Cloud data from archive.Exampleopenit_bentleycloudstat remove <param 1> <param 2> ... <param n>Parameters for Removing Bentley Cloud Data
cleanup- use this to clean up the exported csv.Exampleopenit_bentleycloudstat cleanup
--add-date-format "<date_format>"- use this to add date formats to accept.The supported date formats are:
%Y-%m-%d %H:%M:%S.%f%Y-%m-%dT%H:%M:%S"%Y-%m-%d %H:%M:%S%m/%d/%Y %I:%M:%S %p%Y-%m-%d%d/%m/%Y %H:%M:%S%d/%m/%Y
where:%Y- Year%m- Month%d- Day%dT- ISO 8601 format, where T separates the date from time%H- Hour (e.g., 00-23, 24-hour clock)%I- Hour (e.g., 00-12, 12-hour clock)%M- Minute%S- Second%f- Microsecond%p- AM/PM indicator
-b <browser>,--browser <browser>- use this to specify which common playwright-supported browser to use (e.g.,-b firefox,--browser firefox).The system will automatically install the specified browser if it is not present in the local setup; the default browser is Chromium. Chromium, WebKit, and Firefox are supported.
Make sure that the browser you choose is not blocked or restricted by endpoint security policies, firewalls, or application whitelisting tools in your company's environment.
--browserpath "<browser_path>"- use this to specify the full path to a local browser executable (e.g.,--browserpath "C:/path_to_browser/browser.exe"). Google Chrome and Brave are supported.--headless <option>- set this totrueto prevent browsers from opening when the system interacts with the Bentley portal.
#
Initially Collecting and Sending Bentley Cloud Data to the Server
The collect_bentleycloud.bat script automates the initial stage of data handling by collecting data from the specified sources and sending it to the Open iT server.
This is optional. Run this if you want to collect data for an extended period (e.g., from the start of the year).
Open a command prompt with Administrator level privileges.
Go to the bin directory, which is by default in
C:\Program Files\OpeniT\Core\bin, run the command:Command Syntaxcd $BIN_DIRExamplecd C:\Program Files\OpeniT\Core\binRun the command:
Command Syntaxcollect_bentleycloud.bat --from <YYYY-MM-DD> --to <YYYY-MM-DD>Examplecollect_bentleycloud.bat --from 2024-01-01 --to 2024-06-01Optional Parameters Optional Parameters for Collecting and Sending Bentley Cloud Data to the Server
Verify that there are
archiver*.infiles created in the server in the archiver directory, which is by default inC:\ProgramData\OpeniT\Data\incoming\archiver.
#
Configuring Bentley Cloud Data Collection
These are the steps to activate collection of Bentley Cloud data.
Open a command prompt with Administrator level privileges.
Go to the bin directory, which is by default in
C:\Program Files\OpeniT\Core\bin, run the command:Command Syntaxcd $BIN_DIRExamplecd C:\Program Files\OpeniT\Core\binOnce in the directory, activate the collection of Bentley Cloud data, run the command:
Command Syntaxopenit_oconfinit -u "collect_license_bentleycloud.root.scheduler.jobs.collect_bentleycloud.general.active=true"(Optional) Set the browser that the system will use to interact with the Bentley portal.
The system uses chromium browser to interact with the Bentley portal by default.
If you choose not to complete this step, make sure that Chromium is not blocked or restricted by endpoint security policies, firewalls, or application whitelisting tools in your company's environment.
If you want to use an available browser in your local setup, run the following:
Command Syntaxopenit_oconfinit -u "collect_license_bentleycloud.root.scheduler.jobs.collect_bentleycloud.operations.arguments=collect --browserpath '<browser_path>'"where
<browser_path>is the full path to a local browser executable you want the system to use every time it interacts with the Bentley portal. Edge is supported.Exampleopenit_oconfinit -u "collect_license_bentleycloud.root.scheduler.jobs.collect_bentleycloud.operations.arguments=collect --browserpath 'C:\Program Files (x86)\Microsoft\Edge\Application\msedge.exe'"
The collection runs every midnight by default. To configure the intervals, locate the instances attribute under collect_bentleycloud, collect_bentleycloud_licenselogscsv, parse_bentleycloud_licenselogscsv, transfer_bentleycloud_licenseevents, transfer_bentleycloud_token, or cleanup_bentleycloud in the same file and configure the attributes.
Refer to the Bentley Cloud Data Collection Job Scheduler Instances Configuration table to learn the attributes used to configure Bentley Cloud data collection and transfer.
#
Configuring Bentley Cloud Data Recollection
Recollecting the Bentley Cloud data is required to ensure that the token-based data is in sync with the recalculated license information from the portal. These are the steps to activate recollection of Bentley Cloud data.
Open a command prompt with Administrator level privileges.
Go to the bin directory, which is by default in
C:\Program Files\OpeniT\Core\bin, run the command:Command Syntaxcd $BIN_DIRExamplecd C:\Program Files\OpeniT\Core\binOnce in the directory, activate the recollection of Bentley Cloud data, run the command:
Command Syntaxopenit_oconfinit -u "recollect_license_bentleycloud.root.scheduler.jobs.recollect_bentleycloud.general.active=true"(Optional) Set the browser that the system will use to interact with the Bentley portal.
The system uses chromium browser to interact with the Bentley portal by default.
If you choose not to complete this step, make sure that Chromium is not blocked or restricted by endpoint security policies, firewalls, or application whitelisting tools in your company's environment.
If you want to use an available browser in your local setup, run the following:
Command Syntaxopenit_oconfinit -u "recollect_license_bentleycloud.root.scheduler.jobs.recollect_bentleycloud.operations.arguments=recollect --last Q --data e365 --browserpath '<browser_path>'"where
<browser_path>is the full path to a local browser executable you want the system to use every time it interacts with the Bentley portal. Edge is supported.Exampleopenit_oconfinit -u "recollect_license_bentleycloud.root.scheduler.jobs.recollect_bentleycloud.operations.arguments=recollect --last Q --data e365 --browserpath 'C:\Program Files (x86)\Microsoft\Edge\Application\msedge.exe'"
The recollection runs every Saturday by default. The primary data is then transferred to the server according to the client timezone for processing. To configure the intervals, locate the instances attribute under recollect_bentleycloud, transfer_bentleycloud_token_recollect, or cleanup_bentleycloud_recollect in the same file and configure the attributes.
Refer to the Bentley Cloud Data Recollection Job Scheduler Instances Configuration table to learn the attributes used to configure Bentley Cloud data recollection and transfer.
#
Verifying Bentley Cloud Data Collection
After configuration, you can verify that the data is collected and sent to the server by following these steps:
Open a command prompt with Administrator level privileges.
Go to the bin directory, which is by default in
C:\Program Files\OpeniT\Core\bin, run the command:Command Syntaxcd $BIN_DIRExamplecd C:\Program Files\OpeniT\Core\binRun the command:
Command Syntaxopenit_executor -r collect_license_bentleycloudVerify that there are
archiver*.infiles created in the server in the archiver directory, which is by default inC:\ProgramData\OpeniT\Data\incoming\archiver.
#
Sample Reports
#
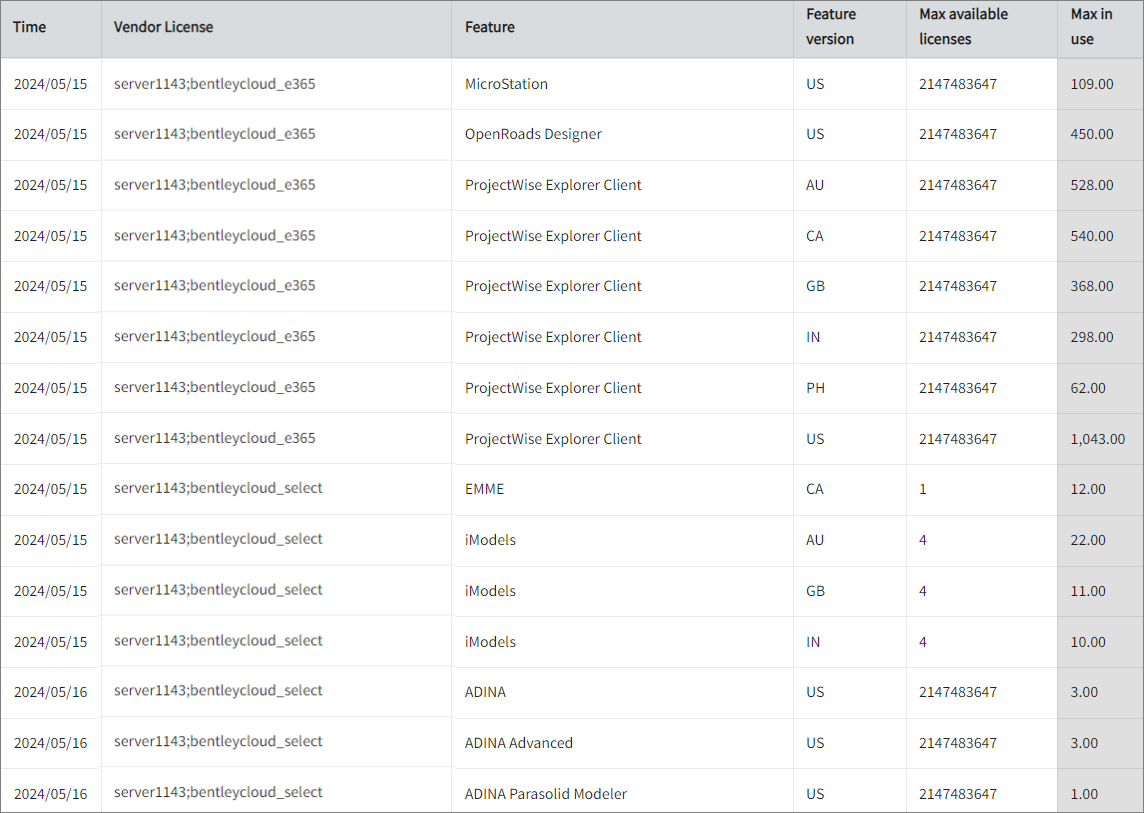
Max Available vs Max in Use
This sample report compares max in-use licenses against max available licenses.
It offers several key benefits:
- Optimized License Allocation – helps ensure you are not over-purchasing licenses you don't need or under-provisioning.
- Cost Savings – identifies opportunities to downgrade or redistribute licenses, reducing unnecessary expenses.
- Usage Trends & Capacity Planning – shows peak usage patterns, allowing better forecasting for future needs.
- Avoiding Service Disruptions – helps prevent situations where users cannot access software due to reaching the license limit.
- Compliance & Audit Readiness – provides a usage record to ensure compliance with vendor agreements and avoid penalties.
- Performance & Productivity Insights – helps assess whether certain teams or departments are under-utilizing or over-utilizing software.
#
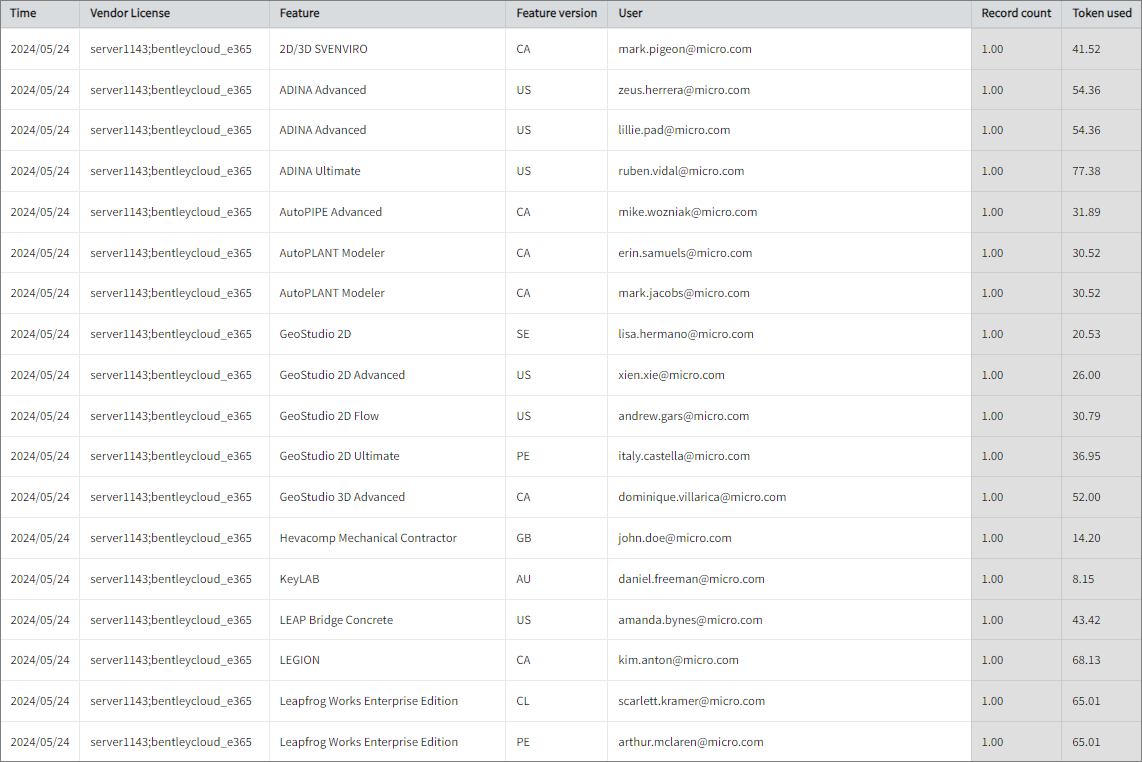
Token Licenses Used per User
This sample report provides insights into how software tokens are allocated and consumed across an organization.
It offers several key benefits:
- Optimized License Utilization – helps ensure you efficiently distribute tokens, reducing waste and preventing unnecessary purchases.
- Cost Management – identifies users or departments consuming the most tokens, allowing better budgeting and cost control.
- Usage Monitoring & Trends – tracks patterns in token usage to forecast future demand and adjust license purchases accordingly.
- Fair Resource Allocation – ensures that tokens are available to those who need them most, preventing access issues for critical users.
- Compliance & Audit Readiness – provides a detailed record of token usage to meet vendor compliance requirements and prepare for audits.
- Productivity & Performance Insights – reveals whether users are under-utilizing or over-utilizing tokens, which may indicate training needs or inefficiencies.
#
Troubleshooting
This section lists possible ERRORS that may occur when running bentleycloudstat and the suggested solutions.
#
Cannot Log In to the Bentley Cloud Portal
#
Problem
This issue may be encountered when the credentials used in setting up the Bentley Cloud data collection is incorrect, showing the error, An error occurred: Login failed. Please check your username and password.
#
Resolution
Verify that the credentials are correct, then repeat the set up following the instructions in the
#
Cannot Collect Data from the Bentley Cloud Portal
#
Problem
This may be encountered when there is an error during log-in, showing the error, An error occurred: Waiting for selector "#HFProfileAnchor" failed: timeout 30000ms exceeds. This may be because of a network issue or incorrect credentials used in setting up the Bentley Cloud data collection.
#
Resolution
Verify that there are no network issues and the credentials are correct, then repeat the set up following the instructions in the
#
Cannot Parse Collected Data from the Bentley Cloud Portal
#
Problem
This may be encountered when the date format from the Bentley Cloud data does not match any of the following formats:
%Y-%m-%d %H:%M:%S.%f%Y-%m-%dT%H:%M:%S%m/%d/%Y %I:%M:%S %p%Y-%m-%d %H:%M:%S%Y-%m-%d%d/%m/%Y %H:%M:%S%d/%m/%Y%Y%m%d
showing an error similar to An error occurred: time data '7/15/2024 12:00:00 AM' does not match format '%Y-%m-%d %H:%M:%S.%f'.
#
Resolution
Go to the scheduler directory, which is by default in
C:\Program Files\OpeniT\Core\Configuration\scheduler, and opencollect_license_bentleycloud.oconf.Locate
root.scheduler.jobs.collect_bentleycloud.operation.argumentsand set its value tocollect --add-date-format <date_format>.Where
<date_format>is the date format from the Bentley Cloud data.collect_license_bentleycloud.oconf48| } 49| arguments 50| { 51| type=string 52| value=collect --add-date-format "%m.%d.%Y %H:%M:%S" 53| }Save the changes.
#
Cannot Find Job in List
#
Problem
This issue may arise from unidentified problems within the Bentley portal, resulting in an error message Cannot find job <export_job_id> in the list (e.g., Cannot find job 0000ab12-0000-cd00-e34f-567890g9876hi in the list).
#
Resolution
Open a command prompt with Administrator level privileges.
Go to the bin directory, which is by default in
C:\Program Files\OpeniT\Core\bin, run the command:Command Syntaxcd $BIN_DIRExamplecd C:\Program Files\OpeniT\Core\binSet the Bentley Cloud data collection to export the intervals data from the Bentley portal's details page. Run the command:
Command Syntaxopenit_bentleycloudstat init --username <bentley_username> --password <bentley_password> --use-usage-details-pagewhere:
Parameters for Setting Up Bentley Cloud Data Collection
Exampleopenit_bentleycloudstat init --username jsmith@email.com --password <bentley_password> --use-usage-details-pageOpen
bentleycloudhistorical.iniinC:\ProgramData\OpeniTand verify that the lineuse_usage_details_page = Trueis at the end of the file:bentleycloudhistorical.ini1| [DEFAULT] 2| username = 3| password = 4| use_usage_details_page = TrueVerify that data is collected. Run the command:
Command Syntaxopenit_executor -r collect_license_bentleycloudVerify that the temp directory, which is by default in
C:\ProgramData\OpeniT\Data\temp, contains a LogFileCollector directory containingraw-bentleycloud-*.parsedand*.statusfiles.
#
Column and Data Size does not Match
#
Problem
This issue may arise when succeeding raw Bentley Cloud log file collector files do not contain the expected columns listed from an already existing csv-column-header.temp file in the Bentley Cloud LogParser directory, which is by default in C:/ProgramData/OpeniT/Data/temp/Bentley.Cloud/LogParser, resulting in an error message Columns_Not_Found: <function_name>: Column and data size does not match. Please check the raw log. (e.g., Columns_Not_Found: BentleyRcdParser::getCSVDetails: Column and data size does not match. Please check the raw log.).
#
Resolution
Check if the column headers in the
csv-column-header.tempdo not match with the existingraw-*bentleycloud-*.datafiles in the LogFileCollector directory, which is by default inC:/ProgramData/OpeniT/Data/temp/LogFileCollector.If the mismatch is confirmed, remove the existing
csv-column-header.temp.Open a command prompt with Administrator level privileges.
Go to the bin directory, which is by default in
C:\Program Files\OpeniT\Core\bin, run the command:Command Syntaxcd $BIN_DIRExamplecd C:\Program Files\OpeniT\Core\binMake sure that the existing log parser data are sent to the server, run the following:
Command Syntaxopenit_apicontroller -t upload_bentleycloud_licenseeventsRun the data parsing job:
Command Syntaxopenit_logparserbentleycloud.exe --matchobjects "C:/Program Files/OpeniT/Core/configuration/matchobjects-record-bentleycloud.oconf" --srcdir "C:/ProgramData/OpeniT/Data/temp//LogFileCollector" --srcpattern "*-bentleycloud-*.data" --srcfilehandling rename --trgdir "C:/ProgramData/OpeniT/Data/temp//Bentley.Cloud/LogParser" --datatype bentleycloud --module license --resolution PT1H --disable-statlogging --debug warning --no-zero-usageMake sure no errors are encountered.
Verify that the column headers in the
csv-column-header.tempnow match with the existingraw-*bentleycloud-*.datafiles in the LogFileCollector directory, which is by default inC:/ProgramData/OpeniT/Data/temp/LogFileCollector.Run the data transfer and clean-up job to ensure structured data. Run the following:
Command Syntaxopenit_apicontroller -t upload_bentleycloud_licenseeventsCommand Syntaxopenit_bentleycloudstat cleanup
#
Next Steps?
Renaming Vendor License Renaming Features Create and Add Report License Monitor