EPLAN License Manager
Introduction
Open iT supports EPLAN usage reporting by collecting log files and converting them to Open iT format.
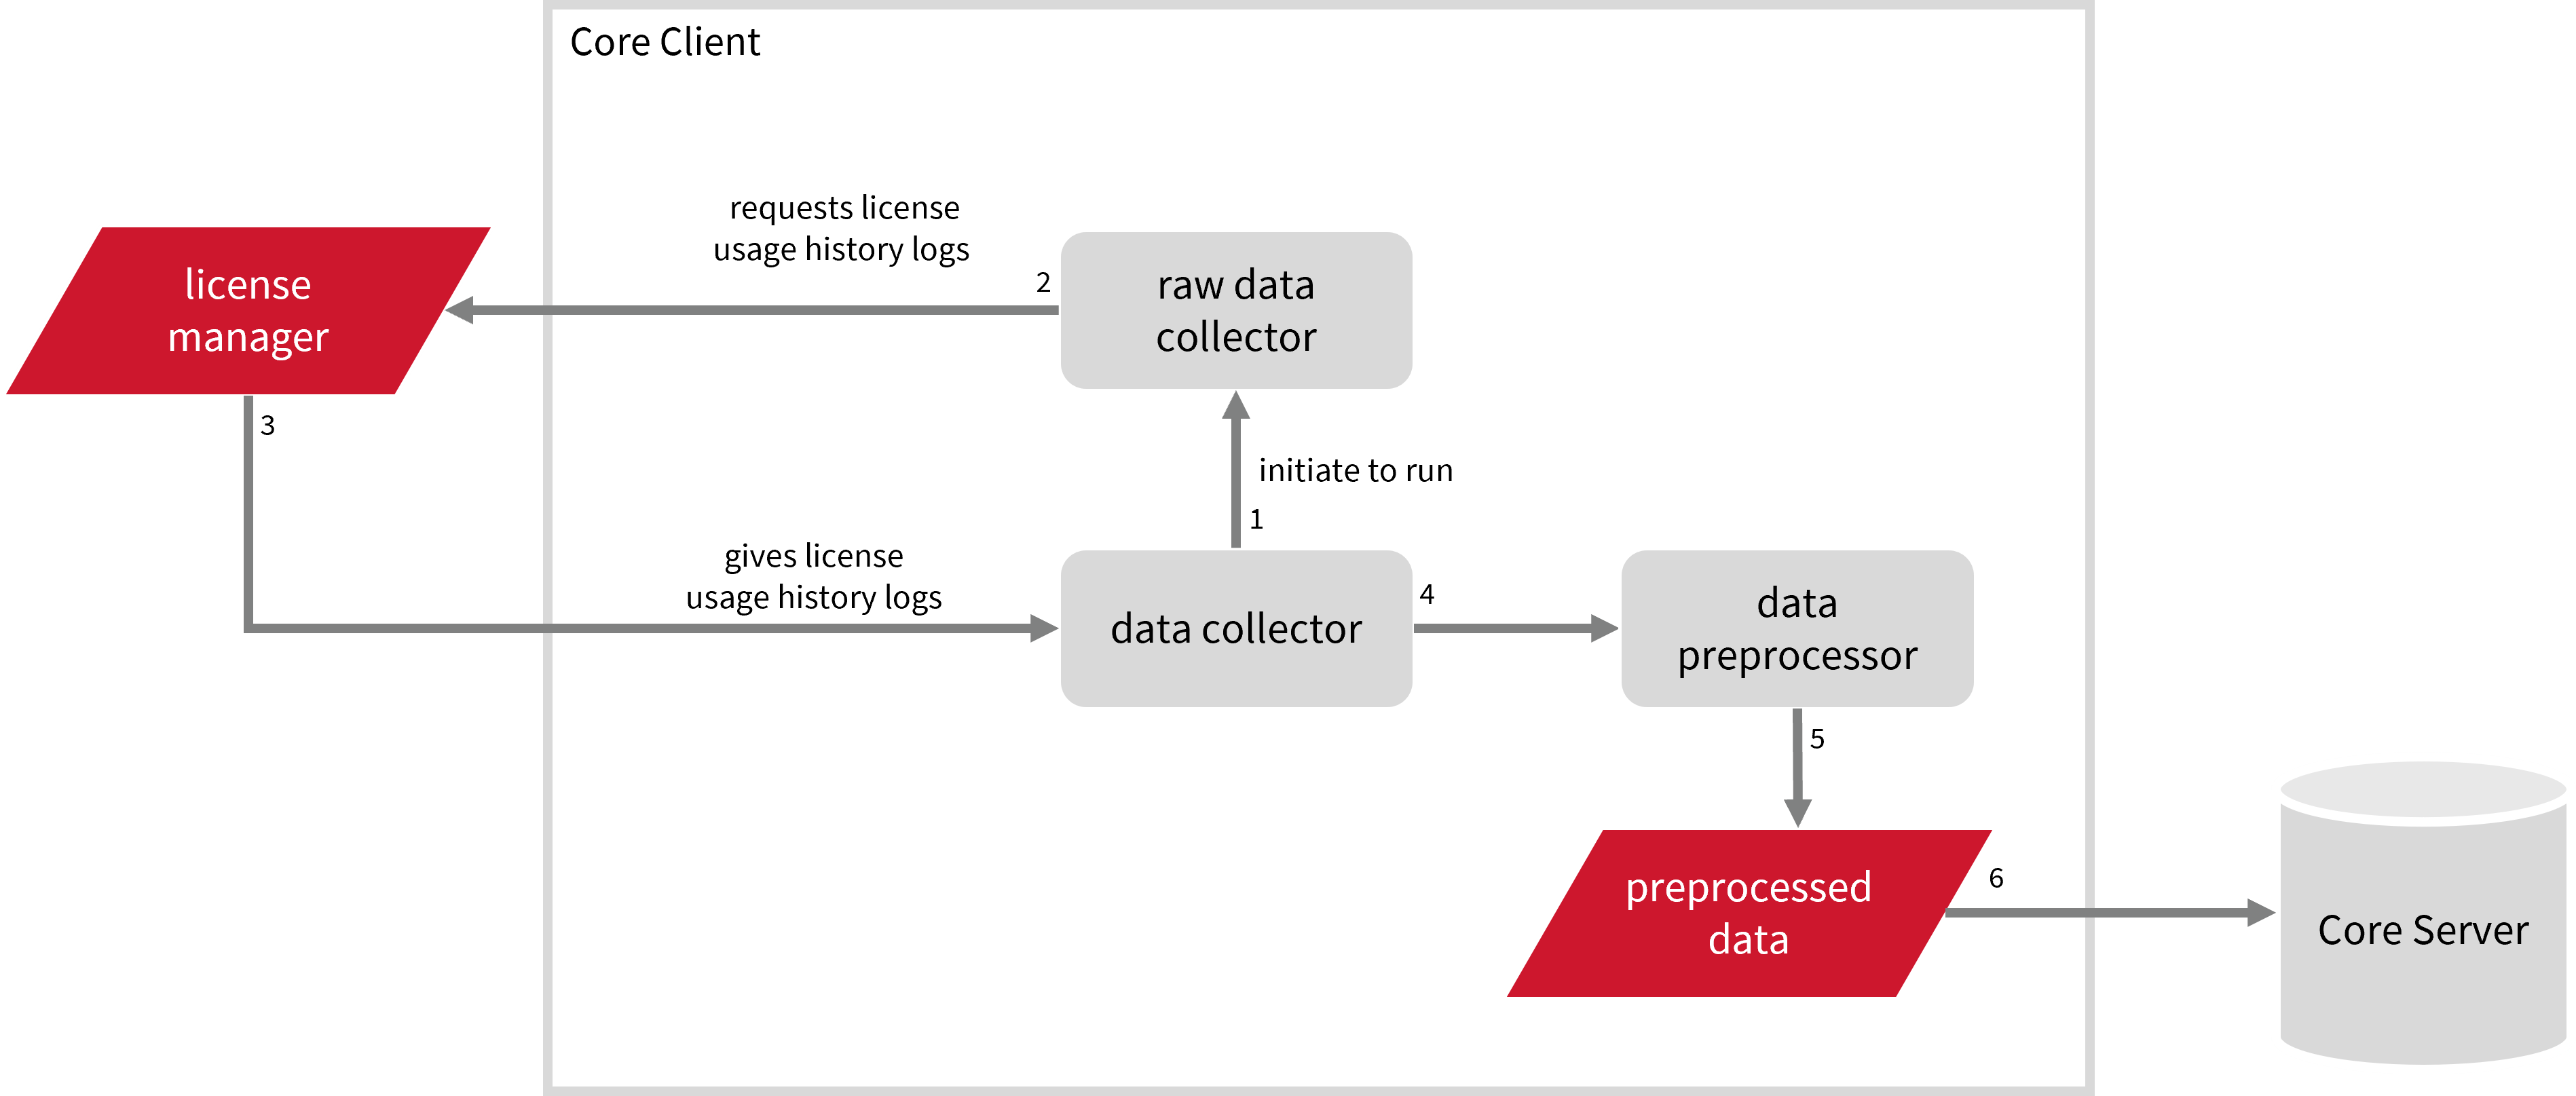
An Open iT Core Client is installed on your license server. The data collector initiates the raw data collector to request license usage history logs from the license manager every hour, triggering the data collection process. Once the logs are received, the raw data collector passes them to the data collector. The collected data is then sent to a data preprocessor for processing. After preprocessing, the final preprocessed data is sent and stored in the Core Server.
The following sections will guide you in setting up the necessary configuration to collect and send the required data to the server.
Apply the configurations shown in the Open iT Core Client.
Requirements
- EPLAN License Manager version 2022.0.3.339 and later
warning
Starting with EPLAN version 2025, make sure that you have EPLAN license monitor.
- License server name (and port)
- Full path to the EPLAN License Manager application
- An Open iT Core Client connected to an Open iT Core Server or a coexistent Open iT Core setup
Configuring Raw Data Collection
These are the required steps to obtain raw data from the EPLAN license manager.
-
Open a command prompt with Administrator level privileges.
-
Go to the bin directory, which is by default in
C:\Program Files\OpeniT\Core\bin, run the command:Command Syntaxcd <bin_dir>Examplecd C:\Program Files\OpeniT\Core\bin -
Once in the directory, activate the collection of raw EPLAN data, run the command:
Command Syntaxopenit_oconfinit -u "collect_license_eplan-raw.root.scheduler.jobs.run_elmmonitor.general.active=true" -
Set the full path to the ELM monitor application and the EPLAN license server name. Run the command:
Command Syntaxopenit_oconfinit -u "collect_license_eplan-raw.root.scheduler.jobs.run_elmmonitor.operations.arguments=--elmmonitor_path \"<eplan_lm_app_path>\" --servername <server_name> --xmlfile \"${OpeniT.directories.conf}/eplan-report.xml\" --outputdir \"${OpeniT.directories.temp}/Raw.EPLAN.Report\""where:
-
<eplan_lm_app_path>- path to the EPLAN License Manager applicationnoteDepending on your installed version of EPLAN License Manager, provide the path to either
ElmMonitor.exe(versions 2022–2025) orElmConfig.exe(version 2026.0.3.389 and later). The executable is typically located inside the EPLAN installation directory (for example, under an ELM or License Tools folder), but the exact path may vary depending on your installation. -
<server_name>- EPLAN license server name; you may also specify a port number using the format<server_name>:<port_number>(e.g.,WIN-HOST01:1234)
Exampleopenit_oconfinit -u "collect_license_eplan-raw.root.scheduler.jobs.run_elmmonitor.operations.arguments=--elmmonitor_path \"C:/Program Files/EPLAN/ELM/ElmMonitor.exe\" --servername WIN-HOST01:1234 --xmlfile \"${OpeniT.directories.conf}/eplan-report.xml\" --outputdir \"${OpeniT.directories.temp}/Raw.EPLAN.Report\""
NOTEYou can also include the date range of the data you want to collect by following the format
--from "DD.MM.YYYY" --to "DD.MM.YYYY"(e.g.,--from "01.01.2023" --to "26.09.2023").
Exampleopenit_oconfinit -u "collect_license_eplan-raw.root.scheduler.jobs.run_elmmonitor.operations.arguments=--elmmonitor_path \"C:/Program Files/EPLAN/ELM/ElmMonitor.exe\" --servername WIN-HOST01:1234 --xmlfile \"${OpeniT.directories.conf}/eplan-report.xml\" --outputdir \"${OpeniT.directories.temp}/Raw.EPLAN.Report\" --from \"01.01.2023\" --to \"26.09.2023\" -
The collection runs hourly by default. To configure, run the command:
openit_oconfinit -u "collect_license_eplan-raw.root.scheduler.jobs.run_elmmonitor.scheduling.start-triggers.trigger#1.period=<time_span>
where <time_span> is the ELM monitor application run frequency in the ISO-8601 duration format PnDtnHnMn.nS
openit_oconfinit -u "collect_license_eplan-raw.root.scheduler.jobs.run_elmmonitor.scheduling.start-triggers.trigger#1.period=P1D
EPLAN Events Log File Collection Configuration
This will produce the following aggregated data types used for historical reporting:
Activating Event Log Data Collection
These are the required steps to activate event log data collection.
-
Open a command prompt with Administrator level privileges.
-
Go to the bin directory, which is by default in
C:\Program Files\OpeniT\Core\bin, run the command:Command Syntaxcd <bin_dir>Examplecd C:\Program Files\OpeniT\Core\bin -
Once in the directory, activate the collection of EPLAN event log data, run the command:
Command Syntaxopenit_oconfinit -u "collect_license_eplan-logs.root.scheduler.jobs.collect_eplan_licenselogs.general.active=true"
Advanced Configuration
The elmmonitor triggers this data collection. To configure the intervals, locate the instances attribute under collect_eplan_licenselogs, preprocess_eplan_licenselogs-events, or transfer_eplan_licenselogs in the same file and configure the attributes.
Refer to the EPLAN Event Log Job Scheduler Instances Configuration table to learn the attributes used to configure EPLAN events data collection and transfer.
| Attribute Name | Accepted Value | Description |
|---|---|---|
| max-instances | Uint (e.g., 5, 8, 9) | The number of instances allowed to run the at the same time. |
| max-handling | String (end-oldest, end-all-old, or end-new) | The action done upon reaching the maximum number of instances:
|
| end-timeout | Timespan (e.g., P30S, P5M, P1H) | The maximum waiting time before terminating a running instance. |
| quarantine | Timespan (e.g., P30S, P5M, P1H) | The waiting time before starting a new instance after a previous one. |
Modifying Feature Name and Bundle Number Separator for Event Log Data
These are the required steps to modify the feature name and bundle number separator for event log data if you don't want to use the default, ().
The bundle number is required for record type to correctly determine the max available licenses.
-
Go to the Configuration directory, which is by default in
C:\Program Files\OpeniT\Core\Configuration, and openmatchobjects-event-eplan.oconf. -
Locate the
data-process11node under thepost-processingnode and change[and].matchobjects-event-eplan.oconfdata-process11
{
description=Presentation of feature name. Configurable. Prohibited character:"|"
type=string
value=feature=(feature!="" && bundle!="") ? feature + "[" + bundle + "]":feature
}Sample OutputEPLAN Electric P8. Professional[4]warningYou can use any character except
|.Example: matchobjects-event-eplan.oconfdata-process11
{
description=Presentation of feature name. Configurable. Prohibited character:"|"
type=string
value=feature=(feature!="" && bundle!="") ? feature + "<" + bundle + ">":feature
}Sample OutputEPLAN Electric P8. Professional<4> -
Save the changes.
Verifying Event Log Data Collection
After configuration, you can verify that the data is collected and sent to the Core Server by following these steps:
-
Open a command prompt with Administrator level privileges.
-
Go to the bin directory, which is by default in
C:\Program Files\OpeniT\Core\bin, run the command:Command Syntaxcd <bin_dir>Examplecd C:\Program Files\OpeniT\Core\bin -
Run the command:
Command Syntaxopenit_executor -r collect_license_eplan-logs -
Verify that there are
archiver*.infiles created in the Core Server's archiver directory, which is by default inC:\ProgramData\OpeniT\incoming\archiver.
EPLAN Records Log File Collection Configuration
This will produce the following aggregated data types used for historical reporting:
- (89) Total License Use Licenseevents
- (90) Individual License Use Licenseevents
- (91) Usergroup License Use Licenseevents
- (108) Host License Use Licenseevents
- (109) Hostgroup License Use Licenseevents
Activating Record Log Data Collection
These are the required steps to activate record log data collection.
-
Open a command prompt with Administrator level privileges.
-
Go to the bin directory, which is by default in
C:\Program Files\OpeniT\Core\bin, run the command:Command Syntaxcd <bin_dir>Examplecd C:\Program Files\OpeniT\Core\bin -
Once in the directory, activate the collection of EPLAN record log data, run the command:
Command Syntaxopenit_oconfinit -u "collect_license_eplan-record-logs.root.scheduler.jobs.collect_eplan_licenselogs-records.general.active=true"
Advanced Configuration
The elmmonitor triggers this data collection. To configure the intervals, locate the instances attribute under collect_eplan_licenselogs-records, preprocess_eplan_licenselogs-records, or transfer_eplan_licenselogs in the same file and configure the attributes.
Refer to the EPLAN Record Log Job Scheduler Instances Configuration table to learn the attributes used to configure EPLAN records data collection and transfer.
| Attribute Name | Accepted Value | Description |
|---|---|---|
| max-instances | Uint (e.g., 5, 8, 9) | The number of instances allowed to run the at the same time. |
| max-handling | String (end-oldest, end-all-old, or end-new) | The action done upon reaching the maximum number of instances:
|
| end-timeout | Timespan (e.g., P30S, P5M, P1H) | The maximum waiting time before terminating a running instance. |
| quarantine | Timespan (e.g., P30S, P5M, P1H) | The waiting time before starting a new instance after a previous one. |
Modifying Feature Name and Bundle Name and Bundle Number Separator for Record Log Data
These are the required steps to modify the feature name and bundle number separator for record log data if you don't want to use the default, ().
The bundle number is required for record type to correctly determine the max available licenses.
-
Go to the Configuration directory, which is by default in
C:\Program Files\OpeniT\Core\Configuration, and openmatchobjects-record-eplan.oconf. -
Locate the
data-process2node under thepost-processingnode and change[and].matchobjects-record-eplan.oconfdata-process2
{
description=Presentation of feature name. Configurable. Prohibited character:"|"
type=string
value=feature=(feature!="" && bundle!="") ? feature + "[" + bundle + "]":feature
}Sample OutputEPLAN Electric P8. Professional[4]warningYou can use any character except
|.Example: matchobjects-record-eplan.oconfdata-process2
{
description=Presentation of feature name. Configurable. Prohibited character:"|"
type=string
value=feature=(feature!="" && bundle!="") ? feature + "<" + bundle + ">":feature
}EPLAN Electric P8. Professional <4>EPLAN Electric P8. Professional <4> -
Save the changes.
Verifying Record Log Data Collection
After configuration, you can verify that the data is collected and sent to the Core Server by following these steps:
-
Open a command prompt with Administrator level privileges.
-
Go to the bin directory, which is by default in
C:\Program Files\OpeniT\Core\bin, run the command:Command Syntaxcd <bin_dir>Examplecd C:\Program Files\OpeniT\Core\bin -
Run the command:
Command Syntaxopenit_executor -r collect_license_eplan-record-logs -
Verify that there are
archiver*.infiles created in the Core Server's archiver directory, which is by default inC:\ProgramData\OpeniT\Data\incoming\archiver.