Mapping
Mapping is a data integration functionality that automatically maintains mapping files based on external data sources, such as Active Directory and text files. This gathers metadata, like Departments, Locations, E-mails, Full Names, etc., from external sources.
Make sure that LDAP Collector is configured before proceeding with the mapping configurations.
Adding a Text File Source
-
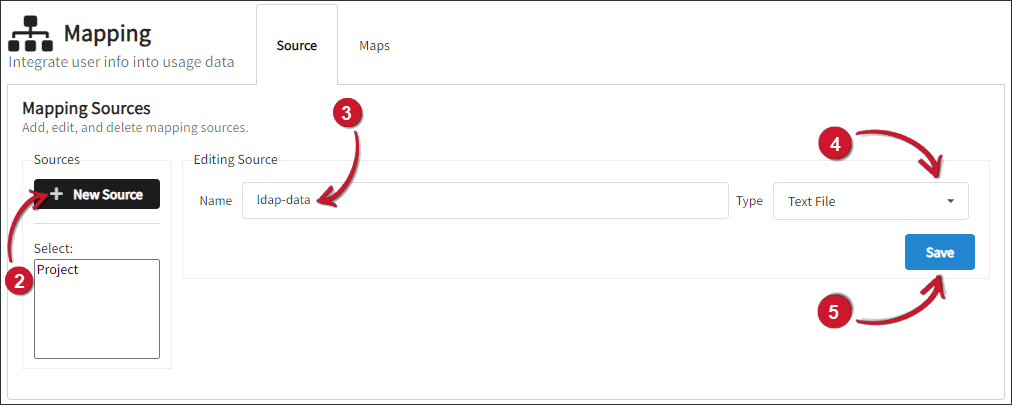
Go to Administration > Mapping > Source.
-
Click New Source.
-
Name the new source created as
ldap_[client_name]. -
On the drop-down beside the text box for the name, select Text File.
-
Click Save.
 Adding Text File Source
-
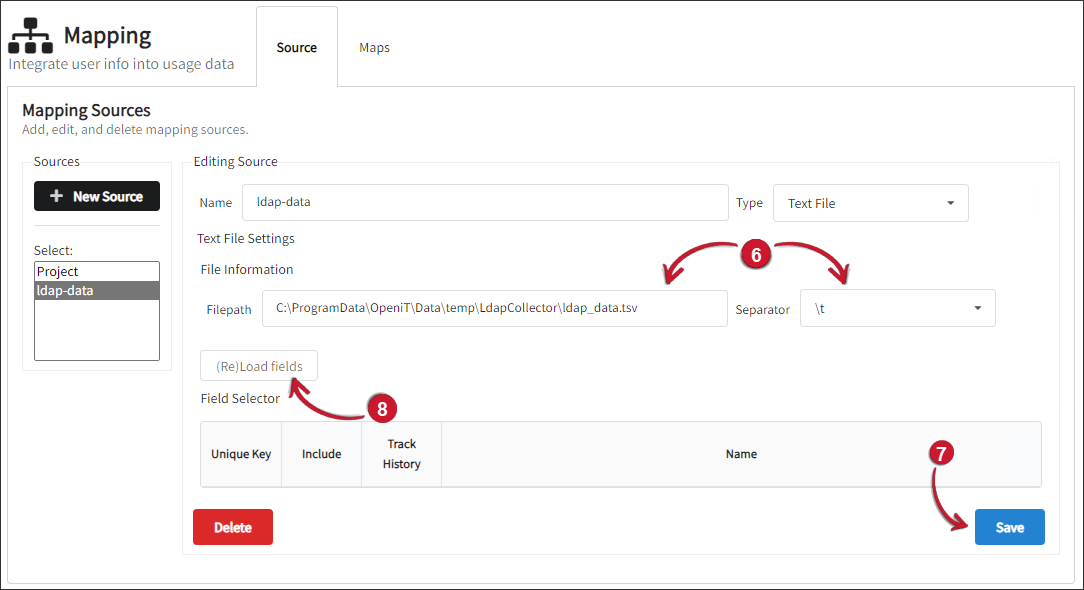
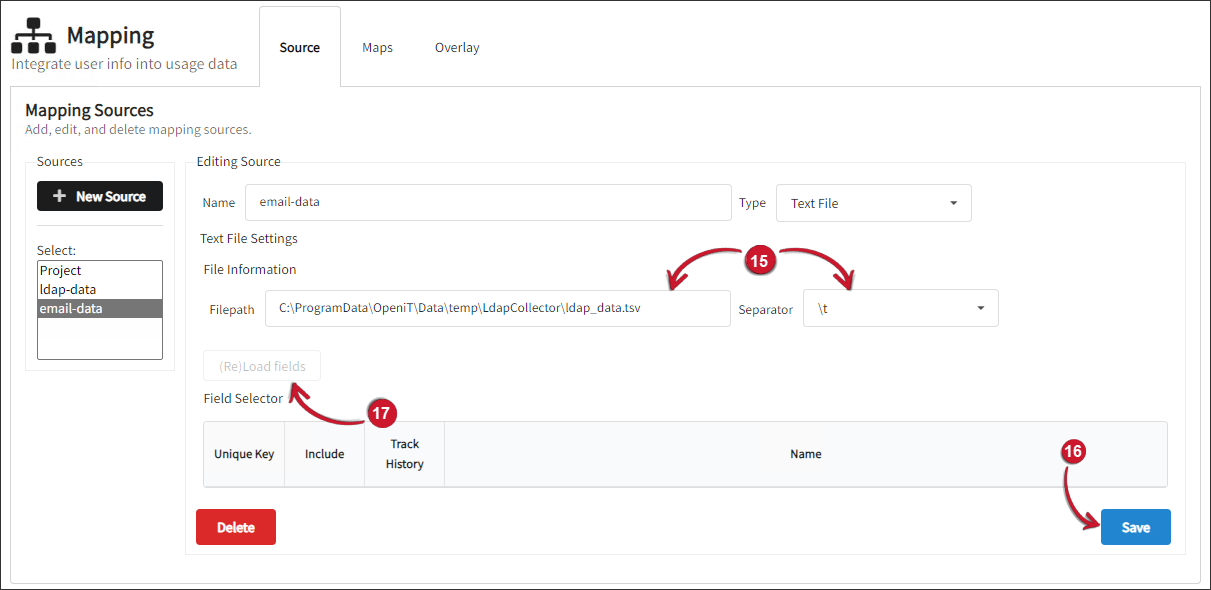
Provide the location of the text file and choose \t as the separator to be used. The file must be located in the LdapCollector directory, which is by default in
C:\Program Files\OpeniT\Core\Log\temp\LdapCollectorfor Windows and/var/opt/openit/temp/LdapCollectorfor Unix. -
Click Save.
-
Click (Re)Load fields.
 Text File Source Information
-
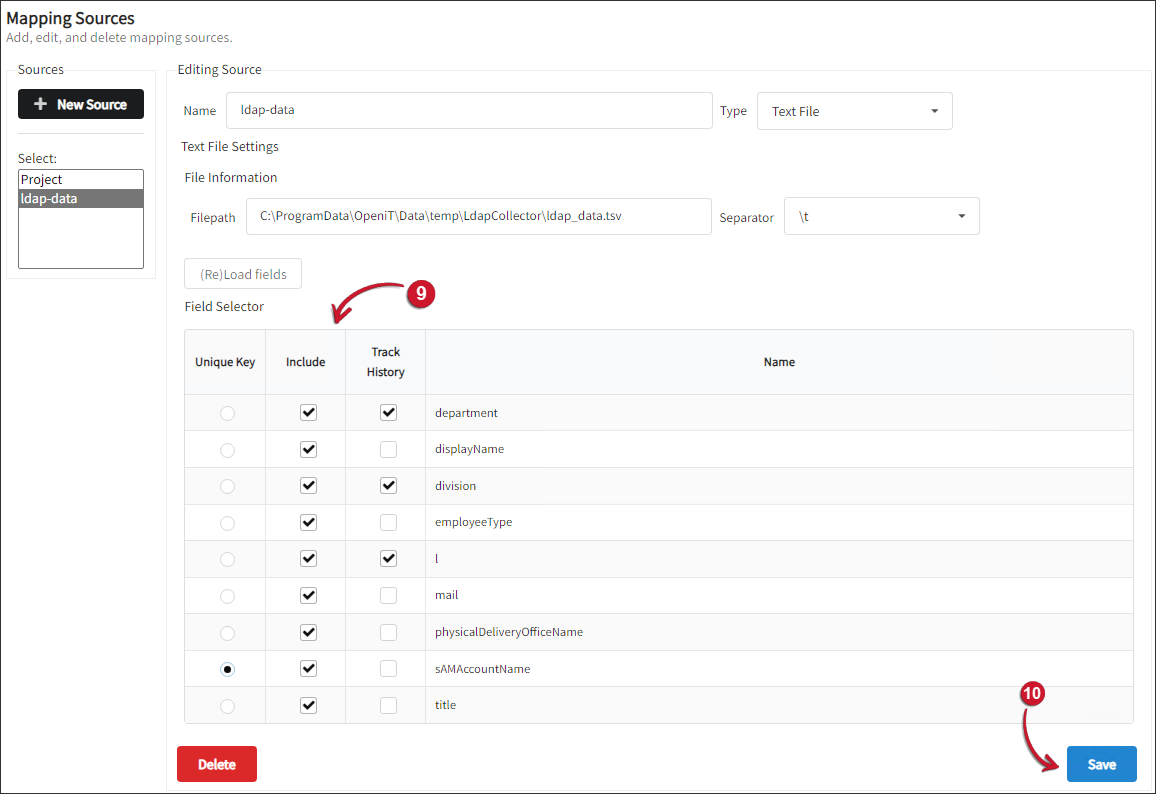
Select sAMAccountName as the Unique Key for the map data. Keeping track of historical changes requires this reference key.
- Under the Include column, check all the fields used for generating mapping files from this source, including the ID key.
- Under the Track History column, check the department, division, and l data fields.
-
Click Save.
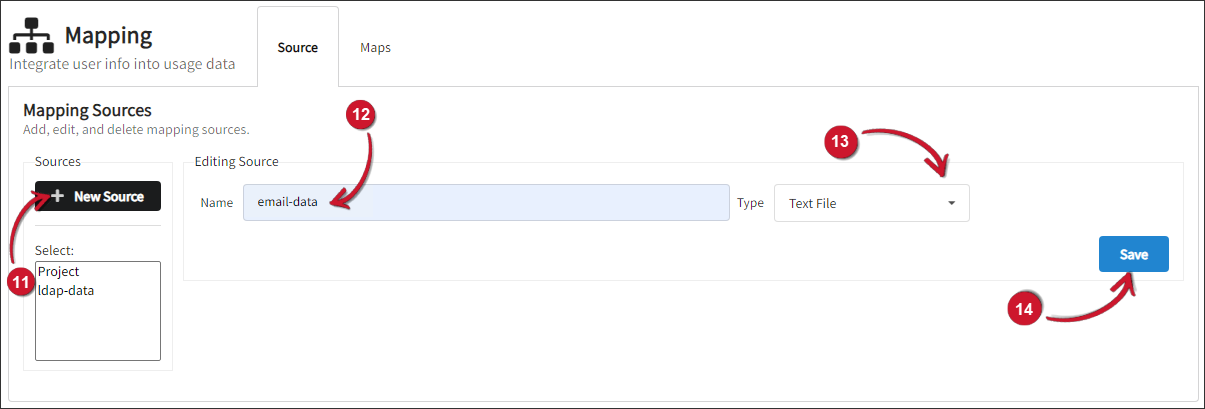
- Create another source by clicking New Source.
- Name the new source created as
email_[client_name]. - On the drop-down beside the text box for the name, select Text File.
- Click Save.
-
Provide the location of the text file and choose \t as the separator to be used. The file must be located in the LdapCollector directory, which is by default in
C:\Program Files\OpeniT\Core\Log\temp\LdapCollectorfor Windows and/var/opt/openit/temp/LdapCollectorfor Unix. -
Click Save.
-
Click (Re)Load fields.
-
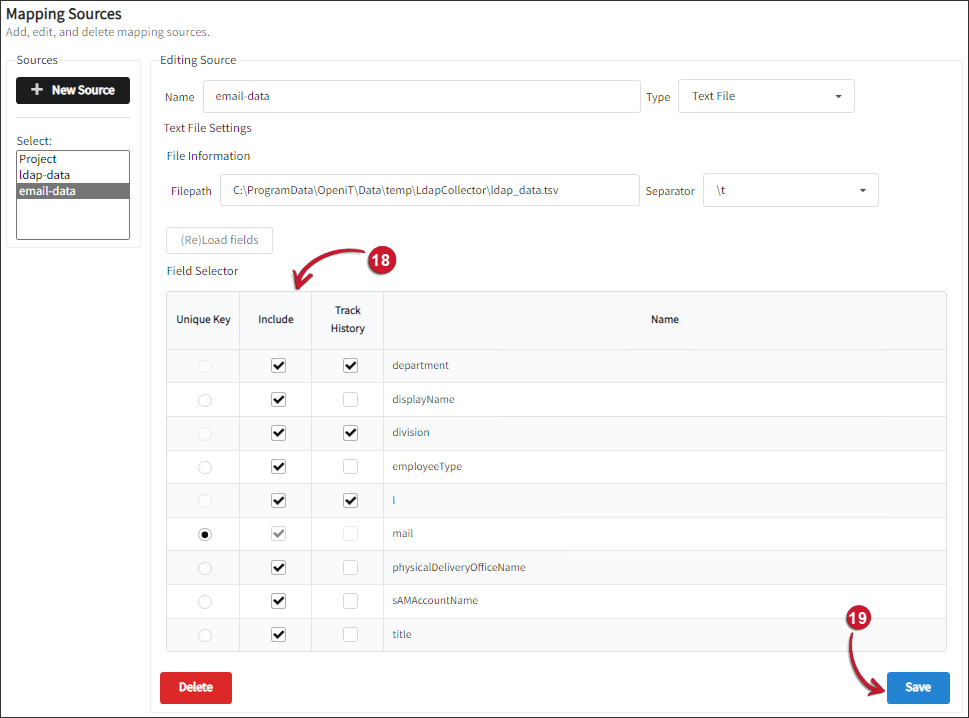
Select mail as the Unique Key for the map data. Keeping track of historical changes requires this reference key.
Under the Include column, check all the fields used for generating mapping files from this source, including the ID key.
Under the Track History column, check the department, division, and l data fields.
-
Click Save.
If you want to use Active Directory (AD) as the mapping source, follow these instructions:
Take note of your Active Directory credentials when using it as the mapping source.
Adding an Active Directory Source
Make sure that a source is available. This requires an AD server, port, forest path, IP address, username, and password.
-
Go to Administration > Mapping > Source.
-
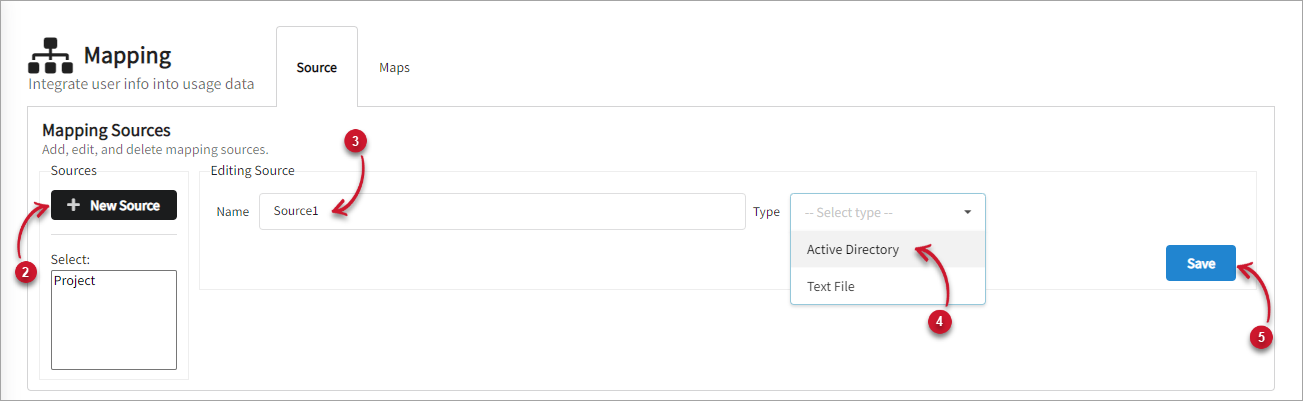
Click New Source.
-
Name the new source.
-
For the Type, select Active Directory.
-
Click Save.
 Adding New Active Directory Source
-
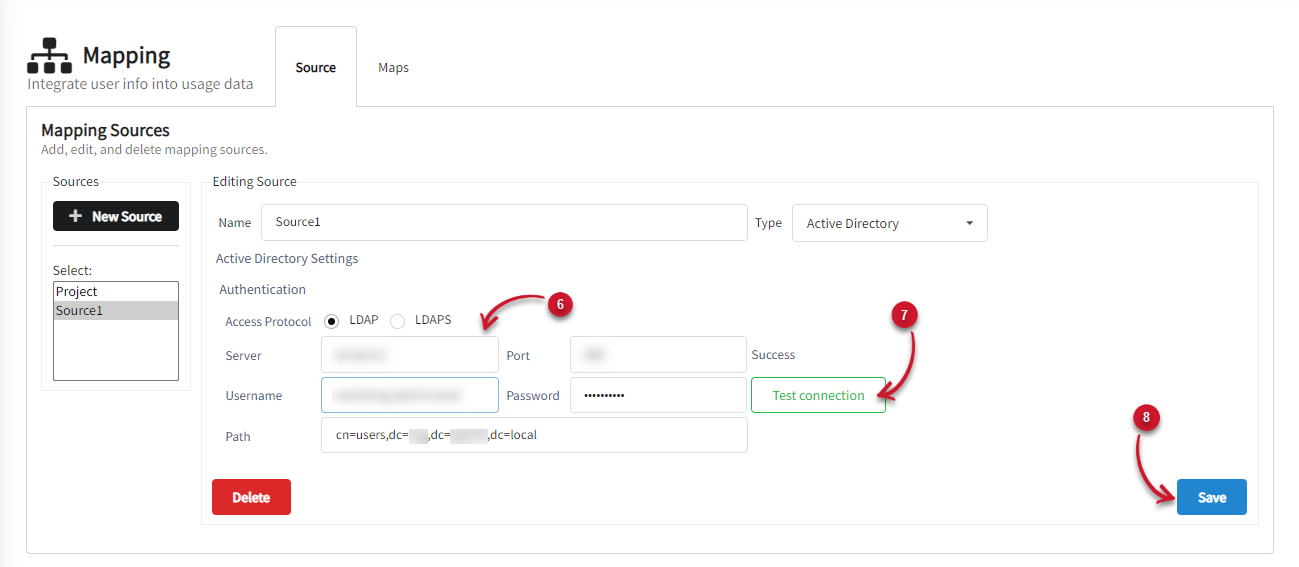
Fill out the details to connect to the Active Directory.
-
Click Test connection.
-
Wait for it to process. After successfully connecting to the AD, click Save.
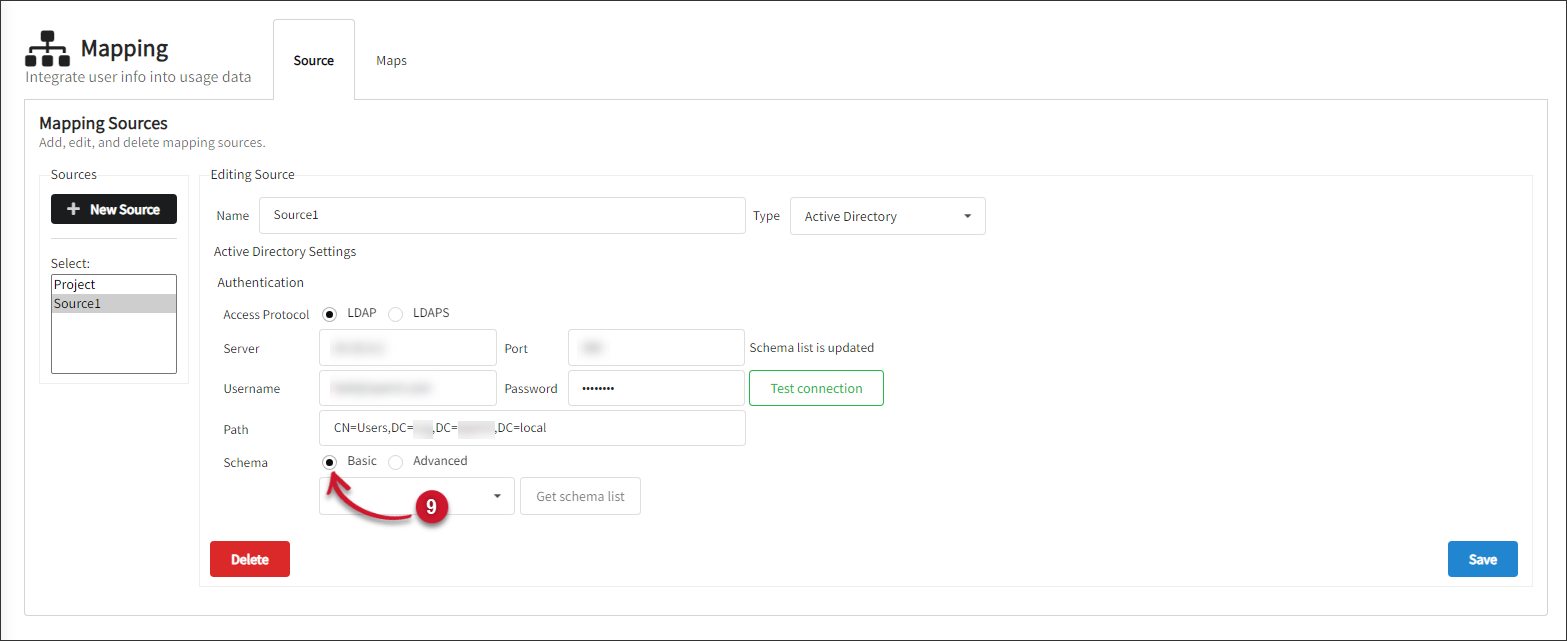
 Active Directory Details
-
Choose how to filter the schema list. Basic is selected by default. The Advanced filtering allows administrators to provide a custom filter string to optimize their interactions with the Active Directory.
NOTEFor advanced filtering, it is helpful to have an AD Explorer installed. The AD Explorer will provide the valid filter string reference needed in the configuration. You may also check this reference for the filter syntax.
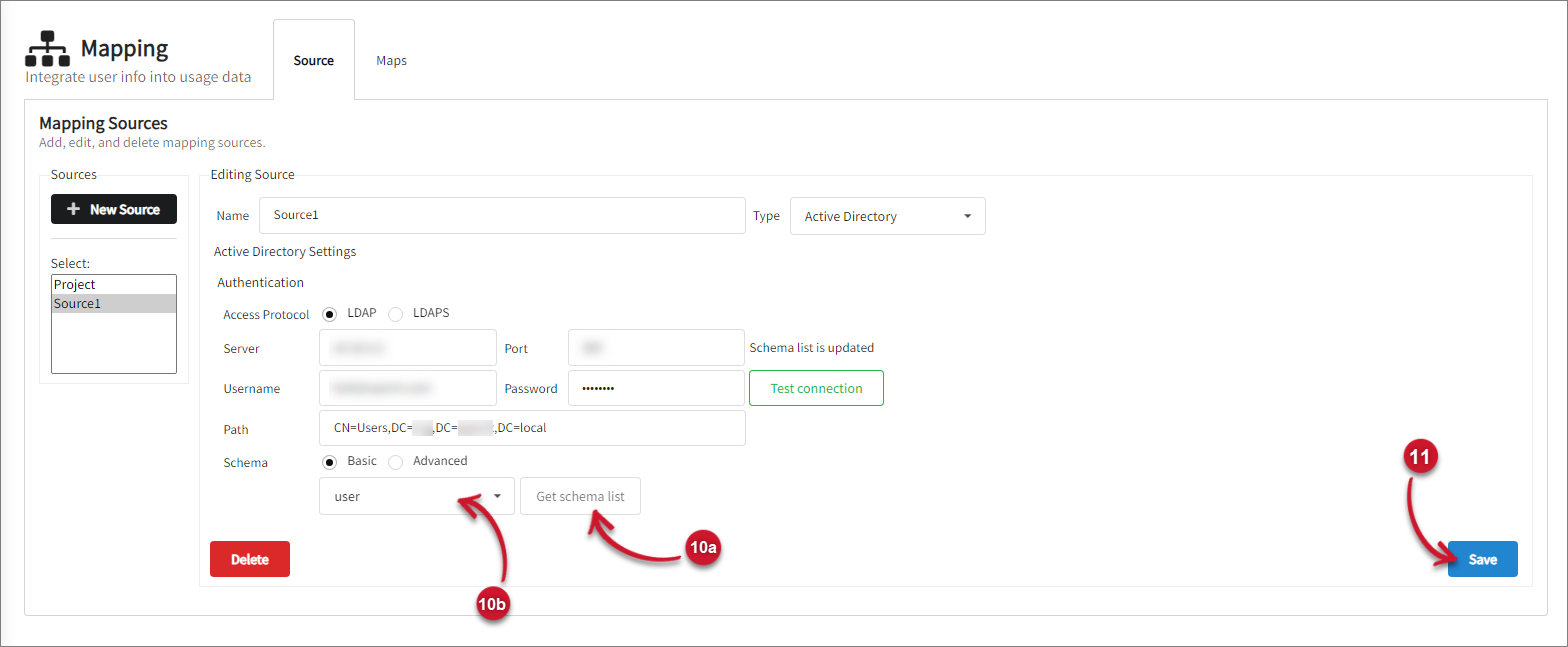
 Active Directory Schema
-
If Basic is selected:
- Click the Get schema list button.
- Select user from the drop-down list.
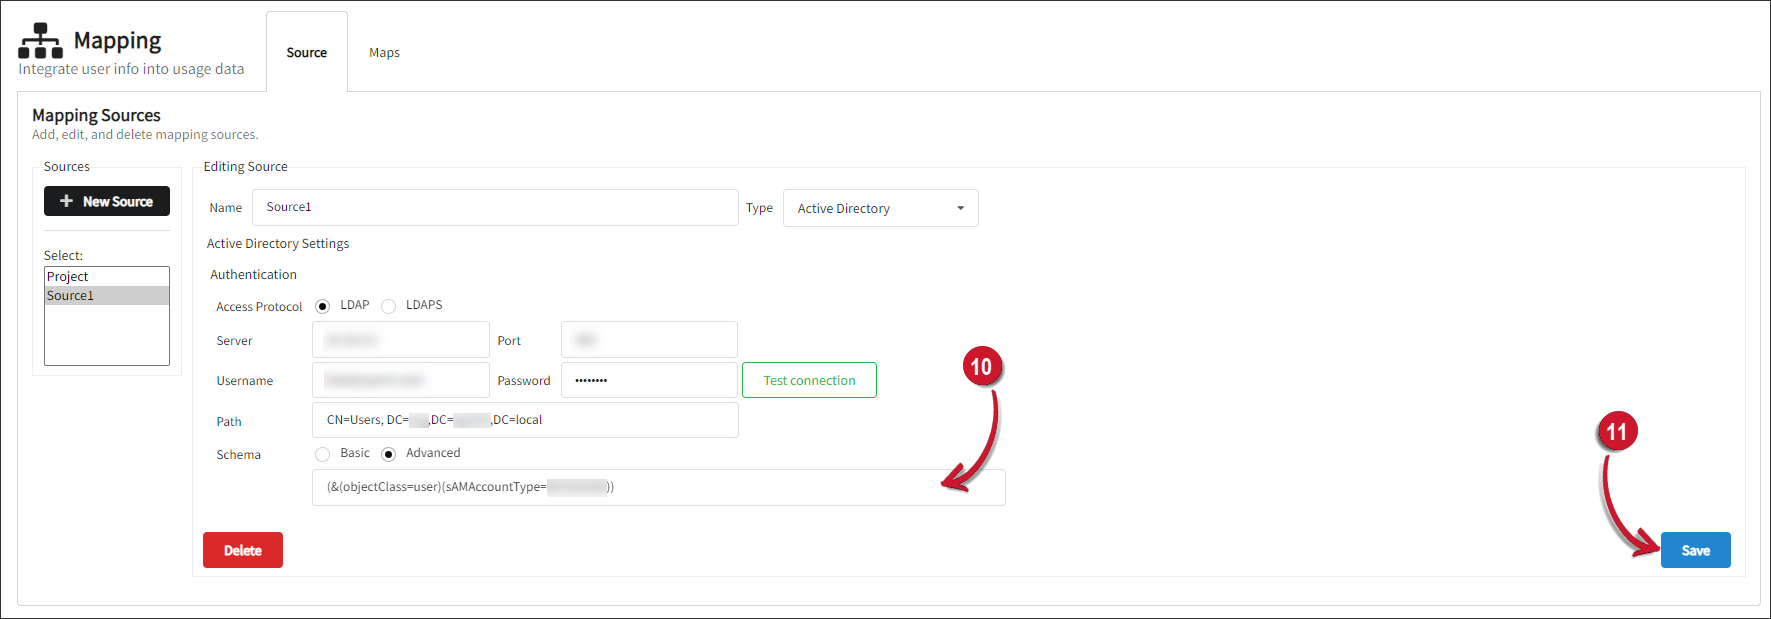
 Active Directory Schema
If Advanced is selected, a default filter string will be supplied. Alternatively, you can manually type in or paste a specific filter string into the text field for precise data filtering.
-
Click Save.
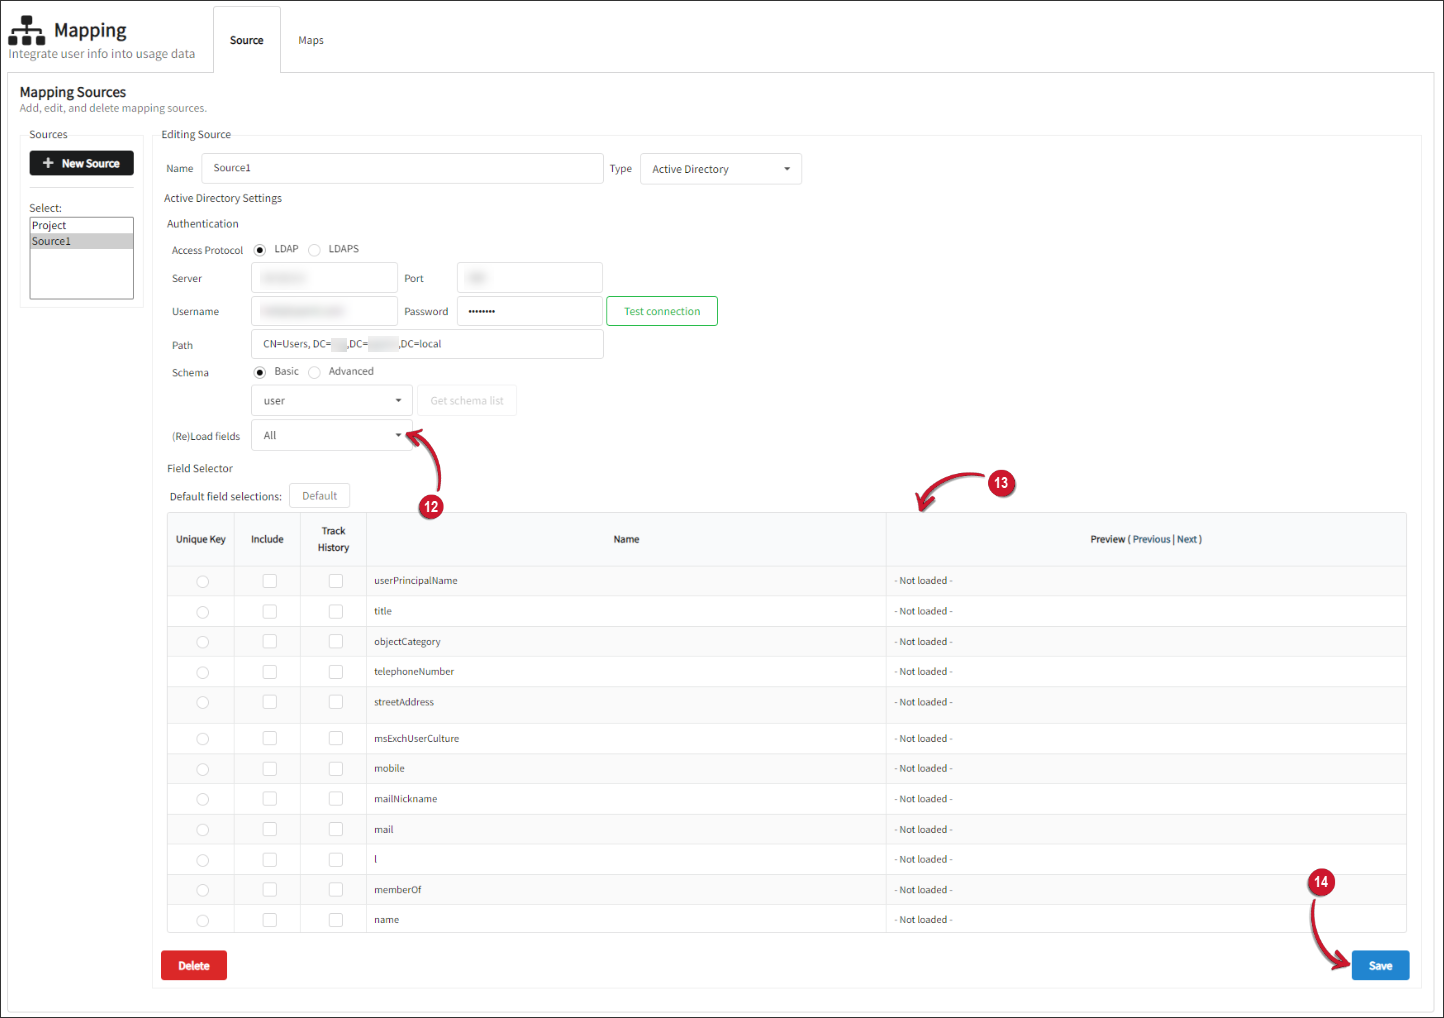
 Active Directory Schema
-
On the (Re)load Fields, select all.
NOTEIf you select the Advanced schema filtering, the reloading of fields may take time, depending on the number of fields filtered based on the provided filter string.
-
Select a stable key and set it as the Unique Key for the map data. Data extraction and historical change monitoring require this key.
Fields Description Unique Key Used to differentiate between user records, usually SAMAccountName in Active Directory. Name Name of the source record as it is seen from the source. Include Select relevant fields to include in the data gathering. The mapping module updates the selected fields nightly. Track History Toggle the history to track the fields over time to account for users moving between departments or if it should only display the most recent value. Consider tracking historical changes when creating input sources. For example, keeping historical data for reporting could be vital for Country, Region, Department, and Project; keeping track of old Mail, Phone number, and Office number is likely not helpful. Field Selector
NOTESeveral mapping files may be generated based on a single input source.
Under the Include column, check all the fields used for generating mapping files from this source, including the ID key.
Under the Track History column, check all the required historical data fields.
NOTEClick the Default button to automatically include title, physicalDeliveryOfficeName, mail, l, displayName, department, sAMAccountName, division, employeeType, and manager fields. Also, the sAMAccountName will be automatically selected as the default Unique Key.
-
After selecting the desired fields, click Save.
 Active Directory Field Selector
After adding a text file source or an Active Directory source, proceed with configuring the mapping files.
Configuring Mapping Files
-
Go to Administration > Mapping > Maps.
-
Click New Map.
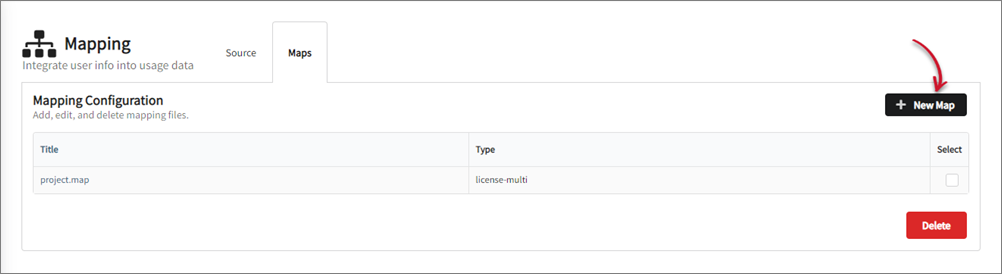 Creating New Map
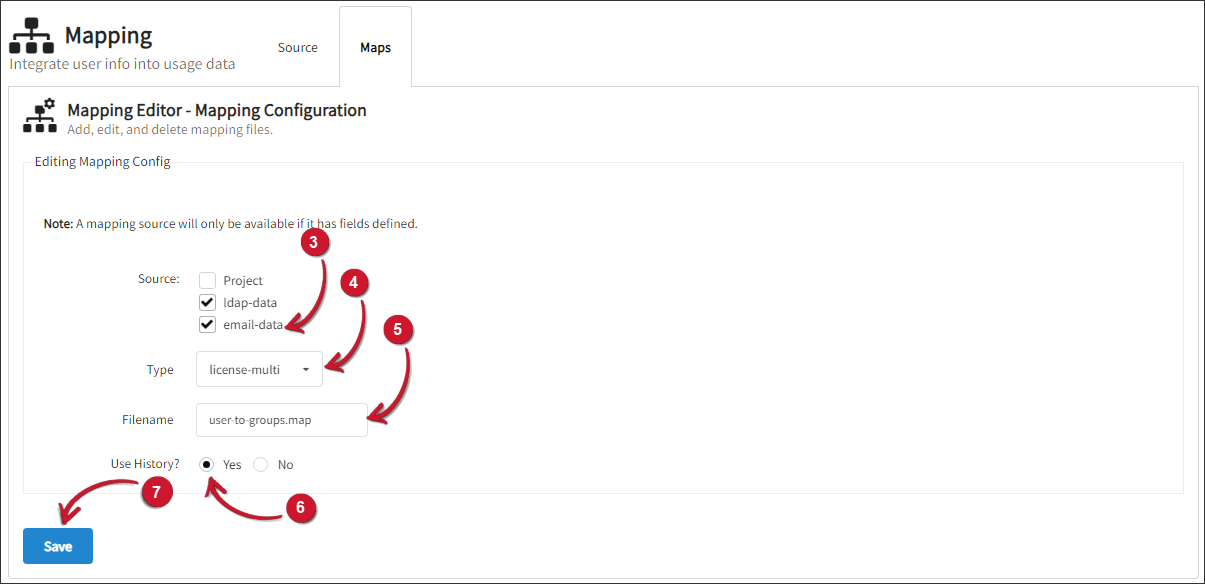
-
Select the two (2) newly created mapping sources.
-
Select license-multi as the mapping Type.
Mapping Types
Types Description license-single The older format of license mapping for a single source field to a single group type (e.g., user to department). It is a one-to-one map used to map a user to a user group. license-multi This new mapping format allows mapping from a single source to multiple group types (e.g., user to department, location, project). It stores fields, such as Location, Department, and City of any group with concurrency. virtual Virtual mapping files can be used for any data type and allow mapping from one source field to a single group type. This mapping adds user attributes and lists users of a department and the corresponding address. Mapping TypesNOTEVirtual mappings are one-to-one maps, which means that each attribute needs one map.
-
Set
user-to-groups.mapas Filename for the map. This file will be saved inC:\Program Files\OpeniT\Core\Configuration\for Windows and/var/opt/openit/etcfor Unix by default.warningIt is not advisable to edit this file manually. The mapping module will overwrite any manual updates made to this file.
-
Choose Yes for Use History?.
-
Click Save. A list of sources will be shown.
 New Map Details
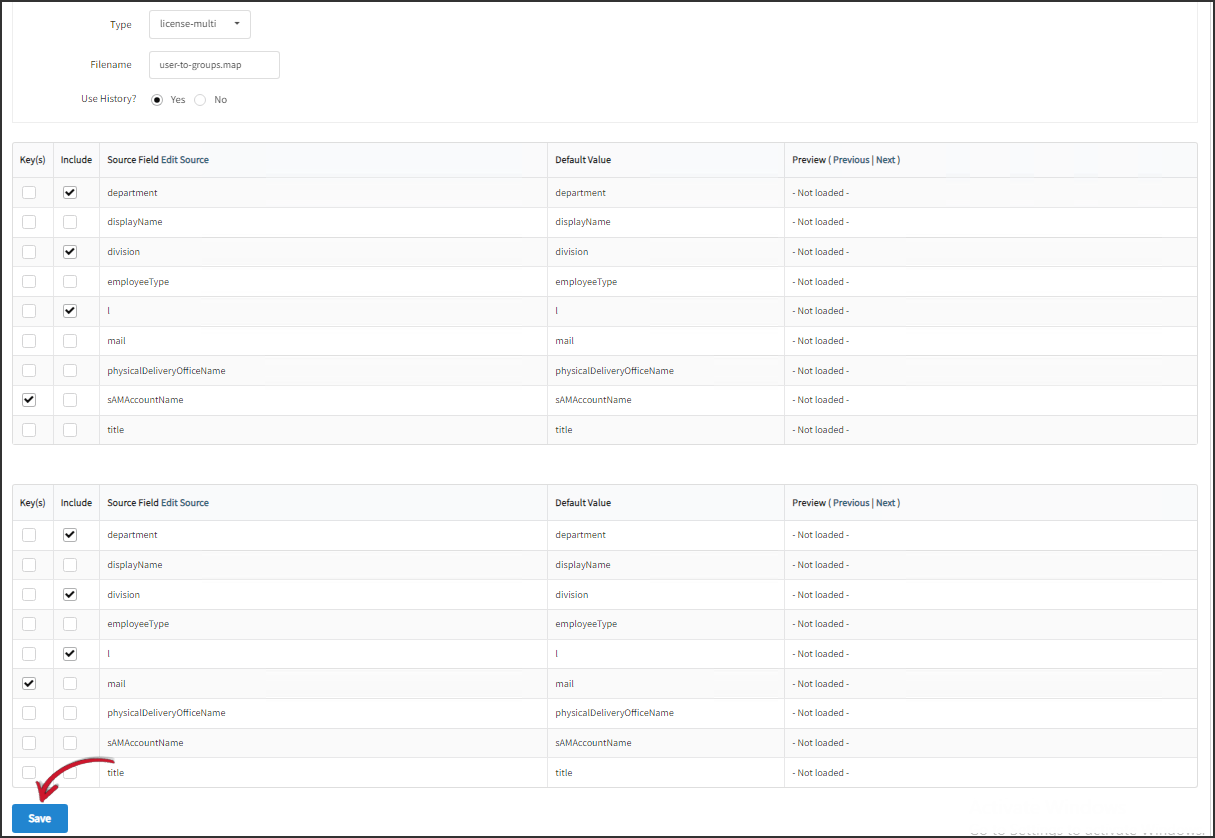
-
Two (2) tables with source fields will be displayed on the interface. The first table corresponds to the first mapping source, and the second table corresponds to the second mapping source.
- For the first table, under the Key(s) column, check sAMAccountName.
Under the Include column, check department, division, and l. - For the second table, under the Key(s) column, check mail.
Under the Include column, check department, division, and l.
dangerAn error will be prompted if no value is selected for Key(s) or Include.
If the mapping file is virtual, you can directly include new maps in the web interface.
- For the first table, under the Key(s) column, check sAMAccountName.
-
Click Save.
 New Map Field Selection
-
Create another map by clicking New Map.
Creating New Map
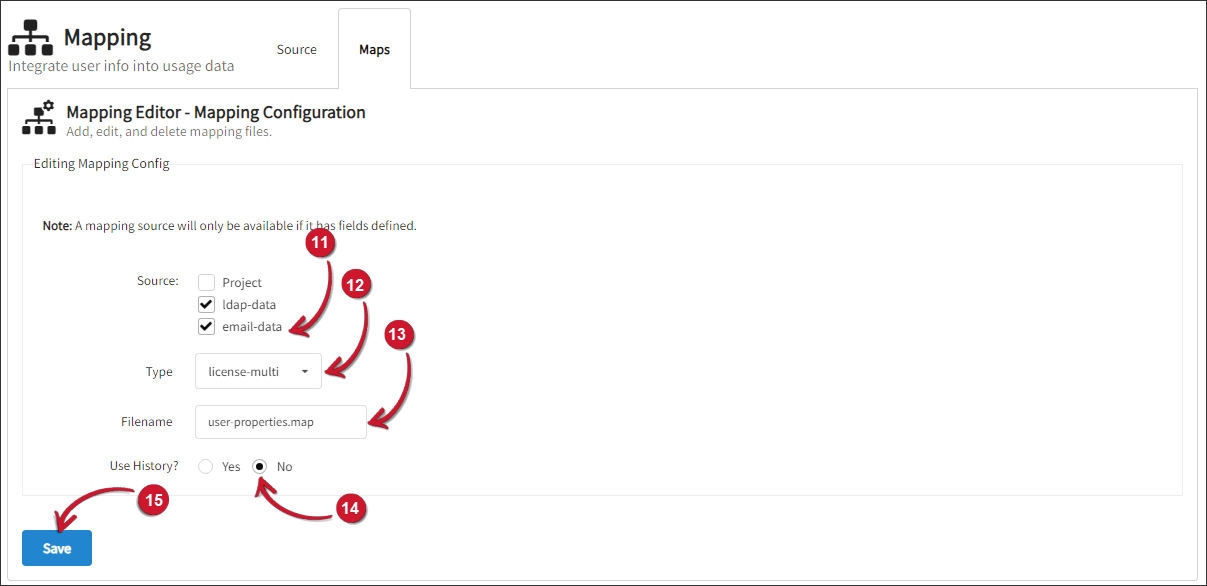
-
Select the two (2) newly created mapping sources.
-
Select license-multi as the mapping Type.
Mapping Types
| Types | Description |
|---|---|
| license-single | The older format of license mapping for a single source field to a single group type (e.g., user to department). It is a one-to-one map used to map a user to a user group. |
| license-multi | This new mapping format allows mapping from a single source to multiple group types (e.g., user to department, location, project). It stores fields, such as Location, Department, and City of any group with concurrency. |
| virtual | Virtual mapping files can be used for any data type and allow mapping from one source field to a single group type. This mapping adds user attributes and lists users of a department and the corresponding address. |
Virtual mappings are one-to-one maps, which means that each attribute needs one map.
-
Set
user-properties.mapas Filename for the map. This file will be saved inC:\Program Files\OpeniT\Core\Configuration\for Windows and/var/opt/openit/etcfor Unix by default.warningIt is not advisable to edit this file manually. The mapping module will overwrite any manual updates made to this file.
-
Choose No for Use History?
-
Click Save. A list of sources will be shown.
 New Map Details
-
Two (2) tables with source fields will be displayed on the interface. The first table corresponds to the first mapping source, and the second table corresponds to the second mapping source.
- For the first table, under the Key(s) column, check sAMAccountName.
Under the Include column, check displayName, employeeType, mail, physicalDeliveryOfficeName, and title. - For the second table, under the Key(s) column, check mail.
Under the Include column, check displayName, employeeType, mail, physicalDeliveryOfficeName, and title.
dangerAn error will be prompted if no value is selected for Key(s) or Include.
If the mapping file is virtual, you can directly include new maps in the web interface. - For the first table, under the Key(s) column, check sAMAccountName.
-
Click Save.
 New Map Field Selection
Verifying the Data Sources and Mapping Files
-
Go to Administration > Job Runner
-
Look for Update Data Sources and Mapping Files, click Run.
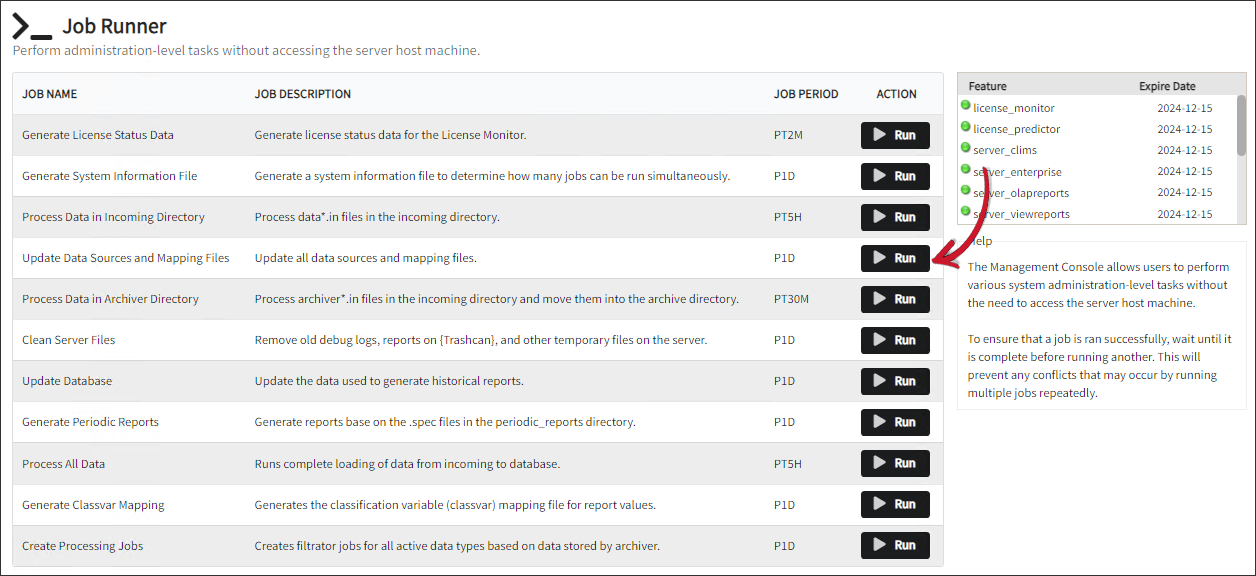 Job Runner: Update Data Sources and Mapping Files
-
Go to the Configuration directory
C:\Program Files\OpeniT\Core\Configurationfor Windows and/var/opt/openit/etcfor Unix. Verify thatuser-to-groups.mapanduser-properties.mapfiles exist.
You may refer to the following guides for managing Mapping Sources, Mapping Files, and Mapping Overlay.
Editing a Mapping Source
-
Go to Administration > Mapping > Source.
-
On the left side of the screen, select the Source to edit.
-
Make the necessary updates to the Source settings or fields.
-
Click Save.
Deleting a Mapping Source
-
Go to Administration > Mapping.
-
On the left side of the screen, select the Source to delete.
-
On the lower-right part of the screen, click Delete.
-
Click OK on the pop-up.

Editing a Mapping File
-
Go to Administration > Mapping > Maps.
-
Click the name of the map to edit.
-
Make the necessary updates to the map.
-
Click Save.
Deleting Mapping Files
-
Go to Administration > Mapping > Maps.
-
Tick the checkbox corresponding the map(s) to delete.
-
Click Delete.
-
Click OK on the pop-up window.

Configuring a Mapping Overlay
Configure the overlay to tailor the user details shown in the License Monitor.
This tab is only accessible if a mapping is configured under Maps and if the mapping files are updated.
Follow these steps to configure the overlay:
- Go to Administration > Mapping > Overlay.
- Select configuration file.
- The overlay will appear on the interface. Select the field to display on the overlay.
- Click the green plus icon to add field(s), meanwhile, click the red minus icon to delete field(s).
- Click the pencil icon to edit the field label.
- Click the up or down icon to change the arrangement of the fields.
- Click Save.
- Click OK on the pop-up.

Editing a Mapping Overlay
-
Select the overlay to edit from the drop-down.
-
Make the necessary updates to the overlay.
-
Click Save.
Next Step?
After completing the Mapping configuration, you may proceed with managing the Mapping Sources in the Analysis Server.