Project Mapping
Introduction
Open iT uses the openit_setid application to register a user to specific projects.
The following sections will guide you on setting up the necessary configuration to list project options and set a user project so that the user and UID classifications in your reports includes the user project ID.
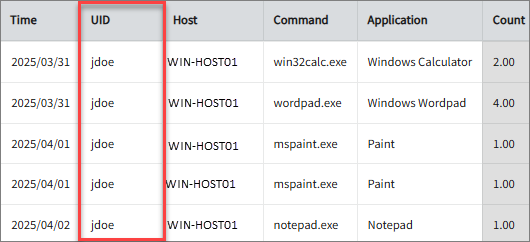
From this:
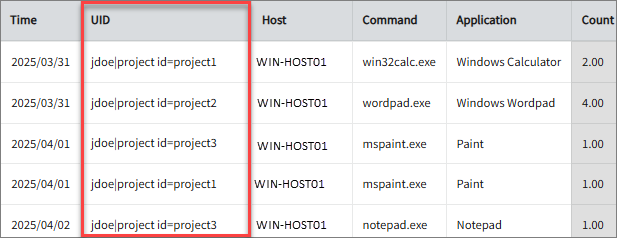
To this:
This configuration affects the following data types:
- (53) Windows Module Usage
- (58) UsageAnalyzer Events
- (87) Process Accounting
- (130) Windows Application Usage
Requirements
- An Open iT Core Client connected to an Open iT Core Server or a coexistent Open iT Core setup
- Activated LicenseAnalyzer collection and license poller
The usage data collection depends on both include-exclude.conf and appusage_process_rules_master.conf. Make sure to configure both files, as they jointly affect filtering behavior.
Listing Project Options
List the projects a user can select and set. A user won't be able to set a random string as a project; only those available in this file.
Apply the configurations shown in the Open iT Core Server.
-
Open the
projectmap.oconffile in the Configuration directory, which is by default inC:\Program Files\OpeniT\Core\Configuration. -
Locate and set the value of
root.setid.gui.titleto configure the title of the interface.projectmap.oconftitle
{
type=string
value="Select Project" -
Locate
root.setid.projects.projectmap.oconfprojects
{
description=Explicit projects for explicit users
sample
{
description=Sample project. List users separating them with the separator or with newline.
type=list
separator=;
nobody;none
} -
Add nodes based on the
samplenode under theprojectsnode and configure it as needed.Each project object can have four (4) sub-objects:
descriptiontypeseparatorusernames
You can list a user name under multiple projects. You can specify multiple users in a project separated by your specified separator (e.g.,
;) or new lines.You can attach the following flags in the project or user names within parentheses:
-
global- you can use this flag for projects only. It means the project is available for everyone.Exampleproject1(global)
{
description=Sample project. List users separating them with the separator or with newline.
type=list
separator=;
} -
default- you can use this flag for project and user names. If this is set to a project, the project will be used if the user does not select a project.Exampleproject2(global,default)
{
description=Sample project. List users separating them with the separator or with newline.
type=list
separator=;
}If this is set for a user, the project under which you listed the user is the default.
Exampleproject3
{
description=Sample project. List users separating them with the separator or with newline.
type=list
separator=;
jdoe;jdelacruz
mdelacruz(default)
}
noteIf multiple projects are flagged as
default, the last defined is used (if the user is in all), but if the user is flagged asdefaultin any project, the first project where the user is tagged asdefaultis used. -
Save the changes.
noteBy default, these updates are delivered from the server to client machine(s) every six hours — specifically at 6 AM, 12 NN, 6 PM, and 12 MN. If you want to deliver the updates immediately, follow the instructions in the Manually Creating and Downloading a Distributable Configuration Files Package section.
Setting a Project
There are two ways to set a project for specific users:
- Setting a project manually through the command line
- Setting a project manually through a user interface
Apply the configurations shown in the Open iT Core Client.
Setting a Project Manually through the Command Line
These are the required steps to set a project through the command line.
-
Open a command prompt with Administrator level privileges.
-
Go to the bin directory, which is by default in
C:\Program Files\OpeniT\Core\bin, run the command:Command Syntaxcd <bin_dir>Examplecd C:\Program Files\OpeniT\Core\bin -
Once in the directory, set your project. Run the command:
Command Syntaxopenit_setid --set <project_name>where
<project_name>is the name of the project you want to set.Command Syntaxopenit_setid --set project1Optional Parameters
Parameter Description -q,--queryUse this to launch the user interface, allowing you to select a project from a list of projects.
Note: If you don't belong to a project and you use this parameter, N/A is defined.-l <exe-path>,--launch <exe-path>Use this to launch an application after saving a project. You can use this with --setor--query.
Examples:
openit_setid --set project1 --launch C:\Windows\system32\notepad.exe
Running this setsproject1as project and launches the Notepad application.
openit_setid --query --launch C:\Windows\system32\notepad.exe
Running this launches the user interface for selecting a project. After you choose a project, the Notepad application will launch.-v,--verboseUse this to output detailed information about what openit_setidis doing.Optional ParametersnoteRefer to the
projectmap.oconffile in the Configuration directory, which is by default inC:\Program Files\OpeniT\Core\Configuration, to make sure that you indicate a project where you belong. If not, the default project available for you will be used, or N/A if no default project is defined.Make sure no errors are encountered.
Setting a Project Manually through a User Interface
Creating an openit_setid Shortcut
You can manually set a project through a user interface. First, you must create a desktop shortcut for openit_setid.exe. These are the required steps to create the shortcut.
-
Right-click on your desktop, click New, and then click Shortcut.
 Create openit_setid.exe Shortcut
A window will appear.
-
Type in or browse for the absolute path to
openit_setid.exe, which is by defaultC:\Program Files\OpeniT\Core\bin\openit_setid.exe, then click Next. Specify openit_setid.exe Path
-
Type in the name for the shortcut, then click Finish.
 Specify Shortcut Name
-
Right-click the shortcut you created, then click Properties.
 Shortcut Properties
-
Replace the value of target with the following:
Target Value<openit_set_id_path> --querywhere
<openit_set_id_path>is the absolute path toopenit_setid.exe, which is by defaultC:\Program Files\OpeniT\Core\bin\openit_setid.exe,Example"C:\Program Files\OpeniT\Core\bin\openit_setid.exe" --queryThen click Apply, then click OK.
 Apply Shortcut Properties
Setting a Project
-
Double-click the shortcut you created. A user interface will appear.
-
Select your project, then click OK.
 Select Project
Verifying a Set Project
Verify that you successfully set the project.
Apply the configurations shown in the Open iT Core Client.
-
Go to the temp directory, which is by default in
C:\ProgramData\OpeniT\Data\temp. -
Verify that there is a generated
project_id-<username>*.idvalfile (e.g.,project_id-jdoe-1.idval). -
Open said file and verify that it contains the timestamp and name for the set project.
Exampletime=3953089194133
project=project1
Creating Project and Username Classifications
These are the required steps to create a virtual classification from the UID classification to separate it into username and project to allow project chargeback implementation.
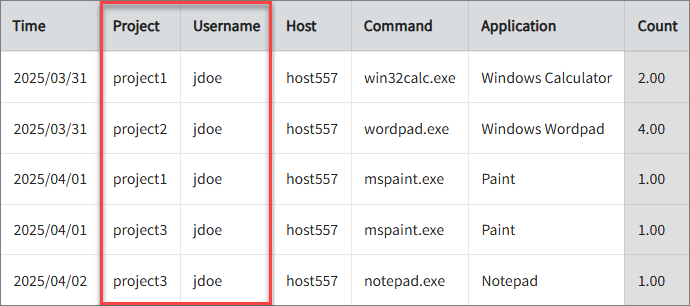
From this:
To this:
Apply the configurations shown in the Open iT Core Server.
-
Go to the mappings directory, which is by default in
C:\Program Files\OpeniT\Core\Configuration\mappings. -
In the default report, the project id is appended to the username in the format
<username>|projectid=<project_name>. With this configuration, we will use the separator|andfields[0]for theusernameand the separator=andfields[1]for theproject id.Create a file named
u-idwith the following contents:u-id[SUB-MAPPINGS]:
sub {
my( $value ) = @_;
my $sep = '|';
my @fields = split( /\Q$sep/, $value );
$sep = '\\\\';
@fields = split( $sep, $fields[0] );
return pop @fields;
}Save the file.
Create a file named
project-idwith the following contents:project-id[SUB-MAPPINGS]:
sub {
my( $value ) = @_;
my $sep = '|';
my @fields = split( /\Q$sep/, $value );
$sep = '=';
@fields = split( /\Q$sep/, $fields[1] );
return pop @fields;
}Save the file.
-
Open the
acc_typesfile in the Configuration directory, which is by default inC:\Program Files\OpeniT\Core\Configuration. -
Locate
(Process^Accounting,and add the following lines beforeDomain,:acc_types(Project,Project^Names,
((UID,project-id))),
(Username,User^ID,
((UID,u-id))),That is,
acc_typesExit^status,
(Program^class,Mapping^from_command^to^classes,
((Command,sample_mapping))),
(Project,Project^Names,
 ((UID,project-id))),
(Username,User^ID,
((UID,u-id))),
Domain, -
Save the changes.
-
Open the
classvar_mapping_configfile in the Configuration directory, which is by default inC:\Program Files\OpeniT\Core\Configuration. -
Locate
(Process^Accounting,and addProjectandUsernameafterProgram^class.acc_types(Process^Accounting,
(Command, Exit^status, Prime^time, Application, GID, UID, Program^class, Project, Username),
((OS, Host), (Architecture, Host), (Domain, Host))), -
Save the changes
Next Steps?
Proceed through the following documentation pages sequentially: