License Usage Portlets
Portlets are panels included in a dashboard. It contains certain data that portrays essential information.
Use these descriptions and specific configurations to manipulate the display of the individual portlet.
Approaching Max
A portlet that contains a table that displays information about applications approaching a certain level of license utilization. This portlet sends an email alert every 5 minutes and 10 seconds.
Details

The table contains Vendor License, Package, Feature Name, Max Available Licenses, In Use, Current Utilization, and Active Utilization.
How to configure
When configuring a table-type portlet, the configuration is separated into two parts: Filters and Alerts settings. Filters consists of configuration for refining the selected classifications and setting the threshold to display in the portlet. While Alerts consists of scheduling of sending email alerts and specifying the desired formatting of the messages.
Filters
To configure the Filters, follow these instructions:
-
In the upper-right corner of the portlet, click the gear icon.
The configuration dialog will appear.
-
Provide the Label or the text displayed in the title bar of the portlet. The initial value is Approaching Max Utilization >= 90%.
-
Select among the available Vendor License, Package, and Feature.
The classification options are cascading, filtering the Vendor License will filter the Package and Feature.
-
Provide the Threshold or the value to limit the rendered data. The value should be in percentage (%).
 Approaching Max Filter Settings
tipYou may save the changes and use the default configuration for the Alerts or proceed with the Alerts configuration.
Alerts
Please make sure to accomplish the necessary configurations for Alerts Scheduling in Alert Settings Configuration section.
To configure the Alerts, follow these instructions:
-
Go to the Alerts tab and choose from the available schedule options. Immediate is selected by default.
Use the statement provided describing the schedule as a guide.
-
If Hourly, the option Only send during this time is checked by default. Set the start and end times to set limitations (e.g., office hours) for sending email alerts.
 Approaching Max Alert Settings Hourly
If Daily, provide the time of the day the email will be sent.
 Approaching Max Alert Settings Daily
If Weekly, provide the specific day of the week and the time of the day the email will be sent.
 Approaching Max Alert Settings Weekly
If Monthly, provide the specific day of the month and the time of the day the email will be sent.
 Approaching Max Alert Settings Monthly
-
Check the following options to enable the functionality:
-
Summarized Report - the report included in the email message is in summarized form; otherwise, will be in detailed form. Only available in Hourly and Daily schedules.
infoA warning will be displayed when Summarized Report is unchecked. Please read carefully.
 Approaching Max Alert Settings Warning
 -
HTML Format - the email alert template is formatted as HTML.
-
Flood Email - all subscribed users will receive email alerts even if there is no new data. Only available in Immediate schedule.
-
-
Click Save to continue.
 Approaching Max Alert Settings
Long Checkout
A portlet that that displays tabular information about the individual users and hosts reaching a certain duration of license checkout. This portlet sends an email alert every 1 hour and 10 seconds.
Details

The table contains Vendor License, Package, Feature Name, Checkout Time, User Name, Host Name, Full Name, Mail, and Status.
Use the page navigator and number of rows option located at the bottom-right corner of the portlet to manipulate the displayed data.
How to configure
When configuring a table-type portlet, the configuration is separated into two parts - Filters and Alerts settings. Filters consists of configuration for refining the selected classifications and setting the threshold to display in the portlet. While Alerts consists of scheduling of sending email alerts and specifying the desired formatting of the messages.
Filters
To configure the Filters, follow these instructions:
-
In the upper-right corner of the portlet, click the gear icon.
The configuration dialog should appear.
-
Provide the Label or the text displayed in the title bar of the portlet. The initial value is Long Checkout: DUration >= 48 Hours.
-
Select among the available Vendor License, Package, and Feature.
-
Provide the Threshold or the value to limit the rendered data. The value should be in hours.
Check the option Include Offline Usage to include all the data tagged as offline usage.
-
Check the option Active Daemons Only to exclude records of vendor license daemons that are down or disconnected.
-
(Optional) Expand the Extended Filters section to narrow down the report by choosing which hostnames to show. You can use wildcard patterns (like *server*) to match hostnames. If you want to include more than one pattern, separate them with commas.
 Long Checkout Filter Settings
tipYou may save the changes and use the default configuration for the Alerts or proceed with the Alerts configuration.
Alerts
Please make sure to accomplish the necessary configurations for Alerts Scheduling in Alert Settings Configuration section.
To configure the Alerts, follow these instructions:
-
Go to the Alerts tab and choose from the available schedule options. Immediate is selected by default.
Use the statement provided describing the schedule as a guide.
-
If Hourly, the option Only send during this time is checked by default. Set the start and end times to set limitations (e.g., office hours) for sending email alerts.
 Long Checkout Alert Settings Hourly
If Daily, provide the time of the day the email will be sent.
 Long Checkout Alert Settings Daily
If Weekly, provide the specific day of the week and the time of the day the email will be sent.
 Long Checkout Alert Settings Weekly
If Monthly, provide the specific day of the month and the time of the day the email will be sent.
 Long Checkout Alert Settings Monthly
 -
Check the following options to enable the functionality:
-
Summarized Report - the report included in the email message is in summarized form; otherwise, will be in detailed form. Only available in Hourly and Daily schedules.
infoA warning will be displayed when Summarized Report is unchecked. Please read carefully.
 Long Checkout Alert Settings Warning
 -
HTML Format - the email alert template is formatted as HTML.
-
Alert Users - alerts all users included in the table. You can exclude specific users from receiving the alert if needed. Use wildcard patterns (e.g., *admin*) to match usernames. If you want to include more than one pattern, separate them with commas.
 Long Checkout Alert Settings Exclude Users
 -
Flood Email - all subscribed users will receive email alerts even if there is no new data. Only available in Immediate schedule.
-
-
Click Save to continue.
 Long Checkout Alert Settings
Sustained Max / Hour
A portlet that contains a table showing applications that have been at maximum utilization for the set threshold of runtime hours. This portlet sends an email alert every 1 hour and 10 seconds.
Details

The table contains Vendor License, Package, Feature Name, Max Available Licenses, In Use, Current Utilization, and Active Utilization.
Use the page navigator and number of rows option located at the bottom-right corner of the portlet to manipulate the displayed data.
How to configure
When configuring a table-type portlet, the configuration is separated into two parts - Filters and Alerts settings. Filters consists of configuration for refining the selected classifications and setting the threshold to display in the portlet. While Alerts consists of scheduling of sending email alerts and specifying the desired formatting of the messages.
Filters
To configure the Filters, follow these instructions:
-
In the upper-right corner of the portlet, click the gear icon.
The configuration dialog should appear.
-
Provide the Label or the text displayed in the title bar of the portlet. The initial value is Sustained Max / Hour: Max Utilization = 100 %.
-
Select among the available Vendor License, Package, and Feature.
-
Provide the Threshold or the value to limit the rendered data. The value should be in percentage (%).
 Sustained Max / Hour Filter Setting
tipYou may save the changes and use the default configuration for the Alerts or proceed with the Alerts configuration.
Alerts
Please make sure to accomplish the necessary configurations for Alerts Scheduling in Alert Settings Configuration section.
To configure the Alerts, follow these instructions:
-
Go to the Alerts tab and choose from the available schedule options. Immediate is selected by default.
Use the statement provided describing the schedule as a guide.
-
If Hourly, the option Only send during this time is checked by default. Set the start and end time to set limitations (e.g., office hours) for sending email alerts.
 Sustained Max / Hour Alert Settings Hourly
If Daily, provide the time of the day the email will be sent.
 Sustained Max / Hour Alert Settings Daily
If Weekly, provide the specific day of the week and the time of the day the email will be sent.
 Sustained Max / Hour Alert Settings Weekly
If Monthly, provide the specific day of the month and the time of the day the email will be sent.
 Sustained Max / Hour Alert Settings Monthly
 -
Check the following options to enable the functionality:
-
Summarized Report - the report included in the email message is in summarized form; otherwise, will be in detailed form. Only available in Hourly and Daily schedules.
infoA warning will be displayed when Summarized Report is unchecked. Please read carefully.
Sustained Max / Hour Alert Settings Warning -
HTML Format - the email alert template is formatted as HTML.
-
Flood Email - all subscribed users will receive email alerts even if there is no new data. Only available in Immediate schedule.
-
-
Click Save to continue.
 Sustained Max / Hour Alert Settings
License Expiration
A portlet that displays a license information table of individual applications expiring in less than or equal to the specified threshold. This portlet sends an email alert every day at 7:00:10 am.
Details

The table contains Vendor License, Package, Feature Name, License Expiration, and Days Remaining.
Use the page navigator and number of rows option located at the bottom-right corner of the portlet to filter the displayed data.
How to configure
When configuring a table-type portlet, the configuration is separated into two parts - Filters and Alerts settings. Filters consists of configuration for refining the selected classifications and setting the threshold to display in the portlet. While Alerts consists of scheduling of sending email alerts and specifying the desired formatting of the messages.
Filters
To configure the Filters, follow these instructions:
-
In the upper-right corner of the portlet, click the gear icon.
The configuration dialog should appear.
-
Provide the Label or the text displayed in the title bar of the portlet. The initial value is License Expiration: Expiration <= 60 Days.
-
Select among the available Vendor License, Package, and Feature.
-
Provide the Threshold or the value to limit the rendered data. Choose among the available conditions to use in comparing the Threshold.
- <= (less than) - includes data expiring in less than the specified threshold.
- = (equal) - includes data exactly expiring in the specified threshold. Provide the value in days.
 License Expiration Filter Settings
tipYou may save the changes and use the default configuration for the Alerts or proceed with the Alerts configuration.
Alerts
Please make sure to accomplish the necessary configurations for Alerts Scheduling in Alert Settings Configuration section.
To configure the Alerts, follow these instructions:
-
Go to the Alerts tab and choose from the available schedule options. Immediate is selected by default.
Use the statement provided describing the schedule as a guide.
-
If Hourly, the option Only send during this time is checked by default. Set the start and end times to set limitations (e.g., office hours) for sending email alerts.
 License Expiration Alert Settings Hourly
If Daily, provide the time of the day the email will be sent.
 License Expiration Alert Settings Daily
If Weekly, provide the specific day of the week and the time of the day the email will be sent.
 License Expiration Alert Settings Weekly
If Monthly, provide the specific day of the month and the time of the day the email will be sent.
 License Expiration Alert Settings Monthly
 -
Check the following options to enable the functionality:
-
Summarized Report - the report included in the email message is in summarized form; otherwise, will be in detailed form. Only available in Hourly and Daily schedules.
infoA warning will be displayed when Summarized Report is unchecked. Please read carefully.
License Expiration Alert Settings Warning -
HTML Format - the email alert template is formatted as HTML.
-
Flood Email - all subscribed users will receive email alerts even if there is no new data. Only available in Immediate schedule.
-
-
Click Save to continue.
 License Expiration Alert Settings
License Hogs
A portlet that displays a tabular information of individual users reaching or exceeding a certain number of checked out licenses. This portlet sends an email alert every 5 minutes and 10 seconds.
Details

The table contains Vendor License, Package, Feature Name, User Name, Full Name, Mail, and Used Licenses.
Use the page navigator and number of rows option located at the bottom-right corner of the portlet to manipulate data displayed.
How to configure
When configuring a table-type portlet, the configuration is separated into two parts - Filters and Alerts settings. Filters consists of configuration for refining the selected classifications and setting the threshold to display in the portlet. While Alerts consists of scheduling of sending email alerts and specifying the desired formatting of the messages.
Filters
To configure the Filters, follow these instructions:
-
In the upper-right corner of the portlet, click the gear icon.
The configuration dialog should appear.
-
Provide the Label or the text displayed in the title bar of the portlet. The initial value is License Hogs: Checkout >= 5 Licenses.
-
Select among the available Vendor License, Package, and Feature.
-
Provide the Threshold or the value to limit the rendered data. The value should be in number of licenses.
-
Check the option Active Daemons Only to exclude records of vendor license daemons that are down or disconnected.
 License Hogs Filter Settings
tipYou may save the changes and use the default configuration for the Alerts or proceed with the Alerts configuration.
Alerts
Please make sure to accomplish the necessary configurations for Alerts Scheduling in Alert Settings Configuration section.
To configure the Alerts, follow these instructions:
-
Go to the Alerts tab and choose from the available schedule options. Immediate is selected by default.
Use the statement provided describing the schedule as a guide.
-
If Hourly, the option Only send during this time is checked by default. Set the start and end times to set limitations (e.g., office hours) for sending email alerts.
 License Hogs Alert Settings Hourly
If Daily, provide the time of the day the email will be sent.
License Hogs Alert Settings HourlyIf Weekly, provide the specific day of the week and the time of the day the email will be sent.
 License Hogs Alert Settings Weekly
If Monthly, provide the specific day of the month and the time of the day the email will be sent.
 License Hogs Alert Settings Monthly
 -
Check the following options to enable the functionality:
-
Summarized Report - the report included in the email message is in summarized form; otherwise, will be in detailed form. Only available in Hourly and Daily schedules.
infoA warning will be displayed when Summarized Report is unchecked. Please read carefully.
License Hogs Alert Settings Warning -
HTML Format - the email alert template is formatted as HTML.
-
Alert Users - alerts all users included in the table. You can exclude specific users from receiving the alert if needed. Use wildcard patterns (e.g., *admin*) to match usernames. If you want to include more than one pattern, separate them with commas.
Long Checkout Alert Settings Exclude Users -
Flood Email - all subscribed users will receive email alerts even if there is no new data. Only available in Immediate schedule.
-
-
Click Save to continue.
 License Hogs Alert Settings
License Daemon Down
A portlet that displays a tabular information about stopped license daemons for a certain period of time. This portlet sends an email alert every 5 minutes and 10 seconds.
Details

The table contains Server Name, Daemon Name, and Down Since.
Use the page navigator and number of rows option located at the bottom- right corner of the portlet to manipulate data displayed.
How to configure
When configuring a table-type portlet, the configuration is separated into two parts - Filters and Alerts settings. Filters consists of configuration for refining the selected classifications and setting the threshold to display in the portlet. While Alerts consists of scheduling of sending email alerts and specifying the desired formatting of the messages.
Filters
To configure the Filters, follow these instructions:
-
In the upper-right corner of the portlet, click the gear icon.
The configuration dialog should appear.
-
Provide the Label or the text displayed in the title bar of the portlet. The initial value is License Daemon Down: Minutes >= 10.
-
Select among the available Vendor License, Package, and Feature.
-
Provide the Threshold or the value to limit the rendered data. The value should be in minutes.
 License Daemon Down Filter Settings
tipYou may save the changes and use the default configuration for the Alerts or proceed with the Alerts configuration.
Alerts
Please make sure to accomplish the necessary configurations for Alerts Scheduling in Alert Settings Configuration section.
To configure the Alerts, follow these instructions:
-
Go to the Alerts tab and choose from the available schedule options. Immediate is selected by default.
Use the statement provided describing the schedule as a guide.
-
If Hourly, the option Only send during this time is checked by default. Set the start and end times to set limitations (e.g., office hours) for sending email alerts.
 License Daemon Down Alert Settings Hourly
If Daily, provide the time of the day the email will be sent.
 License Daemon Down Alert Settings Daily
If Weekly, provide the specific day of the week and the time of the day the email will be sent.
 License Daemon Down Alert Settings Weekly
If Monthly, provide the specific day of the month and the time of the day the email will be sent.
 License Daemon Down Alert Settings Monthly
 -
Check the following options to enable the functionality:
-
Summarized Report - the report included in the email message is in summarized form; otherwise, will be in detailed form. Only available in Hourly and Daily schedules.
infoA warning will be displayed when Summarized Report is unchecked. Please read carefully.
License Daemon Down Alert Settings Warning -
HTML Format - the email alert template is formatted as HTML.
-
Flood Email - all subscribed users will receive email alerts even if there is no new data. Only available in Immediate schedule.
-
-
Click Save to continue.
 License Daemon Down Alert Settings
License Server Down
A portlet that displays a tabular information about stopped license servers for a certain period of time. This portlet sends an email alert every 5 minutes and 10 seconds.
Details

The table contains Server Name and Last Seen.
Use the page navigator and number of rows option located at the bottom-right corner of the portlet to manipulate data displayed.
How to configure
When configuring a table-type portlet, the configuration is separated into two parts - Filters and Alerts settings. Filters consists of configuration for refining the selected classifications and setting the threshold to display in the portlet. While Alerts consists of scheduling of sending email alerts and specifying the desired formatting of the messages.
Filters
To configure the Filters, follow these instructions:
-
In the upper-right corner of the portlet, click the gear icon.
The configuration dialog should appear.
-
Provide the Label or the text displayed in the title bar of the portlet. The initial value is License Server Down: Minutes >= 10.
-
Select among the available Vendor License, Package, and Feature.
-
Provide the Threshold or the value to limit the rendered data. The value should be in minutes.
 License Server Down Filter Settings
tipYou may save the changes and use the default configuration for the Alerts or proceed with the Alerts configuration.
Alerts
Please make sure to accomplish the necessary configurations for Alerts Scheduling in Alert Settings Configuration section.
To configure the Alerts, follow these instructions:
-
Go to the Alerts tab and choose from the available schedule options. Immediate is selected by default.
Use the statement provided describing the schedule as a guide.
-
If Hourly, the option Only send during this time is checked by default. Set the start and end times to set limitations (e.g., office hours) for sending email alerts.
 License Server Down Alert Settings Hourly
If Daily, provide the time of the day the email will be sen
 License Server Down Alert Settings Daily
If Weekly, provide the specific day of the week and the time of the day the email will be sent.
 License Server Down Alert Settings Weekly
If Monthly, provide the specific day of the month and the time of the day the email will be sent.
 License Server Down Alert Settings Monthly
 -
Check the following options to enable the functionality:
-
Summarized Report - the report included in the email message is in summarized form; otherwise, will be in detailed form. Only available in Hourly and Daily schedules.
infoA warning will be displayed when Summarized Report is unchecked. Please read carefully.
License Server Down Alert Settings Warning -
HTML Format - the email alert template is formatted as HTML.
-
Flood Email - all subscribed users will receive email alerts even if there is no new data. Only available in Immediate schedule.
-
-
Click Save to continue.
 License Server Down Alert Settings
Application Denials
A portlet that displays the total number of license denials of Feature under a Vendor License. Using this portlet in your dashboard triggers daily email alerts to the subscribed users after RunEtl processing.
Details

The table contains Vendor License, Feature Name, and Denials.
Use the page navigator and number of rows option located at the bottom-right corner of the portlet to view specific data.
How to configure
When configuring a table-type portlet, the configuration is separated into two parts - Filters and Alerts settings. Filters consists of configuration for refining the selected classifications and setting the threshold to display in the portlet. While Alerts consists of scheduling of sending email alerts and specifying the desired formatting of the messages.
Filters
To configure the Filters, follow these instructions:
-
In the upper-right corner of the portlet, click the gear icon.
The configuration dialog will appear.
-
Provide the Label or the text displayed in the title bar of the portlet. The initial value is Application Denials: License Denials >= 1.
-
Select among the available Vendor License, Package, Feature, and Denial Reason.
-
Provide the Threshold or the value to limit the rendered data. The value should be in number of license denials.
-
Select among the available time ranges. The default is 365 days.
 Application Denials Filter Settings
tipYou may save the changes and use the default configuration for the Alerts or proceed with the Alerts configuration.
Alerts
Please make sure to accomplish the necessary configurations for Alerts Scheduling in Alert Settings Configuration section.
To configure the Alerts, follow these instructions:
-
Go to the Alerts tab and choose from the available schedule options. Immediate is selected by default.
Use the statement provided describing the schedule as a guide.
-
If Daily, provide the time of the day the email will be sent.
 Application Denials Alert Settings Daily
If Weekly, provide the specific day of the week and the time of the day the email will be sent.

Application Denials Alert Settings WeeklyIf Monthly, provide the specific day of the month and the time of the day the email will be sent.
 Application Denials Alert Settings Monthly
 -
Check the following options to enable the functionality:
-
Summarized Report - the report included in the email message is in summarized form; otherwise, will be in detailed form. Only available in Hourly and Daily schedules.
infoA warning will be displayed when Summarized Report is unchecked. Please read carefully.
 Application Denials Alert Settings Warning
 -
HTML Format - the email alert template is formatted as HTML.
-
Flood Email - all subscribed users will receive email alerts even if there is no new data. Only available in Immediate schedule.
-
-
Click Save to continue.

User Denials
A portlet that displays the number of license denials a user received from using a specific Feature under a Vendor License. It also includes the specific reason for the license denial (Denial Reason). Using this portlet in your dashboard triggers daily email alerts to the subscribed users after RunEtl processing.
Details

The table contains Vendor License, Feature Name, User Name, Denial Reason, and Denials.
Use the page navigator and number of rows option located at the bottom-right corner of the portlet to filter the displayed data.
How to configure
When configuring a table-type portlet, the configuration is separated into two parts - Filters and Alerts settings. Filters consists of configuration for refining the selected classifications and setting the threshold to display in the portlet. While Alerts consists of scheduling of sending email alerts and specifying the desired formatting of the messages.
Filters
To configure the Filters, follow these instructions:
-
In the upper-right corner of the portlet, click the gear icon.
The configuration dialog will appear.
-
Provide the Label or the text displayed in the title bar of the portlet. The initial value is User Denials: License Denials >= 1.
-
Select among the available Vendor License, Package, Feature, and Denial Reason.
-
Provide the Threshold or the value to limit the rendered data. The value should be in number of license denials.
-
Select among the available time ranges. The default is 365 days.
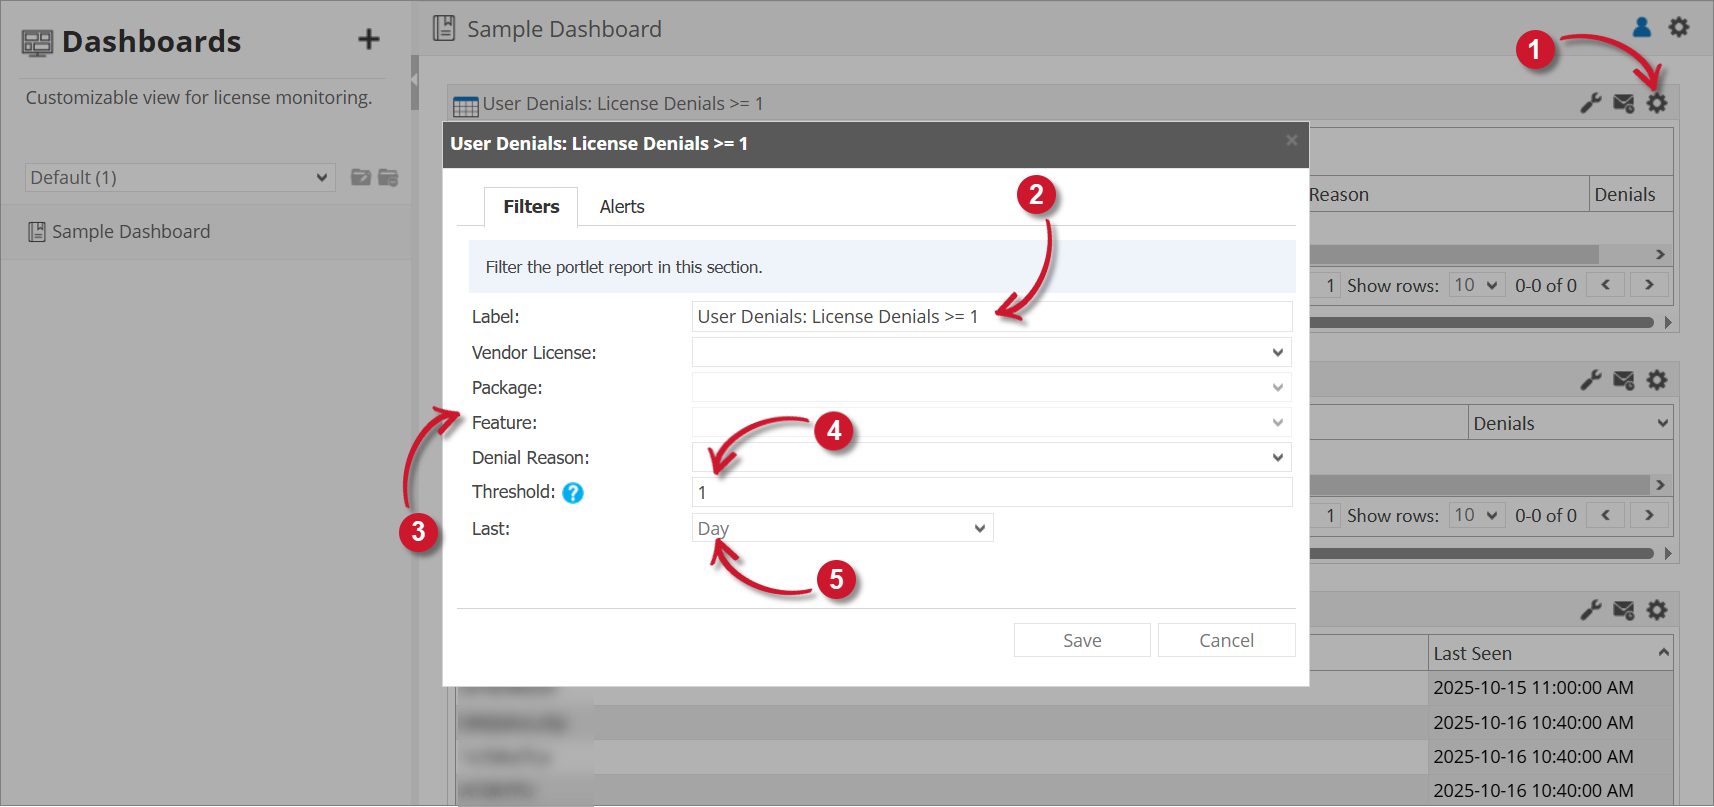 User Denials Filter Settings
tipYou may save the changes and use the default configuration for the Alerts or proceed with the Alerts configuration.
Alerts
Please make sure to accomplish the necessary configurations for Alerts Scheduling in Alert Settings Configuration section.
To configure the Alerts, follow these instructions:
-
Go to the Alerts tab and choose from the available schedule options. Immediate is selected by default.
Use the statement provided describing the schedule as a guide.
-
If Daily, provide the time of the day the email will be sent.
 User Denials Alert Settings Daily
If Weekly, provide the specific day of the week and the time of the day the email will be sent.
 User Denials Alert Settings Weekly
If Monthly, provide the specific day of the month and the time of the day the email will be sent.
 User Denials Alert Settings Monthly
 -
Check the following options to enable the functionality:
-
Summarized Report - the report included in the email message is in summarized form; otherwise, will be in detailed form. Only available in Hourly and Daily schedules.
infoA warning will be displayed when Summarized Report is unchecked. Please read carefully.
User Denials Alert Settings Warning -
HTML Format - the email alert template is formatted as HTML.
-
Flood Email - all subscribed users will receive email alerts even if there is no new data. Only available in Immediate schedule.
-
-
Click Save to continue.
 User Denials Alert Settings
Inactive User Applications
A portlet that that displays tabular information about the individual users and application that has been inactive within the set duration. This portlet sends an email alert every 1 hour and 10 seconds.
Run ETL ResetSchedule to activate the dashboard alert for the Inactive Application User portlet.
To use and configure the Inactive User Applications portlet, make sure the Root.Level configuration value is set to Level 3.
Details

The table contains Application Name, User Name, Host Name, Full Name, Mail, and Inactive Duration.
Use the page navigator and number of rows option located at the bottom-right corner of the portlet to manipulate the displayed data.
How to configure
When configuring a table-type portlet, the configuration is separated into two parts - Filters and Alerts settings. Filters consists of configuration for refining the selected classifications and setting the threshold to display in the portlet. While Alerts consists of scheduling of sending email alerts and specifying the desired formatting of the messages.
Filters
To configure the Filters, follow these instructions:
-
In the upper-right corner of the portlet, click the gear icon.
The configuration dialog should appear.
-
Provide the Label or the text displayed in the title bar of the portlet. The initial value is Inactive User Applications: Duration >= 1 Hours.
-
Select among the available Vendor License, Package, and Feature.
-
Provide the Threshold or the value to limit the rendered data. The value should be in hours.
-
(Optional) Expand the Extended Filters section to narrow down the report by choosing which hostnames to show. You can use wildcard patterns (like *server*) to match hostnames. If you want to include more than one pattern, separate them with commas.
 Long Checkout Filter Settings
tipYou may save the changes and use the default configuration for the Alerts or proceed with the Alerts configuration.
Alerts
Please make sure to accomplish the necessary configurations for Alerts Scheduling in Alert Settings Configuration section.
To configure the Alerts, follow these instructions:
-
Go to the Alerts tab and choose from the available schedule options. Immediate is selected by default.
Use the statement provided describing the schedule as a guide.
-
If Hourly, the option Only send during this time is checked by default. Set the start and end times to set limitations (e.g., office hours) for sending email alerts.
 Inactive User Applications Alert Settings Hourly
If Daily, provide the time of the day the email will be sent.
 Inactive User Applications Alert Settings Daily
If Weekly, provide the specific day of the week and the time of the day the email will be sent.
 Inactive User Applications Alert Settings Weekly
If Monthly, provide the specific day of the month and the time of the day the email will be sent.
 Inactive User Applications Alert Settings Monthly
 -
Check the following options to enable the functionality:
-
Summarized Report - the report included in the email message is in summarized form; otherwise, will be in detailed form. Only available in Hourly and Daily schedules.
infoA warning will be displayed when Summarized Report is unchecked. Please read carefully.
Inactive User Applications Alert Settings Warning -
HTML Format - the email alert template is formatted as HTML.
-
Alert Users - alerts all users included in the table. You can exclude specific users from receiving the alert if needed. Use wildcard patterns (e.g., *admin*) to match usernames. If you want to include more than one pattern, separate them with commas.
Inactive User Applications Alert Settings Exclude Users -
Flood Email - all subscribed users will receive email alerts even if there is no new data. Only available in Immediate schedule.
-
-
Click Save to continue.
 Inactive User Applications Alert Settings
Data Overview
A portlet that contains a table showing archive data files with missing data based on the accepted threshold. The table initially shows the following information:
- 90 days worth of data
- All the vendor licenses with greater than 0 missing data files
- License Polling (LicPoll2) data
Before using the Data Overview portlet, follow the instructions on Displaying Core Server Tracking pages in the Analysis Server.
Details

The table contains Date, Vendor License, Baseline, File Count and File Size.
Use the page navigator and number of rows option located at the bottom-right corner of the portlet to view specific data.
How to configure
When configuring a table-type portlet, the configuration is separated into two parts - Filters and Alerts settings. Filters consists of configuration for refining the selected classifications and setting the threshold to display in the portlet. While Alerts consists of scheduling of sending email alerts and specifying the desired formatting of the messages.
Filters
To configure the Filters, follow these instructions:
-
In the upper-right corner of the portlet, click the gear icon.
The configuration dialog should appear.
-
Provide the Label or the text displayed in the title bar of the portlet. The initial value is Data Overview: Missing Data Files > 0.
-
Select among the available Vendor License. It is possible to select multiple items.
-
Provide the Threshold or the value to limit the rendered data. The value will be the accepted number of missing data files compared to the baseline.
The default value is 0 which means no data should be missing.
 Data Overview Filter Settings
tipYou may save the changes and use the default configuration for the Alerts or proceed with the Alerts configuration.
Alerts
To configure the Alerts, follow these instructions:
-
Go to the Alerts tab and choose from the available schedule options. Immediate is selected by default.
Use the statement provided describing the schedule as a guide.
-
If Daily, provide the time of the day the email will be sent.
 Data Overview Alert Settings Daily
If Weekly, provide the specific day of the week and the time of the day the email will be sent.
 Data Overview Alert Settings Weekly
If Monthly, provide the specific day of the month and the time of the day the email will be sent.
 Data Overview Alert Settings Monthly
 -
Check the following options to enable the functionality:
-
Summarized Report - the report included in the email message is in summarized form; otherwise, will be in detailed form. Only available in Hourly and Daily schedules.
infoA warning will be displayed when Summarized Report is unchecked. Please read carefully.
Data Overview Alert Settings Warning -
HTML Format - the email alert template is formatted as HTML.
-
Flood Email - all subscribed users will receive email alerts even if there is no new data. Only available in Immediate schedule.
-
-
Click Save to continue.
 Data Overview Alert Settings
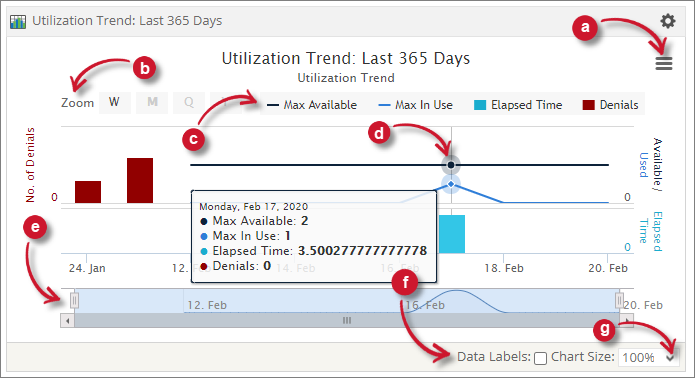
Utilization Trend
A chart portlet showing the historical license usage information of certain applications in a specified time range.
How to configure
The chart appears blank by default. To display data, you must first configure the chart details. Follow these instructions to configure:
-
Click the gear icon located at the upper-right corner of the portlet or in the portlet.
The configuration dialog should appear.
-
Provide the Label or the text displayed in the title bar of the portlet. The initial value is Utilization Trend: Last 365 Days.
-
Select among the available Vendor License, Package, and Feature.
-
Select among the available time ranges. The default is 365 days.
-
Click Save to continue.
The chart should be displayed based on the selected configuration.
The chart contains Max Available Licenses, Max in Use, Elapsed Time, and Number of Denials.
 Utilization Trend Configuration
Chart Functionalities
The portlet contains some functionalities to manipulate the display. Use these descriptions to use these functionalities.
a. Export - choose among the available formats to export the chart.
b. Zoom - choose among the available time chunks to manipulate the displayed data.
- W - Weekly
- M - Monthly
- Q - Quarterly
- Y - Yearly
c. Legend - click the legend to hide or show.
d. Data Information - hover each point in the chart to show the data information.
e. Navigator - slide the navigator to specific date ranges to manipulate the displayed data.
f. Data Labels - tick the option to show data labels in the chart.
g. Chart Size - choose among the available sizes to resize the chart.
Top Usage Shares
A portlet containing a chart about the top license usage by user group division in a specified time range.
How to configure
The chart appears blank by default. To display data, you must first configure the chart details. To configure, follow these instructions:
-
Click the gear icon located at the upper-right corner of the portlet or in the portlet.
The configuration dialog should appear.
-
Provide the Label or the text displayed in the title bar of the portlet. The initial value is Top Usage Shares: Last 365 Days.
-
Select among the available Vendor License, Package, and Feature.
-
Select among the available time ranges. The default is 365 days.
-
Click Save to continue or Cancel to disregard.
The chart should be displayed based on the selected configuration.
The chart contains User Group Division and Elapsed Time.
 Top Usage Shares Configuration
Chart Functionalities
The portlet contains some functionalities to manipulate the display. Use these descriptions to use these functionalities.
a. Export - choose among the available formats to export the chart.
b. Data Information - hover each point in the chart to show the data information.
c. Data Labels - tick the option to show data labels in the chart.
d. Chart Size - choose among the available sizes to resize the chart.

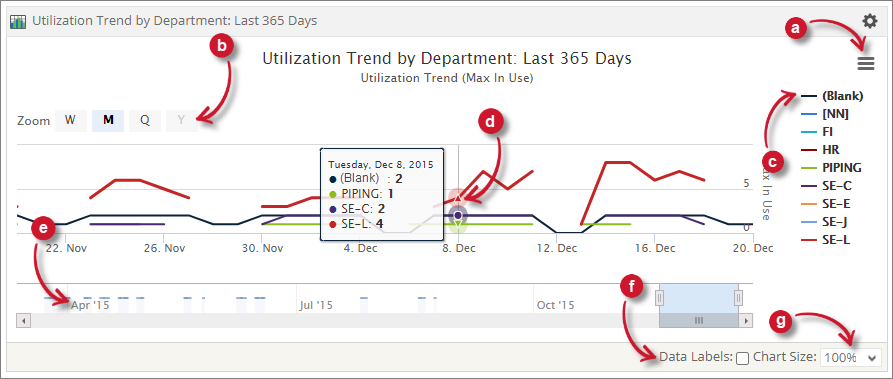
Utilization Trend by Department
A chart portlet showing the historical license usage information of certain applications in a specified time range grouped by department.
How to configure
The chart appears blank by default. To display data, you must first configure the chart details. To configure, follow these instructions:
-
Click the gear icon located at the upper-right corner of the portlet or in the portlet.
The configuration dialog should appear.
-
Provide the Label or the text displayed in the title bar of the portlet. The initial value is Utilization Trend by Department: Last 365 Days.
-
Select among the available Vendor License, Package, and Feature.
-
Select among the available time ranges. The default is 365 days.
-
Click Save to continue or Cancel to disregard.
The chart should be displayed based on the configuration selected.
The chart contains Max In Use and User Department.
 Utilization Trend by Department Configuration
Chart Functionalities
The portlet contains some functionalities to manipulate the display. Use these descriptions to use these functionalities.
a. Export - choose among the available formats to export the chart.
b. Zoom - choose among the available time chunks to manipulate the displayed data.
- W - Weekly
- M - Monthly
- Q - Quarterly
- Y - Yearly
c. Legend - click the legend to hide or show.
d. Data Information - hover each point in the chart to show the data information.
e. Navigator - slide the navigator to specific date ranges to manipulate the displayed data.
f. Data Labels - tick the option to show data labels in the chart.
g. Chart Size - choose among the available sizes to resize the chart.
Top Users
A portlet that contains a bar chart showing the top ten users with the highest license usage in a specified time range.
How to configure
The chart appears blank by default. To display data, you must first configure the chart details. Follow these instructions to configure:
-
Click the gear icon located at the upper-right corner of the portlet or in the portlet.
The configuration dialog should appear.
-
Provide the Label or the text displayed in the title bar of the portlet. The initial value is Top Users: Last 365 Days.
-
Select among the available Vendor License, Package, and Feature.
-
Select among the available time ranges. The default is 365 days.
-
Click Save to continue or Cancel to disregard.
The chart should be displayed based on the selected configuration.
The chart contains User Name and Elapsed Time.
 Top Users Configuration
Chart Functionalities
The portlet contains some functionalities to manipulate the display. Use these descriptions to use these functionalities.
a. Export - choose among the available formats to export the chart.
b. Data Information - hover each point in the chart to show the data information.
c. Data Labels - tick the option to show data labels in the chart.
d. Chart Size - choose among the available sizes to resize the chart.

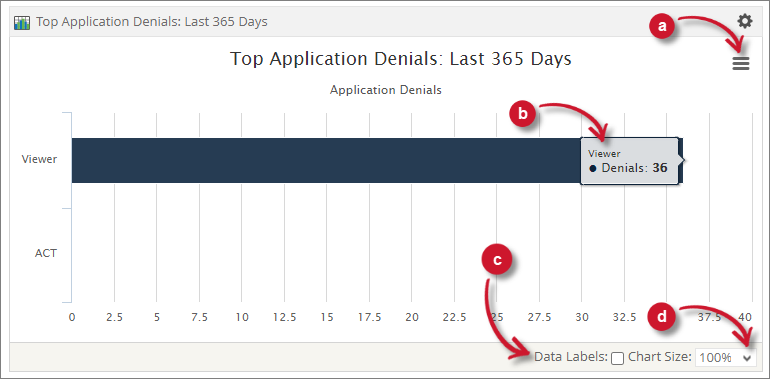
Top Application Denials
A portlet that contains a chart showing individual applications with license denial counts in a specified time range.
How to configure
The chart appears blank by default. To display data, you must first configure the chart details. To configure, follow these instructions:
-
Click the gear icon located at the upper-right corner of the portlet or in the portlet.
The configuration dialog should appear.
-
Provide the Label or the text displayed in the title bar of the portlet. The initial value is Top Application Denials: Last 365 Days.
-
Select among the available Vendor License, Package, and Feature.
-
Select among the available time ranges. The default is 365 days.
-
Click Save to continue or Cancel to disregard.
The chart should be displayed based on the selected configuration.
The chart contains Feature Name and Number of Denials.
 Top Applications Denials Configuration
Chart Functionalities
The portlet contains some functionalities to manipulate the display. Use these descriptions to use these functionalities.
a. Export - choose among the available formats to export the chart.
b. Data Information - hover each point in the chart to show the data information.
c. Data Labels - tick the option to show data labels in the chart.
d. Chart Size - choose among the available sizes to resize the chart.
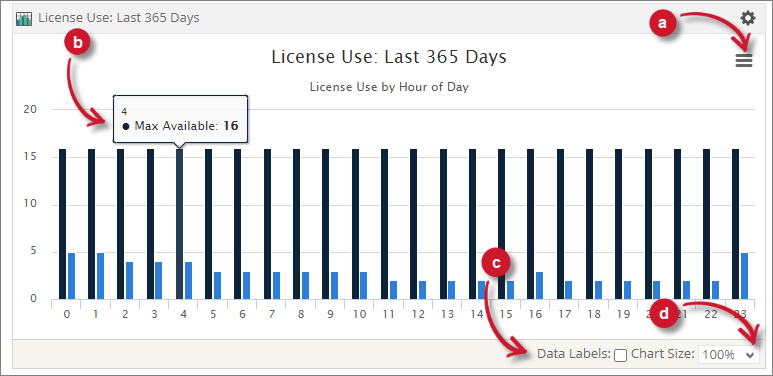
License Use
A portlet that contains a chart showing license usage of certain applications by hour of day in a specified time range.
How to configure
The chart appears blank by default. To display data, you must first configure the chart details. To configure, follow these instructions:
-
Click the gear icon located at the upper-right corner of the portlet or in the portlet.
The configuration dialog should appear.
-
Provide the Label or the text displayed in the title bar of the portlet. The initial value is License Use: Last 365 Days.
-
Select among the available Vendor License, Package, and Feature.
-
Select among the available time ranges. The default is 365 days.
-
Click Save to continue or Cancel to disregard.
The chart should be displayed based on the selected configuration.
The chart contains Max Available Licenses and Max In Use.
 License Use Configuration
Chart Functionalities
The portlet contains some functionalities to manipulate the display. Use these descriptions to use these functionalities.
a. Export - choose among the available formats to export the chart.
b. Data Information - hover each point in the chart to show the data information.
c. Data Labels - tick the option to show data labels in the chart.
d. Chart Size - choose among the available sizes to resize the chart.
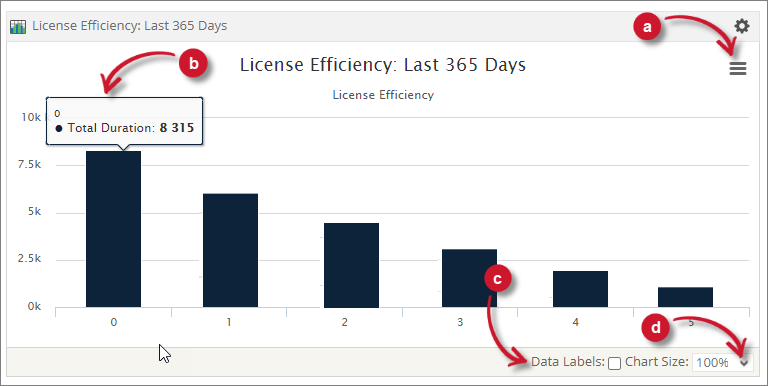
License Efficiency
A portlet that contains a chart showing license usage efficiency through license usage duration with the number of used licenses in a specified time range.
How to configure
The chart appears blank by default. To display data, you must first configure the chart details. Follow these instructions to configure:
-
Click the gear icon located at the upper-right corner of the portlet or in the portlet.
The configuration dialog should appear.
-
Provide the Label or the text displayed in the title bar of the portlet. The initial value is License Efficiency: Last 365 Days.
-
Select among the available Vendor License, Package, and Feature.
-
Select among the available time ranges. The default is 365 days.
-
Click Save to continue or Cancel to disregard.
The chart should be displayed based on the selected configuration.
The chart contains Total Duration.
 License Efficiency Configuration
Chart Functionalities
The portlet contains some functionalities to manipulate the display. Use these descriptions to use these functionalities.
a. Export - choose among the available formats to export the chart.
b. Data Information - hover each point in the chart to show the data information.
c. Data Labels - tick the option to show data labels in the chart.
d. Chart Size - choose among the available sizes to resize the chart.
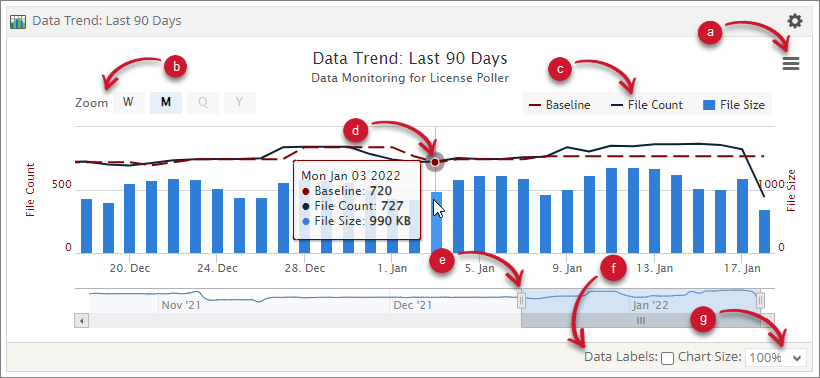
Data Trend
A portlet that contains a chart showing the archived historical data on the Core Server. It shows the file count and size with a baseline computed from the number of vendor licenses in the license status directory, which is by default in C:\ProgramData\OpeniT\Data\license_status, multiplied by 24. The chart initially shows the following information:
- Summation of all the vendor licenses file counts and file sizes per day
- 90 Days worth of data
- License Polling (LicPoll2) data
Before using the Data Trend portlet, follow the instructions on Displaying Core Server Tracking pages in the Analysis Server.
How to configure
Follow these instructions to configure the portlet:
-
Click the gear icon located at the upper-right corner of the portlet or in the portlet.
The configuration dialog should appear.
-
Provide the Label or the text displayed in the title bar of the portlet. The initial value is Data Trend: Last 90 Days.
-
Select among the available Vendor License, Package, and Feature.
-
Select among the available time ranges. The default is 365 days.
-
Click Save to continue or Cancel to disregard.
The chart should be displayed based on the selected configuration.
The chart contains Baseline, File Count, and File Size.
 Data Trend Configuration
Chart Functionalities
The portlet contains some functionalities to manipulate the display. Use these descriptions to use these functionalities.
a. Export - choose among the available formats to export the chart.
b. Zoom - choose among the available time chunks to manipulate the displayed data.
- W - Weekly
- M - Monthly
- Q - Quarterly
- Y - Yearly
c. Legend - click the legend to hide or show.
d. Data Information - hover each point in the chart to show the data information.
e. Navigator - slide the navigator to specific date ranges to manipulate the displayed data.
f. Data Labels - tick the option to show data labels in the chart.
g. Chart Size - choose among the available sizes to resize the chart.
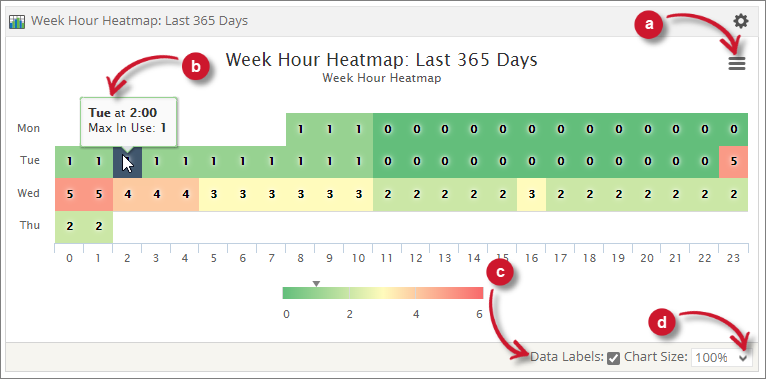
Week Hour Heatmap
A portlet that displays a chart showing the maximum number of licenses used per hour, aggregated daily over a specified time range.
How to configure
The chart appears blank by default. To display data, you must first configure the chart details. Follow these instructions to configure:
-
Click the gear icon located at the upper-right corner of the portlet or in the portlet.
The configuration dialog should appear.
-
Provide the Label or the text displayed in the title bar of the portlet. The initial value is Week Hour Heatmap: Last 90 Days.
-
Select among the available Vendor License, Package, and Feature.
-
Select among the available time ranges. The default is 365 days.
-
Click Save to continue or Cancel to disregard.
The chart should be displayed based on the selected configuration.
The chart contains Max In Use.
 Week Hour Heatmap Configuration
Chart Functionalities
The portlet contains some functionalities to manipulate the display. Use these descriptions to use these functionalities.
a. Export - choose among the available formats to export the chart.
b. Data Information - hover each point in the chart to show the data information.
c. Data Labels - tick the option to show data labels in the chart.
d. Chart Size - choose among the available sizes to resize the chart.
Recommended Reading
The following configuration are applied in Dashboard Portlet Settings, review and determine if necessary.