Manage Mapping Sources
The Mapping Sources page contains various functionalities to configure and set up sources of mapping. Some of the examples that are always configured are user-to-groups.map and user-properties.map mapping files, which are manually created using instructions from the Core Server Web Interface > Administration > Mapping and are located by default in C:\Program Files\OpeniT\Core\Configuration.
The user-to-groups.map mapping file usually contains one-to-many usergroup to users mapping, which are also from the Active Directory with the following commonly used group types:
- Cost Center
- Department
- Division
- Location
The user-properties.map mapping file usually contains user details from the Active Directory such as:
- Display Name
- Employee Type
- Manager
- Physical Delivery Office Name
- Title
The page is only visible to users with administrative rights to Analysis Server.
If the Anaysis Server is installed on a cloud instance, mapping sources to be configured must reside locally on the cloud instance machine.
Adding a Mapping Source
Before proceeding, make sure to prepare the required mapping files user-to-groups.map and user-properties.map. For detailed instructions, refer to the Core Server Web Interface > Administration > Mapping section.
-
Create a mapping source for
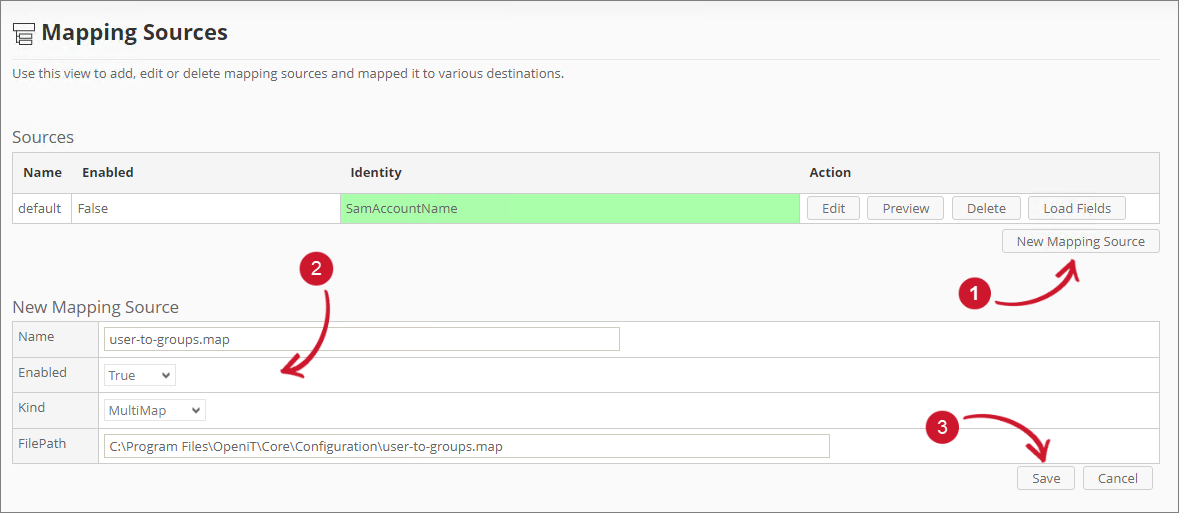
user-to-groups.map. Click the New Mapping Source button.The edit pane will appear.
-
Configure the details of the mapping source:
Mapping Source Fields
Detail Description Name The descriptive identifier of the mapping source. Name it user-to-groups.map.Enabled The switch to enable or disable the mapping source. Set it to True. Kind The type of the mapping source file. Supports Multimap and CSV, with Multimap being the recommended option. FilePath The mapping file's relative path, which is by default in C:\Program Files\OpeniT\Core\Configuration.Separator The type of separator used in the mapping file. Only applicable for CSV. Identity Field The field that uniquely identifies a record in the mapping file. Only applicable for CSV. Mapping Source Fields -
Click Save to add the mapping source.
 Adding Adding Mapping Sources
A notification message will appear at the top of the page, and the sources list should automatically be updated.
 Added Mapping Sources
-
Create another mapping source for
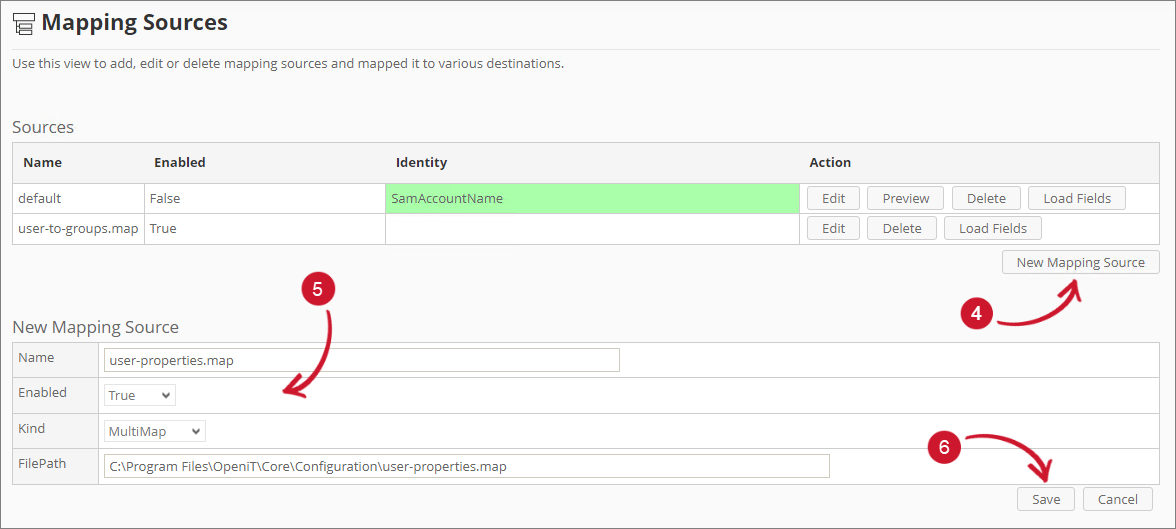
user-properties.map. Click the New Mapping Source button.The edit pane will appear.
-
Configure the details of the mapping source:
Mapping Source Fields
Detail Description Name The descriptive identifier of the mapping source. Name it user-properties.map.Enabled The switch to enable or disable the mapping source. Set it to True. Kind The type of the mapping source file. Supports Multimap and CSV, with Multimap being the recommended option. FilePath The mapping file's relative path, which is by default in C:\Program Files\OpeniT\Core\Configuration.Separator The type of separator used in the mapping file. Only applicable for CSV. Identity Field The field that uniquely identifies a record in the mapping file. Only applicable for CSV. Mapping Source Fields -
Click Save to add the mapping source.
 Adding Mapping Sources
A notification message will appear at the top of the page, and the sources list should automatically be updated.
 Added Mapping Sources
Configuring Destination Field Sources
Follow these instructions to assign a mapping source to various destination types used for reporting:
When configuring Destination Field Sources with multiple mapping sources, make sure that all fields from each configured mapping source are fully loaded.
-
Look for
user-to-groups.mapanduser-properties.mapfrom the source list, then click Load Fields. Loading Mapping Sources
-
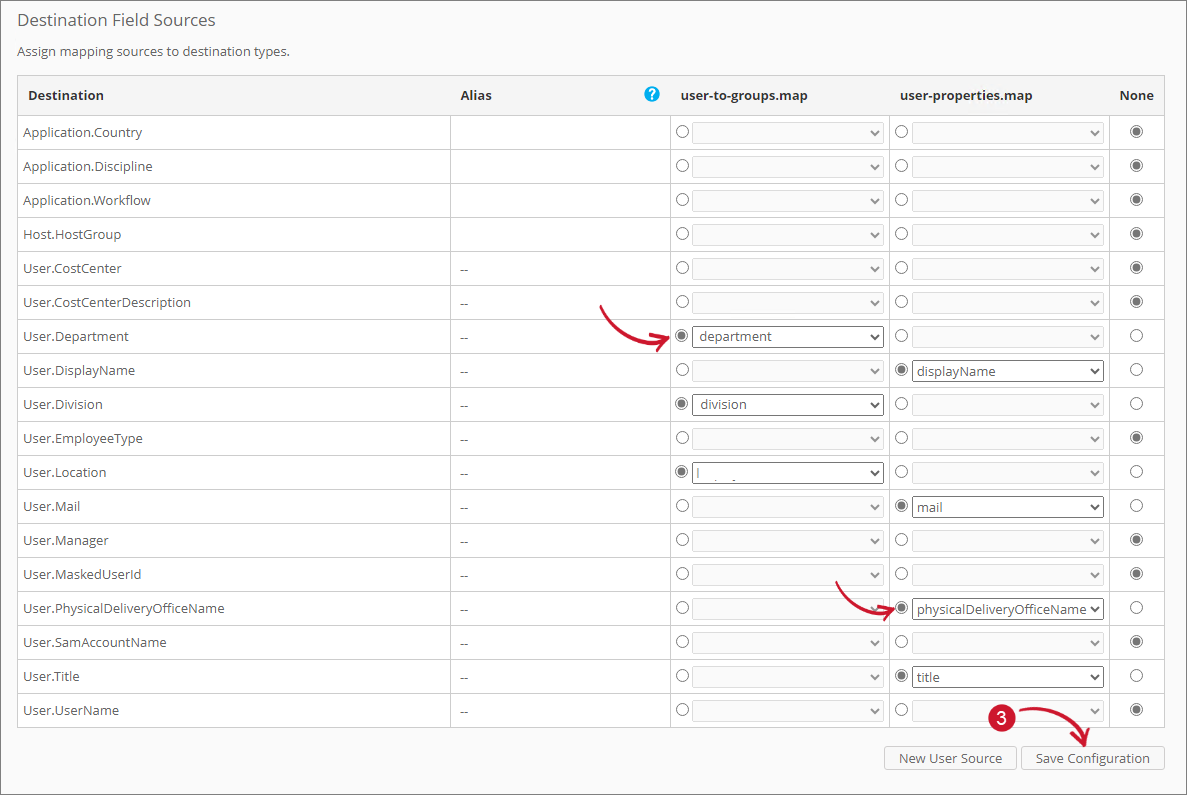
Map the following source values by clicking the radio button beside the row value then select the same destination value:
Destination Field Sources (user-to-groups.map)
Destination Source Value User.Department department User.Division division User.Location l Destination Field SourceDestination Field Sources (user-properties.map)
Destination Source Value User.DisplayName displayName User.Mail mail User.PhysicalDeliveryOfficeName physicalDeliveryOfficeName User.Title title Destination Field SourceNOTEThese are the default configurations for the Destination Field Sources. To add or remove attribute values, follow step number 4 in the Configuring LDAP Collector section.
-
Click Save Configuration to apply the changes.
 Configuring Mapping Sources
Verifying Mapping Sources Configuration
Follow these instructions to check whether the mappings have been successfully configured in the License Monitor Portal:
-
Go to the License Monitor Portal's Web Interface.
NOTEFor detailed instructions, refer to the License Monitor Portal section.
-
Select an item from the list of vendor licenses.
-
Click on a feature from the list. Check if it displays only the UserName instead of the Display Name.
-
Run the command
SyncMapping. Follow the instructions in the SyncMapping section. -
Run the command
ProcesSql. Follow the instructions in the ProcessSql section. -
Run the command
SyncLicenseStatus /reload. Follow the instructions in the SyncLicenseStatus section. -
Refresh the License Monitor Portal page.
This should now show the Display Name instead of the UserName. Click on the Display Name to view the details, including UserName, Mail, Department, Division, Manager, EmployeeType, Location, CostCenter, and PhysicalDeliveryOfficeName, if available.
Previewing a Mapping Source
The preview functionality is only applicable for CSV type mapping source.
Follow these instructions to preview a CSV mapping source:
-
Look for the CSV mapping source to preview from the list.
-
Click the Preview button.
-
The preview should appear under the sources list.
Recommended Reading
The following configurations are required for Mapping Sources to function properly.