Upgrading Analysis Server
Direct upgrades between major versions are not supported.
Please refer to the Analysis Server migration guide for the appropriate steps to move from one major version to another.
With Ingress Setup
Use this guide if the Analysis Server to upgrade is planned to connect to an Ingress installation (local or remote).
For optimal integration of the Analysis Server with Ingress, facilitating a seamless global navigation experience across Open iT web interfaces, it is advisable to ensure the presence of Open iT Ingress and have the URI prepared. This preparation will pave the way for a streamlined transition to a configuration with Ingress, ensuring a smooth upgrade process. Use the instructions in Ingress Installation section if installing Ingress for the first time.
This assumes that Ingress is properly installed on the same machine where the Analysis Server will be installed and is accessible. Choose among the installation methods:
Upgrading through the Windows Installer Interface
-
Right-click the
openit_<version>_asee_windows_x64.msiinstaller file, then click Run as Administrator.Allow the app to make changes to the device to begin. A setup wizard will be displayed. Click Next.
 Welcome Screen
-
Read the License Agreement before accepting the terms. Click Next.
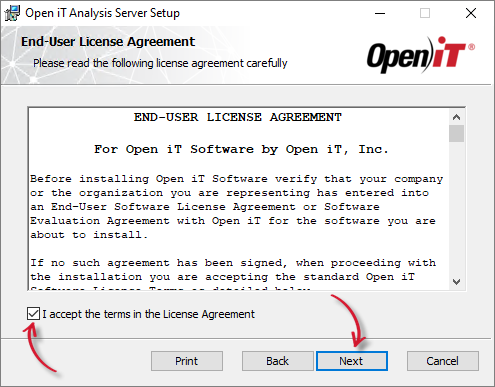 End-user License Agreement
-
Specify where the Open iT software will be installed. Click Change to specify a different directory and click OK. Clicking Next without doing any changes will use the default installation path.
Click Next.
 Destination Folder
-
Specify the new Service Account User Name and the Password. The user name must include the Active Directory domain. Click Next.
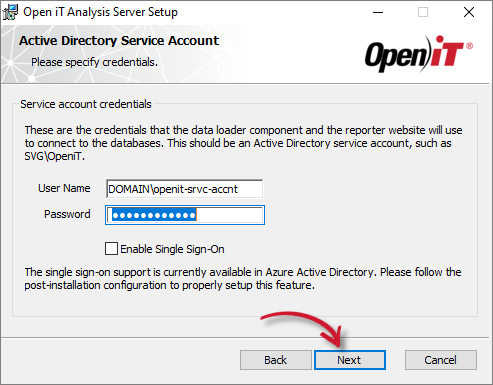 Service Account Credentials
-
Specify the User Group and Administrator Group. The current value can also be left as-is.
Click Next.
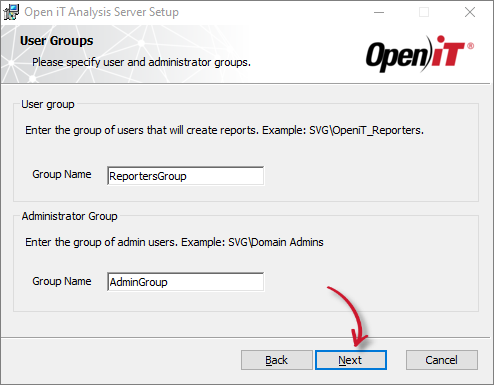 User and Administrator Group
-
Specify the new SQL Server database and instance name where the SQL data warehouse will be created and deployed. Click Browse to look for available SQL Servers on the network. The current value can also be left as-is.
Specify the SQL Server Analysis Services database and instance name which will hold the reporting cube. The current value can also be left as-is.
Click Next.
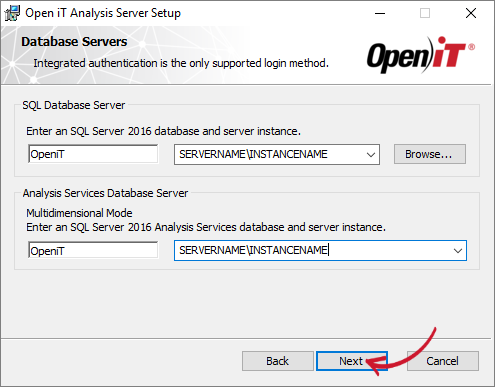 Destination Folder
If the installer detects that the SQL Server provided is an Azure SQL Server, another dialog will appear.
This will require you to provide the Azure SQL Server Login credentials pre-created in the server. This is required since the credentials will be used to connect to the server. Make sure that the user has a DBMANAGER server role.
NOTEFor further details in connecting to Azure SQL Server, please read the article Azure SQL Database Connection Configuration.
Click Next.
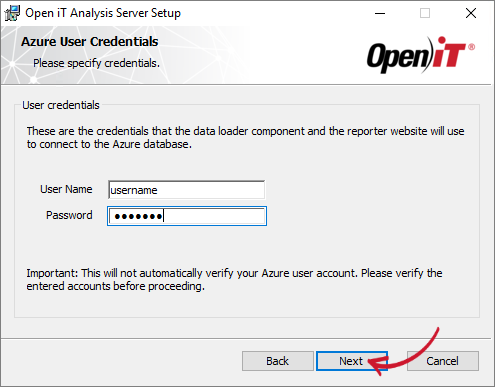 Server Login
-
Click Install to start the installation upgrade process. If a review of the entries is needed, click Back.
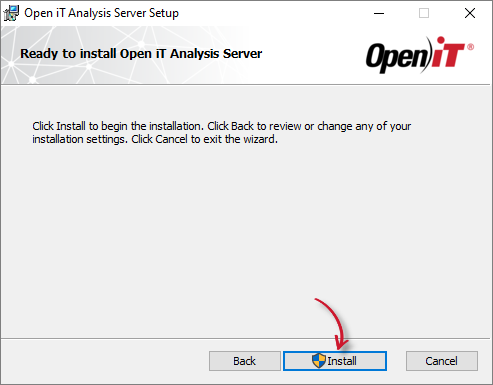 Ready to Install
-
The installer will set up all necessary files on the computer.
After the installation, the View Release Notes option will be automatically selected. This option will show a list of updates and fixes included on the installer through a web browser. Deselect this option as needed.
Click Finish to complete the installation.
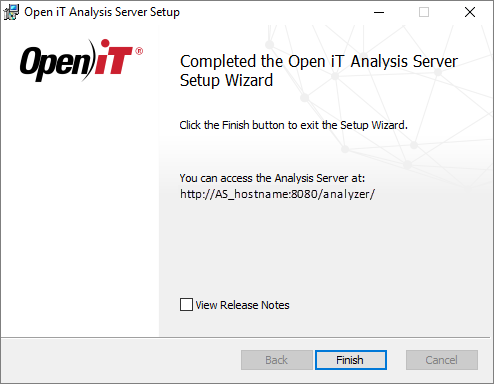 Installation Complete
Continue reading to suggested next steps.
Upgrading through the Command Line
-
Open a command prompt with Administrator level privilege.
-
Execute the following command:
Command Syntaxmsiexec /i <msi_file> /l*v <log_file> <options> USEPREVSITE=1Required Parameters:
Parameter Description /i <msi_file>The path of the Windows installer file, openit_<version>_asee_windows_x64.msi.l*v <log_file>The path of the installation log file that will be created during installation. Installing through Command Line: Required Parameters
Optional Parameters:
NOTEThe installer will use the Windows Installer Interface process when the installation option is not specified.
Parameter Description /quiet Run the command in silent mode. /passive Run the command in unattended mode - progress bar only. Installing through Command Line: Optional Parameters
Required Properties:
USEPREVSITE=1
A trigger that commands the installer to use the previous installation settings for creating an IIS website.If not specified, this will create a new IIS website.
Examplemsiexec /i C:\AS_installer\openit_10_2_500_asee_windows_x64.msi /l*v C:\AS_install_logs\AS_logs.txt /quiet USEPREVSITE=1
infoAll other settings will use the previous values.
Optional Properties:
Use the optional properties to further customize the installation. The default values are used when not specified.
INSTALLDIR=$INSTALL_DIR
The path where the Open iT files will be installed. This value is set toC:\Program Files\OpeniT\Analysis Serverby default.Examplemsiexec /i C:\AS_installer\openit_10_2_500_asee_windows_x64.msi /l*v C:\AS_install_logs\AS_logs.txt /quiet LICENSEFILE=C:\AS_license\license RUNASUSER=SVG\johndoe RUNASPASSWORD=password REPORTERSGROUP=AS_Reporters ADMINGROUP=AS_Admins INSTALLDIR="C:\OpeniT\Analysis Server\"IISPORTNUMBER=[portnumber]
The TCP/IP port number used by the reporter website. This is set to 80 by default.Examplemsiexec /i C:\AS_installer\openit_10_2_500_asee_windows_x64.msi /l*v C:\AS_install_logs\AS_logs.txt /quiet LICENSEFILE=C:\AS_license\license RUNASUSER=SVG\johndoe RUNASPASSWORD=password REPORTERSGROUP=AS_Reporters ADMINGROUP=AS_Admins IISPORTNUMBER=8088RUNASUSER=[domain\user]
The username, including the Active Directory domain, used as the service account.RUNASPASSWORD=[password]
The password of the service account.Examplemsiexec /i C:\AS_installer\openit_10_2_500_asee_windows_x64.msi /l*v C:\AS_install_logs\AS_logs.txt /quiet USEPREVSITE=1 RUNASUSER=SVG\johndoe RUNASPASSWORD=passwordADMINGROUP=[group_name]
The predefined user group with administrative rights.NOTEMake sure that the Administrators Group is an active dome user group.
Examplemsiexec /i C:\AS_installer\openit_10_2_500_asee_windows_x64.msi /l*v C:\AS_install_logs\AS_logs.txt /quiet USEPREVSITE=1 ADMINGROUP=AS_AdministratorsREPORTERSGROUP=[group_name]
The predefined user group with reporting access.Examplemsiexec /i C:\AS_installer\openit_10_2_500_asee_windows_x64.msi /l*v C:\AS_install_logs\AS_logs.txt /quiet USEPREVSITE=1 REPORTERSGROUP=AS_ReportersLICENSEFILE=[license_file]
The path to the Open iT license file.Examplemsiexec /i C:\AS_installer\openit_10_2_500_asee_windows_x64.msi /l*v C:\AS_install_logs\AS_logs.txt /quiet USEPREVSITE=1 LICENSEFILE=C:\licenseSQLSERVER=[sqlserver\instance_name]
The SQL Server including the instance name where the SQL database is created.Examplemsiexec /i C:\AS_installer\openit_10_2_500_asee_windows_x64.msi /l*v C:\AS_install_logs\AS_logs.txt /quiet LICENSEFILE=C:\AS_license\license RUNASUSER=SVG\johndoe RUNASPASSWORD=password REPORTERSGROUP=AS_Reporters ADMINGROUP=AS_Admins SQLSERVER=WIN-HOST01\SQL2019SQLDATABASE=[database_name]
The name of the SQL database.Examplemsiexec /i C:\AS_installer\openit_10_2_500_asee_windows_x64.msi /l*v C:\AS_install_logs\AS_logs.txt /quiet LICENSEFILE=C:\AS_license\license RUNASUSER=SVG\johndoe RUNASPASSWORD=password REPORTERSGROUP=AS_Reporters ADMINGROUP=AS_Admins SQLDATABASE=OpeniT2022OLAPSERVER=[olapserver\instance_name]
The OLAP (SQL Server Analysis Services) Server including the instance name where the OLAP database is created.Examplemsiexec /i C:\AS_installer\openit_10_2_500_asee_windows_x64.msi /l*v C:\AS_install_logs\AS_logs.txt /quiet LICENSEFILE=C:\AS_license\license RUNASUSER=SVG\johndoe RUNASPASSWORD=password REPORTERSGROUP=AS_Reporters ADMINGROUP=AS_Admins OLAPSERVER=WIN-HOST01\SQL2019OLAPDATABASE=[database_name]
The name of the OLAP database where the OLAP cubes are created.Examplemsiexec /i C:\AS_installer\openit_10_2_500_asee_windows_x64.msi /l*v C:\AS_install_logs\AS_logs.txt /quiet LICENSEFILE=C:\AS_license\license RUNASUSER=SVG\johndoe RUNASPASSWORD=password REPORTERSGROUP=AS_Reporters ADMINGROUP=AS_Admins OLAPDATABASE=OpeniT2022INGRESSURI=[http(s)://hostname:<port_number>]
The valid URI of Ingress installation to connect. Please make sure to use the correct protocol, hostname, and port number to avoid errors in connection. If not specified, the value will be set to the local Ingress installation.Examplemsiexec /i C:\AS_installer\openit_10_2_500_asee_windows_x64.msi /l*v C:\AS_install_logs\AS_logs.txt /quiet LICENSEFILE=C:\AS_license\license RUNASUSER=SVG\johndoe RUNASPASSWORD=password REPORTERSGROUP=AS_Reporters ADMINGROUP=AS_Admins INGRESSURI=http://win-host01:8080/Combine or use optional parameters at the same time to achieve necessary capabilities.
Examplemsiexec /i C:\AS_installer\openit_10_2_500_asee_windows_x64.msi /l*v C:\AS_install_logs\AS_logs.txt /quiet LICENSEFILE=C:\AS_license\license RUNASUSER=SVG\johndoe RUNASPASSWORD=password REPORTERSGROUP=AS_Reporters ADMINGROUP=AS_Admins INSTALLDIR="C:\OpeniT\AnalysisServer\" IISPORTNUMBER=8088 SQLSERVER=WIN-HOST01\SQL2019 SQLDATABASE=OpeniT2022 OLAPSERVER=WIN-HOST01\SQL2019 OLAPDATABASE=OpeniT2022
- When using the passive mode, wait until the process bar dialog disappears. When using the quiet mode, verify if the installation is complete by opening the Task Manager and checking in the Details tab if the msiexec process is still running.
Remote Ingress Setup
Use this guide if Ingress is installed remotely or on a different machine from Analysis Server. This assumes that the Ingress installation is up and running, and the URI is ready.
Upgrading through the Windows Installer Interface
-
Right-click the
openit_<version>_asee_windows_x64.msiinstaller file, then click Run as Administrator.Allow the app to make changes to the device to begin. A setup wizard will be displayed. Click Next.
Welcome Screen
-
Read the License Agreement before accepting the terms. Click Next.
End-user License Agreement
-
Specify where the Open iT software will be installed. Click Change to specify a different directory and click OK. Clicking Next without doing any changes will use the default installation path.
Click Next.
Destination Folder
-
Specify the remote Ingress URI to be utilized by the Analysis Server. This will trigger the Analysis Server to establish a connection with Ingress and access the Open iT web application. The default value is http://localhost:27983. Proceed by clicking Next.
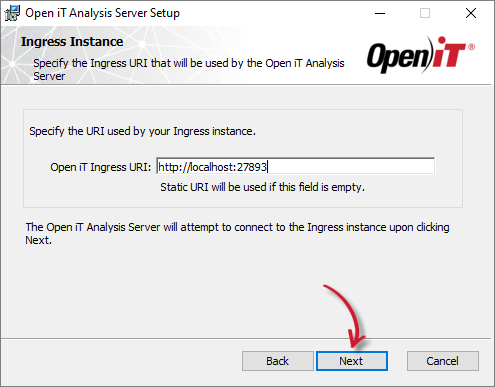 Ingress Instance URI
If Ingress is not accessible or installed yet, a pop-up warning will appear. Please make sure that Ingress is installed in the remote machine and accessible. If it persists, skip by clicking Yes to continue with the upgrade process.
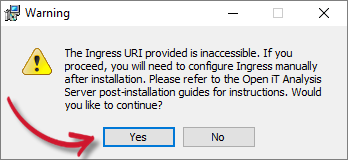 Ingress Warning
-
Specify the new Service Account User Name and the Password. The user name must include the Active Directory domain. Click Next.
Service Account Credentials
-
Specify the User Group and Administrator Group. The current value can also be left as-is.
Click Next.
User and Administrator Group
-
Specify the new SQL Server database and instance name where the SQL data warehouse will be created and deployed. Click Browse to look for available SQL Servers on the network. The current value can also be left as-is.
Specify the SQL Server Analysis Services database and instance name which will hold the reporting cube. The current value can also be left as-is.
Click Next.
Database Servers
If the installer detects that the SQL Server provided is an Azure SQL Server, another dialog will appear.
This will require you to provide the Azure SQL Server Login credentials pre-created in the server. This is required since the credentials will be used to connect to the server. Make sure that the user has a DBMANAGER server role.
NOTEFor further details in connecting to Azure SQL Server, please read the article Azure SQL Database Connection Configuration.
Click Next.
Server Login
-
Click Install to start the installation upgrade process. If a review of the entries is needed, click Back.
Ready to Install
-
The installer will set up all necessary files on the computer.
After the installation, the View Release Notes option will be automatically selected. This option will show a list of updates and fixes included on the installer through a web browser. Deselect this option as needed.
Click Finish to complete the installation.
Installation Complete
Continue reading if upgrading through command line is necessary. If not, here are some suggested next steps.
Upgrading through the Command Line
-
Open a command prompt with Administrator level privilege.
-
Execute the following command:
Examplemsiexec /i <msi_file> /l*v <log_file> <options> USEPREVSITE=1Required Parameters:
Parameter Description /i <msi_file>The path of the Windows installer file, openit_<version>_asee_windows_x64.msi.l*v <log_file>The path of the installation log file that will be created during installation. Installing through Command Line: Required Parameters
Optional Parameters:
infoThe installer will use the Windows Installer Interface process when the installation option is not specified.
Parameter Description /quiet Run the command in silent mode. /passive Run the command in unattended mode - progress bar only. Installing through Command Line: Optional Parameters
Required Properties:
USEPREVSITE=1
A trigger that commands the installer to use the previous installation settings for creating an IIS website.If not specified, this will create a new IIS website.
Examplemsiexec /i C:\AS_installer\openit_10_2_500_asee_windows_x64.msi /l*v C:\AS_install_logs\AS_logs.txt /quiet USEPREVSITE=1
NOTEAll other settings will use the previous values.
Optional Properties:
Use the optional properties to further customize the installation. The default values are used when not specified.
INSTALLDIR=$INSTALL_DIR
The path where the Open iT files will be installed. This value is set toC:\Program Files\OpeniT\Analysis Serverby default.Examplemsiexec /i C:\AS_installer\openit_10_2_500_asee_windows_x64.msi /l*v C:\AS_install_logs\AS_logs.txt /quiet LICENSEFILE=C:\AS_license\license RUNASUSER=SVG\johndoe RUNASPASSWORD=password REPORTERSGROUP=AS_Reporters ADMINGROUP=AS_Admins INSTALLDIR="C:\OpeniT\Analysis Server\"IISPORTNUMBER=[portnumber]
The TCP/IP port number used by the reporter website. This is set to 80 by default.Examplemsiexec /i C:\AS_installer\openit_10_2_500_asee_windows_x64.msi /l*v C:\AS_install_logs\AS_logs.txt /quiet LICENSEFILE=C:\AS_license\license RUNASUSER=SVG\johndoe RUNASPASSWORD=password REPORTERSGROUP=AS_Reporters ADMINGROUP=AS_Admins IISPORTNUMBER=8088RUNASUSER=[domain\user]
The username, including the Active Directory domain, used as the service account.RUNASPASSWORD=[password]
The password of the service account.Examplemsiexec /i C:\AS_installer\openit_10_2_500_asee_windows_x64.msi /l*v C:\AS_install_logs\AS_logs.txt /quiet USEPREVSITE=1 RUNASUSER=SVG\johndoe RUNASPASSWORD=passwordADMINGROUP=[group_name]
The predefined user group with administrative rights.NOTEMake sure that the Administrators Group is an active dome user group.
Examplemsiexec /i C:\AS_installer\openit_10_2_500_asee_windows_x64.msi /l*v C:\AS_install_logs\AS_logs.txt /quiet USEPREVSITE=1 ADMINGROUP=AS_AdministratorsREPORTERSGROUP=[group_name]
The predefined user group with reporting access.Examplemsiexec /i C:\AS_installer\openit_10_2_500_asee_windows_x64.msi /l*v C:\AS_install_logs\AS_logs.txt /quiet USEPREVSITE=1 REPORTERSGROUP=AS_ReportersLICENSEFILE=[license_file]
The path to the Open iT license file.Examplemsiexec /i C:\AS_installer\openit_10_2_500_asee_windows_x64.msi /l*v C:\AS_install_logs\AS_logs.txt /quiet USEPREVSITE=1 LICENSEFILE=C:\licenseSQLSERVER=[sqlserver\instance_name]
The SQL Server including the instance name where the SQL database is created.Examplemsiexec /i C:\AS_installer\openit_10_2_500_asee_windows_x64.msi /l*v C:\AS_install_logs\AS_logs.txt /quiet LICENSEFILE=C:\AS_license\license RUNASUSER=SVG\johndoe RUNASPASSWORD=password REPORTERSGROUP=AS_Reporters ADMINGROUP=AS_Admins SQLSERVER=WIN-HOST01\SQL2019SQLDATABASE=[database_name]
The name of the SQL database.Examplemsiexec /i C:\AS_installer\openit_10_2_500_asee_windows_x64.msi /l*v C:\AS_install_logs\AS_logs.txt /quiet LICENSEFILE=C:\AS_license\license RUNASUSER=SVG\johndoe RUNASPASSWORD=password REPORTERSGROUP=AS_Reporters ADMINGROUP=AS_Admins SQLDATABASE=OpeniT2022OLAPSERVER=[olapserver\instance_name]
The OLAP (SQL Server Analysis Services) Server including the instance name where the OLAP database is created.Examplemsiexec /i C:\AS_installer\openit_10_2_500_asee_windows_x64.msi /l*v C:\AS_install_logs\AS_logs.txt /quiet LICENSEFILE=C:\AS_license\license RUNASUSER=SVG\johndoe RUNASPASSWORD=password REPORTERSGROUP=AS_Reporters ADMINGROUP=AS_Admins OLAPSERVER=WIN-HOST01\SQL2019OLAPDATABASE=[database_name]
The name of the OLAP database where the OLAP cubes are created.Examplemsiexec /i C:\AS_installer\openit_10_2_500_asee_windows_x64.msi /l*v C:\AS_install_logs\AS_logs.txt /quiet LICENSEFILE=C:\AS_license\license RUNASUSER=SVG\johndoe RUNASPASSWORD=password REPORTERSGROUP=AS_Reporters ADMINGROUP=AS_Admins OLAPDATABASE=OpeniT2022INGRESSURI=[http(s)://hostname:<port_number>]
The valid URI of Ingress (remote) installation to connect. Please make sure to use the correct protocol, hostname, and port number to avoid errors in connection. If not specified, the upgrade will not be connected to Ingress.Examplemsiexec /i C:\AS_installer\openit_10_2_500_asee_windows_x64.msi /l*v C:\AS_install_logs\AS_logs.txt /quiet LICENSEFILE=C:\AS_license\license RUNASUSER=SVG\johndoe RUNASPASSWORD=password REPORTERSGROUP=AS_Reporters ADMINGROUP=AS_Admins INGRESSURI=http://win-host01:8080/Combine or use optional parameters at the same time to achieve necessary capabilities.
Examplemsiexec /i C:\AS_installer\openit_10_2_500_asee_windows_x64.msi /l*v C:\AS_install_logs\AS_logs.txt /quiet LICENSEFILE=C:\AS_license\license RUNASUSER=SVG\johndoe RUNASPASSWORD=password REPORTERSGROUP=AS_Reporters ADMINGROUP=AS_Admins INSTALLDIR="C:\OpeniT\AnalysisServer\" IISPORTNUMBER=8088 SQLSERVER=WIN-HOST01\SQL2019 SQLDATABASE=OpeniT2022 OLAPSERVER=WIN-HOST01\SQL2019 OLAPDATABASE=OpeniT2022 -
When using the passive mode, wait until the process bar dialog disappears. When using the quiet mode, verify if the installation is complete by opening the Task Manager and checking in the Details tab if the msiexec process is still running.
Without Ingress Setup
Use this guide if the Analysis Server to upgrade will only be standalone and no connection to Ingress will be made. Choose among the upgrade methods:
Upgrading through the Windows Installer Interface
-
Right-click the
openit_<version>_asee_windows_x64.msiinstaller file, then click Run as Administrator.Allow the app to make changes to the device to begin. A setup wizard will be displayed. Click Next.
Welcome Screen
-
Read the License Agreement before accepting the terms. Click Next.
End-user License Agreement
-
Specify where the Open iT software will be installed. Click Change to specify a different directory and click OK. Clicking Next without doing any changes will use the default installation path.
Click Next.
Destination Folder
-
Skip this dialog since you are installing a standalone Analysis Server (without Ingress). Click Next.
Ingress Instance URI
Click Yes to continue the upgrade process.
Ingress Warning
-
Specify the new Service Account User Name and Password. The user name must include the Active Directory domain. Click Next.
Service Account Credentials
-
Specify the User Group and Administrator Group. The current value can also be left as-is.
Click Next.
User and Administrator Group
-
Specify the new SQL Server database and instance name where the SQL data warehouse will be created and deployed. Click Browse to look for available SQL Servers on the network. The current value can also be left as-is.
Specify the SQL Server Analysis Services database and instance name which will hold the reporting cube. The current value can also be left as-is.
Click Next.
Database Servers
If the installer detects that the SQL Server provided is an Azure SQL Server, another dialog will appear.
This will require you to provide the Azure SQL Server Login credentials pre-created in the server. This is required since the credentials will be used to connect to the server. Make sure that the user has a DBMANAGER server role.
NOTEFor further details in connecting to Azure SQL Server, please read the article Azure SQL Database Connection Configuration.
Click Next.
Server Login
-
Click Install to start the installation upgrade process. If a review of the entries is needed, click Back.
Ready to Install
-
The installer will set up all necessary files on the computer.
After the installation, a link will be provided for users to access the Open iT Analysis Server Web application. The View Release Notes option can be selected. This option will show a list of updates and fixes included on the installer through a web browser. Deselect this option as needed.
NOTEYou may experience a delay when viewing the release notes due to the registration process of Analysis Server with Ingress.
Click Finish to complete the installation.
Installation Complete
Continue reading to suggested next steps.
Upgrading through the Command Line
-
Open a command prompt with Administrator level privilege.
-
Execute the following command:
Command Syntaxmsiexec /i <msi_file> /l*v <log_file> <options> USEPREVSITE=1Required Parameters:
Parameter Description /i <msi_file>The path of the Windows installer file, openit_<version>_asee_windows_x64.msi.l*v <log_file>The path of the installation log file that will be created during installation. Installing through Command Line: Required Parameters
Optional Parameters:
NOTEThe installer will use the Windows Installer Interface process when the installation option is not specified.
Parameter Description /quiet Run the command in silent mode. /passive Run the command in unattended mode - progress bar only. Installing through Command Line: Optional Parameters
Required Properties:
USEPREVSITE=1
A trigger that commands the installer to use the previous installation settings for creating an IIS website.If not specified, this will create a new IIS website.
Examplemsiexec /i C:\AS_installer\openit_10_2_500_asee_windows_x64.msi /l*v C:\AS_install_logs\AS_logs.txt /quiet USEPREVSITE=1
NOTEAll other settings will use the previous values.
Optional Properties:
Use the optional properties to further customize the installation. The default values are used when not specified.
INSTALLDIR=$INSTALL_DIR
The path where the Open iT files will be installed. This value is set toC:\Program Files\OpeniT\Analysis Serverby default.Examplemsiexec /i C:\AS_installer\openit_10_2_500_asee_windows_x64.msi /l*v C:\AS_install_logs\AS_logs.txt /quiet LICENSEFILE=C:\AS_license\license RUNASUSER=SVG\johndoe RUNASPASSWORD=password REPORTERSGROUP=AS_Reporters ADMINGROUP=AS_Admins INSTALLDIR="C:\OpeniT\Analysis Server\"IISPORTNUMBER=[portnumber]
The TCP/IP port number used by the reporter website. This is set to 80 by default.Examplemsiexec /i C:\AS_installer\openit_10_2_500_asee_windows_x64.msi /l*v C:\AS_install_logs\AS_logs.txt /quiet LICENSEFILE=C:\AS_license\license RUNASUSER=SVG\johndoe RUNASPASSWORD=password REPORTERSGROUP=AS_Reporters ADMINGROUP=AS_Admins IISPORTNUMBER=8088RUNASUSER=[domain\user]
The username, including the Active Directory domain, used as the service account.RUNASPASSWORD=[password]
The password of the service account.Examplemsiexec /i C:\AS_installer\openit_10_2_500_asee_windows_x64.msi /l*v C:\AS_install_logs\AS_logs.txt /quiet USEPREVSITE=1 RUNASUSER=SVG\johndoe RUNASPASSWORD=passwordADMINGROUP=[group_name]
The predefined user group with administrative rights.NOTEMake sure that the Administrators Group is an active dome user group.
Examplemsiexec /i C:\AS_installer\openit_10_2_500_asee_windows_x64.msi /l*v C:\AS_install_logs\AS_logs.txt /quiet USEPREVSITE=1 ADMINGROUP=AS_AdministratorsREPORTERSGROUP=[group_name]
The predefined user group with reporting access.Examplemsiexec /i C:\AS_installer\openit_10_2_500_asee_windows_x64.msi /l*v C:\AS_install_logs\AS_logs.txt /quiet USEPREVSITE=1 REPORTERSGROUP=AS_ReportersLICENSEFILE=[license_file]
The path to the Open iT license file.Examplemsiexec /i C:\AS_installer\openit_10_2_500_asee_windows_x64.msi /l*v C:\AS_install_logs\AS_logs.txt /quiet USEPREVSITE=1 LICENSEFILE=C:\licenseSQLSERVER=[sqlserver\instance_name]
The SQL Server including the instance name where the SQL database is created.Examplemsiexec /i C:\AS_installer\openit_10_2_500_asee_windows_x64.msi /l*v C:\AS_install_logs\AS_logs.txt /quiet LICENSEFILE=C:\AS_license\license RUNASUSER=SVG\johndoe RUNASPASSWORD=password REPORTERSGROUP=AS_Reporters ADMINGROUP=AS_Admins SQLSERVER=WIN-HOST01\SQL2019SQLDATABASE=[database_name]
The name of the SQL database.Examplemsiexec /i C:\AS_installer\openit_10_2_500_asee_windows_x64.msi /l*v C:\AS_install_logs\AS_logs.txt /quiet LICENSEFILE=C:\AS_license\license RUNASUSER=SVG\johndoe RUNASPASSWORD=password REPORTERSGROUP=AS_Reporters ADMINGROUP=AS_Admins SQLDATABASE=OpeniT2022OLAPSERVER=[olapserver\instance_name]
The OLAP (SQL Server Analysis Services) Server including the instance name where the OLAP database is created.Examplemsiexec /i C:\AS_installer\openit_10_2_500_asee_windows_x64.msi /l*v C:\AS_install_logs\AS_logs.txt /quiet LICENSEFILE=C:\AS_license\license RUNASUSER=SVG\johndoe RUNASPASSWORD=password REPORTERSGROUP=AS_Reporters ADMINGROUP=AS_Admins OLAPSERVER=WIN-HOST01\SQL2019OLAPDATABASE=[database_name]
The name of the OLAP database where the OLAP cubes are created.Examplemsiexec /i C:\AS_installer\openit_10_2_500_asee_windows_x64.msi /l*v C:\AS_install_logs\AS_logs.txt /quiet LICENSEFILE=C:\AS_license\license RUNASUSER=SVG\johndoe RUNASPASSWORD=password REPORTERSGROUP=AS_Reporters ADMINGROUP=AS_Admins OLAPDATABASE=OpeniT2022Combine or use optional parameters at the same time to achieve necessary capabilities.
Examplemsiexec /i C:\AS_installer\openit_10_2_500_asee_windows_x64.msi /l*v C:\AS_install_logs\AS_logs.txt /quiet LICENSEFILE=C:\AS_license\license RUNASUSER=SVG\johndoe RUNASPASSWORD=password REPORTERSGROUP=AS_Reporters ADMINGROUP=AS_Admins INSTALLDIR="C:\OpeniT\AnalysisServer\" IISPORTNUMBER=8088 SQLSERVER=WIN-HOST01\SQL2019 SQLDATABASE=OpeniT2022 OLAPSERVER=WIN-HOST01\SQL2019 OLAPDATABASE=OpeniT2022 -
When using the passive mode, wait until the process bar dialog disappears. When using the quiet mode, verify if the installation is complete by opening the Task Manager and checking in the Details tab if the msiexec process is still running.
Next Steps?
After an upgrade, accomplish all post-upgrade procedures.