Tabular Model Configuration
On-premise Server
To setup a local server for tabular model, follow this sequence of instructions:
-
Setting Tabular Server Connection String.
Update the Tabular Server key in the
ConnectionStrings.configand provide the Azure Analysis Services Server and database information. Use the instructions in the section Database Connection Strings Configuration to perform this step. -
Using the Analyis Server console application, run the following commands:
-
CreateOlap /tabular
Use the instructions in the section CreateOlap as guide in performing the command. -
DeployOlap /tabular
Use the instructions in the section DeployOlap as guide in performing the command. -
ProcessOlap /tabularonly
Use the instructions in the section ProcessOlap as guide in performing the command.
NOTEMake sure that the data is successfully loaded and processed in the SQL Server data source for the Tabular Model to process successfully.
-
-
Save the changes.
Azure Analysis Services Server
To setup the deployment of Tabular model in Azure Analysis Services, follow this sequence of instructions:
-
Create Azure Analysis Services server in Azure Portal. Use the instructions in the Microsoft Learn article – Create a server - Portal
NOTEUse the link to create an AAS in Azure Portal.
-
Register application in Azure Active Directory (Microsoft Entra ID) using App registration.
-
Create Service Principal in Azure Analysis Services using SSMS.
-
Setup Azure SQL Server Connection.
Use the instructions in the section Azure SQL Database Connection Configuration.
NOTEIt is also supported to connect to On-premises SQL Server (local server) and database as data source. But it requires the configuration of On-premises Data Gateway. Use the instructions in this article Azure Analysis Services with On-Premises Data Gateway to perform the installation and configuration.
-
Configure
appsetings.config.Use the instructions in the section Application Settings Configuration as guide in providing the value for the following keys:
Example appsetings.config<add key="aas:ClientId" value="CLIENTID" />
<add key="aas:ClientSecret" value="sample_client_secret" />
<add key="aas:Domain" value="openit.com" />
<add key="aas:TenantId" value="sample_tenant_id" />Where all the values are from the registered application in AAD. The Domain can be seen in the Overview page of the Microsoft Entra ID (AAD).
-
Configure
ConnectionStrings.config.Update the Tabular Server key in the
ConnectionStrings.configand provide the Azure Analysis Services Server and database information. Use the instructions in the section Database Connection Strings Configuration to perform this step. -
Using the Analysis Server console application run the following commands:
-
CreateOlap /tabular
Use the instructions in the section CreateOlap as guide in performing the command. -
DeployOlap /tabular
Use the instructions in the section DeployOlap as guide in performing the command. -
ProcessOlap /tabularonly
Use the instructions in the section ProcessOlapas guide in performing the command.
NOTEMake sure that the data is successfully loaded and processed in the SQL Server data source for the Tabular Model to process successfully.
-
Registering an application in Azure Active Directory (Microsoft Entra ID) in Azure Portal
Make sure to register an application in Azure Portal that will serve as token provider for the authentication in Azure Analysis Services.
Use the instructions in the Microsoft Learn article – Register an app with Microsoft Entra ID for a more detailed instructions.
To register an application, please follow these instructions:
-
Go to Microsoft Azure's official website, sign in to your Azure Portal account.
-
Search for Microsoft Entra ID and navigate to it.
-
In the left pane, click Manage > App registrations.
-
Click New registration in the upper left corner of the page.
-
Provide a descriptive name for the application.
-
In the Redirect URI, select Web as platform and
http://localhost/for the URI. -
Once redirected, click Manage > Certificates & secrets.
-
Click New client secret.
-
Provide a description and select desired expiration days. Click Add.
-
Copy the Value and store it in a safe storage for future use.
-
In the left pane, click Overview. Take note of the following information:
- Application (client) ID
- Directory (tenant) ID
Creating a Service Principal in Azure Analysis Services using SSMS
Make sure that token provider is part of the Server users in the Azure Analysis Services. To create, please follow these instructions:
The user doing this should be part of the Administrators of the Azure Analysis Services Server. In Azure Portal, navigate to the Azure Analysis Services Server > Settings > Analysis Services Admins. Then, add the account that will perform this task.
Use the instructions in the Microsoft Learn article – Add a service principal to the server administrator role for a more detailed instructions.
-
Open SSMS.
-
Connect to Analysis Services using the Server Name of the created Azure Analysis Services.
-
Once connected, right-click the root node and select Properties.
-
The Analysis Server Properties dialog will appear. Click Security, then click Add.
-
This will allow you to use your Azure credentials. Next, the Select a User or Group dialog will appear. Use the Manual Entry textbox to provide the Service Principal credential in the following format:
app:<clientid>@<tenantid>, where<clientid>and<tenantid>are from the registered application in AAD. Click Add, then click OK. -
Save the changes.
Including Tabular Model Processing in Background ETL Process
If you would like the Tabular Model to be included in data daily processing of Analysis Server, follow these instructions:
-
Open the Task Scheduler in the machine where Analysis Server is installed.
-
In the left pane, click Task Scheduler Library.
-
In the list of tasks, look for OpeniT.Server.Etl.Console.exe.
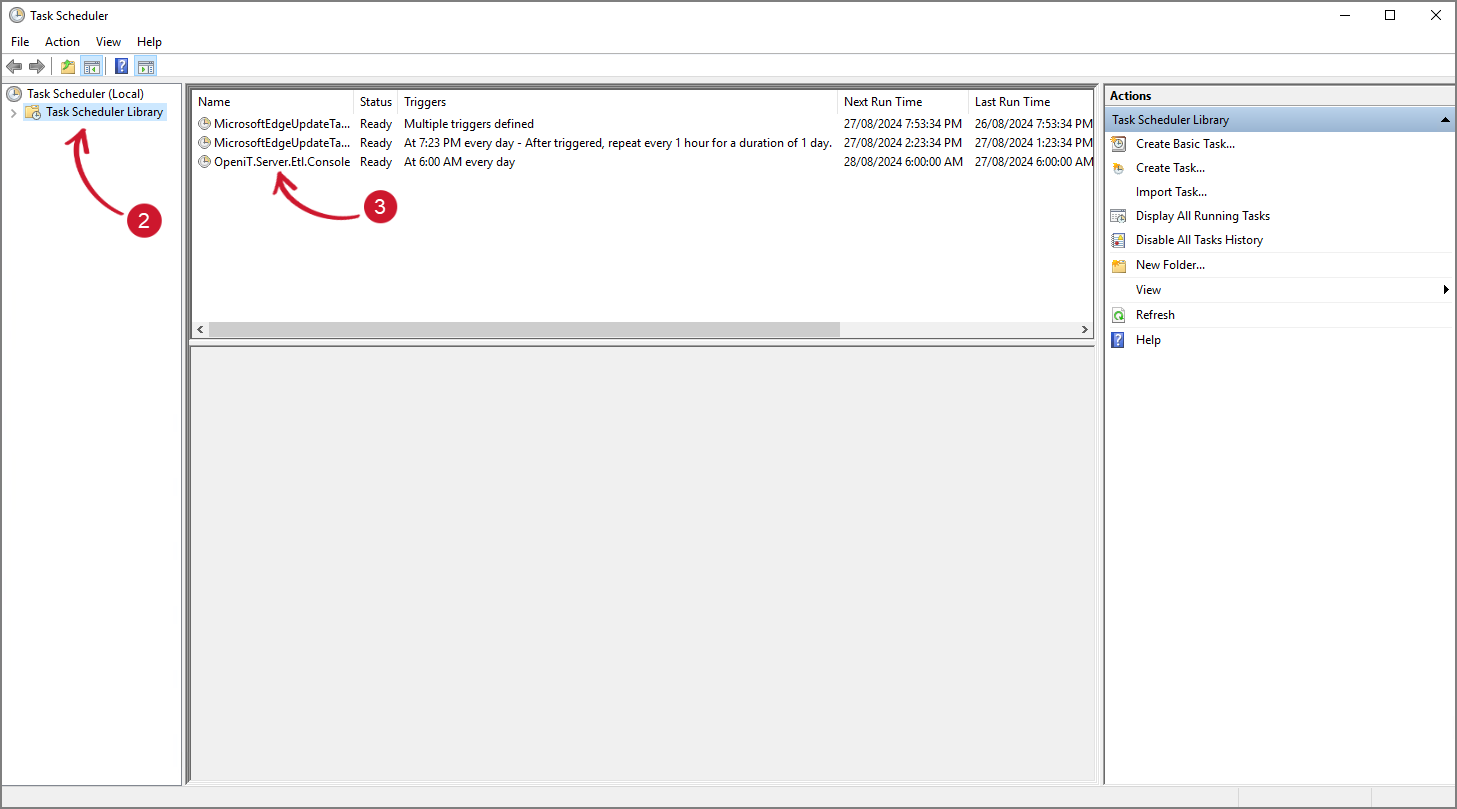 Task Scheduler
-
Right-click on it and select Properties.
 Task Scheduler Library
-
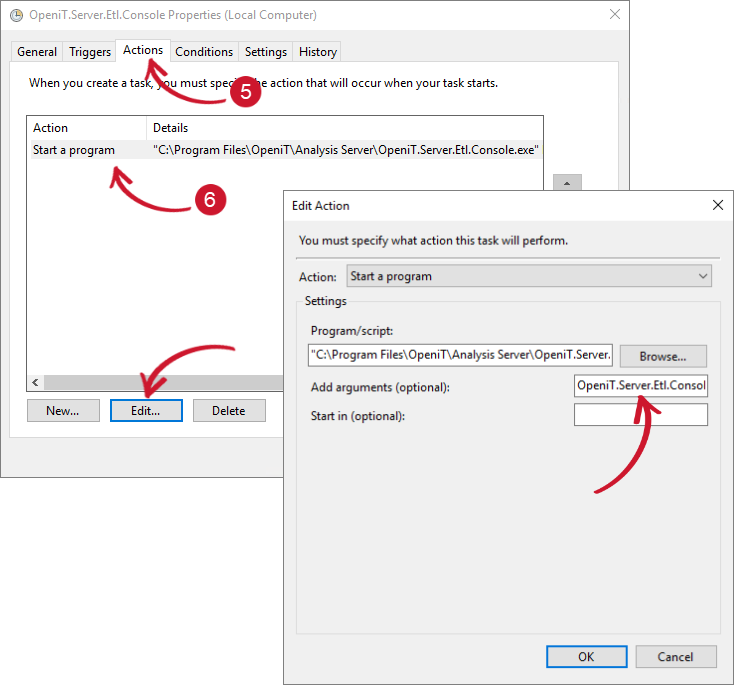
Click the Actions tab.
 Task Scheduler Library Properties
-
Click Edit and change the argument into:
If including the processing along with the Multidimensional cube, use this command:
ExampleOpeniT.Server.Etl.Console.exe runetl /tabularIf only the tabular model will be processed and not the Multidimensional cube, use this command:
ExampleOpeniT.Server.Etl.Console.exe runetl /tabularonly