SCCM (System Center Configuration Manager) Data Collection Configuration
Open iT supports collecting data from Microsoft System Center Configuration Manager for reporting and analysis. It integrates with the SCCM SQL Server database to extract data and push it to the Open iT SQL Server database using SQL Server Integration Services (SSIS).
This document provides information on how to set up the integration with SCCM.
Requirements
- An installed Open iT Analysis Server
- Administrator account for SSIS connection
- Analysis Server Service Account registered in the SQL Server where the SSCM database resides with connect and read access
This assumes that you have Analysis Server installed and configured properly.
Integration
To integrate, follow these instructions sequentially:
- Uploading SSIS Packages. Use these instructions to upload the SSIS packages using SQL Server Management Studio.
- Configuring SSIS Packages. Use these instructions to configure each individual SSIS package with the correct connection string using SQL Server Management Studio.
- Testing the configuration. Use these instructions to test if the configuration is working properly.
- Creating a scheduled job. Use these instructions to create a scheduled job using the SQL Server Agent.
- Testing the scheduled job. Use these instructions to test if the created scheduled job is working fine.
Uploading SSIS Packages through SSMS
The integration is orchestrated by the SQL Server Integration Services (SSIS). It includes the extraction of data from the SQL Server database of SCCM and pushing it to the Analysis Server SQL Server database to be included in its daily processing.
To upload the projects, follow these instructions:
-
Open SSMS as Administrator, and connect to the server where the Open iT database is hosted.
NOTEIt is required to run as an Administrator since SQL Server Integration Services only allows an Administrator account to access its service.
-
Once connected, right-click Integration Services Catalogs folder. Choose Create Catalog.
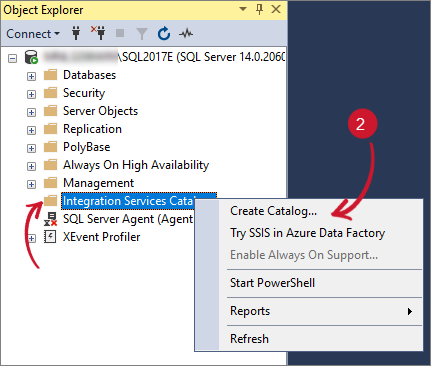 Creating Catalog in SSIS
-
The Catalog Creation Wizard will appear. Click Enable CLR Integration.
-
Provide the Password and leave the other values as default. Click OK.
NOTEMake sure to secure a copy of the Password.
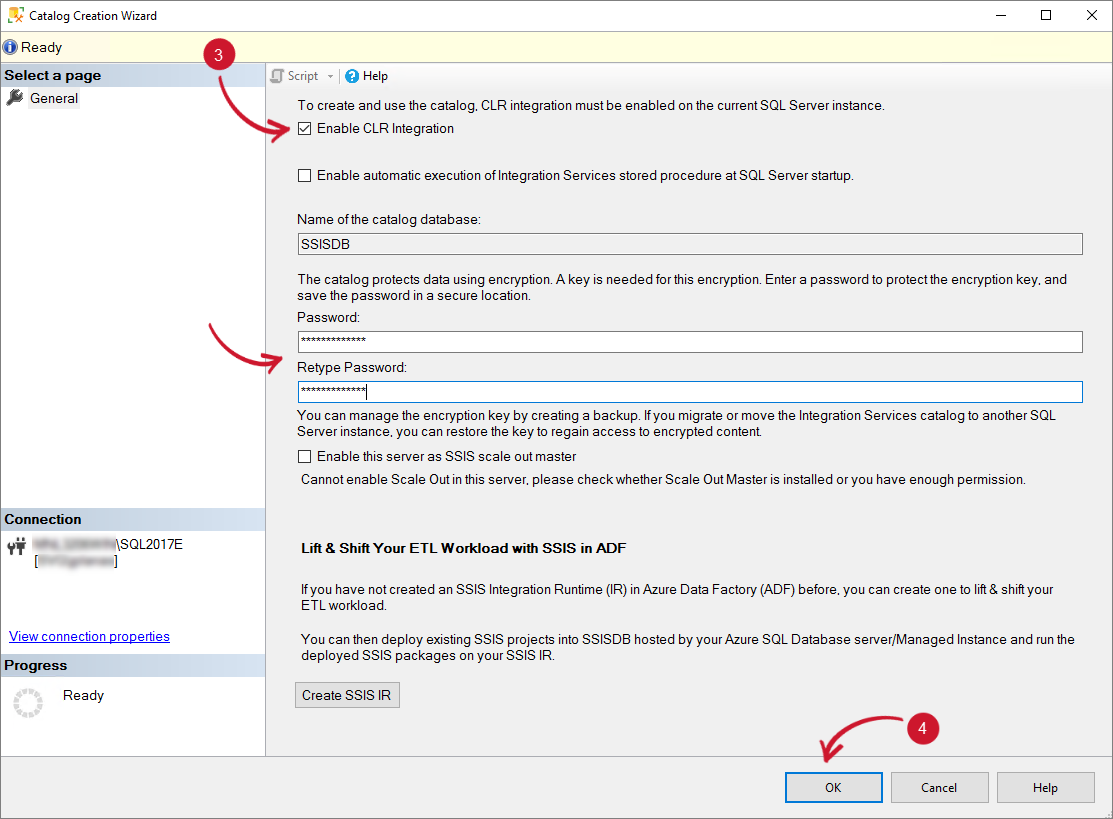 Catalog Creation Wizard
-
Wait until the process is finished. The SSISDB will be created. Right-click the SSISDB and choose Create Folder.
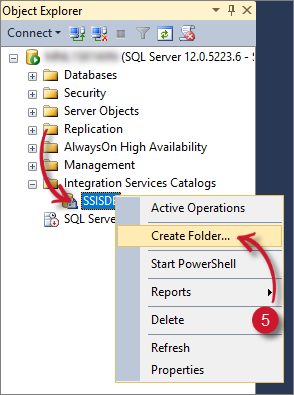 Creating Catalog Folder in SSIS
-
Name the folder as SCCM. Click OK.
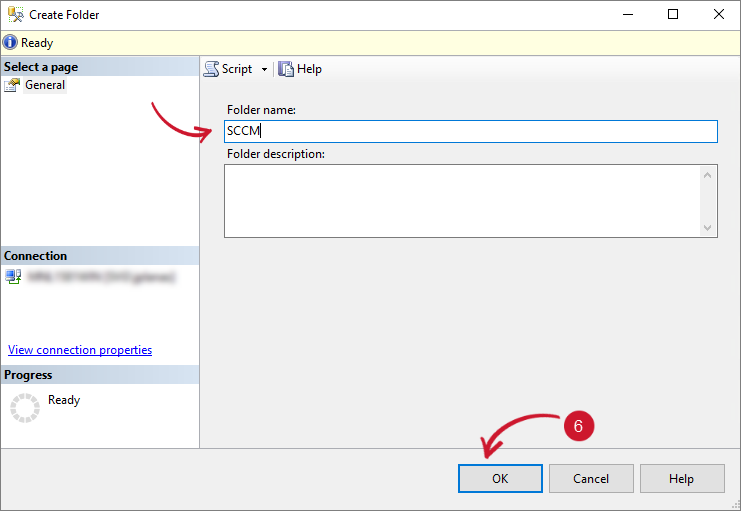 Catalog Name in SSIS
-
Expand the SCCM folder, and it should contain the Projects folder. Right-click the Projects folder and choose Import Packages.
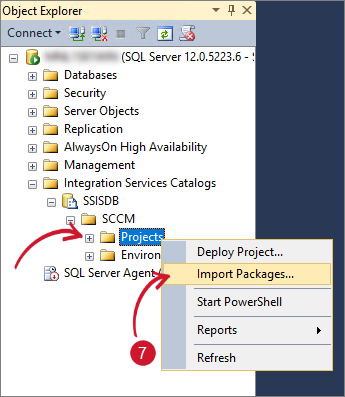 Import Packages in SSIS
-
The Integration Services Project Conversion dialog will appear. Click Next.
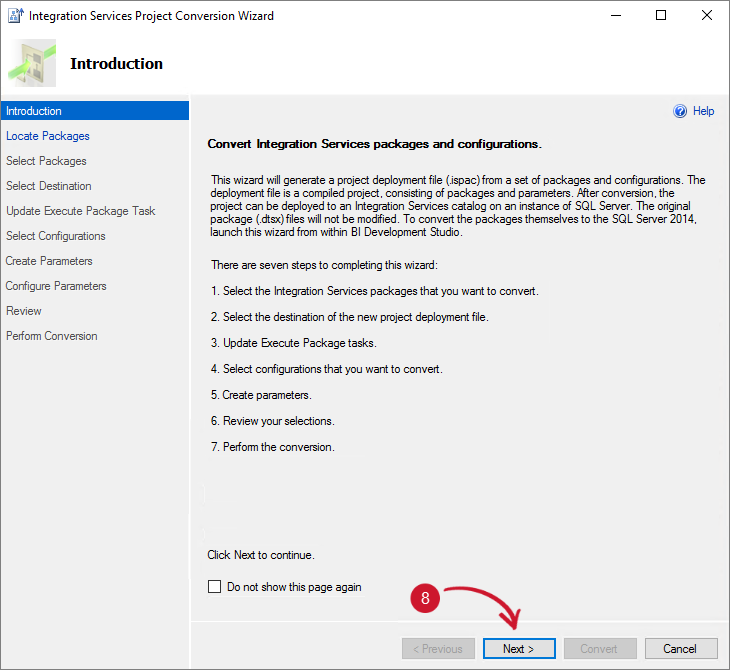 Integration Services Project Conversion
-
In the Folder option, browse in the Analysis Server SSIS packages directory. This is commonly located at
C:\Program Files\OpeniT\Analysis Server\SSIS. Then, click OK and Next to proceed.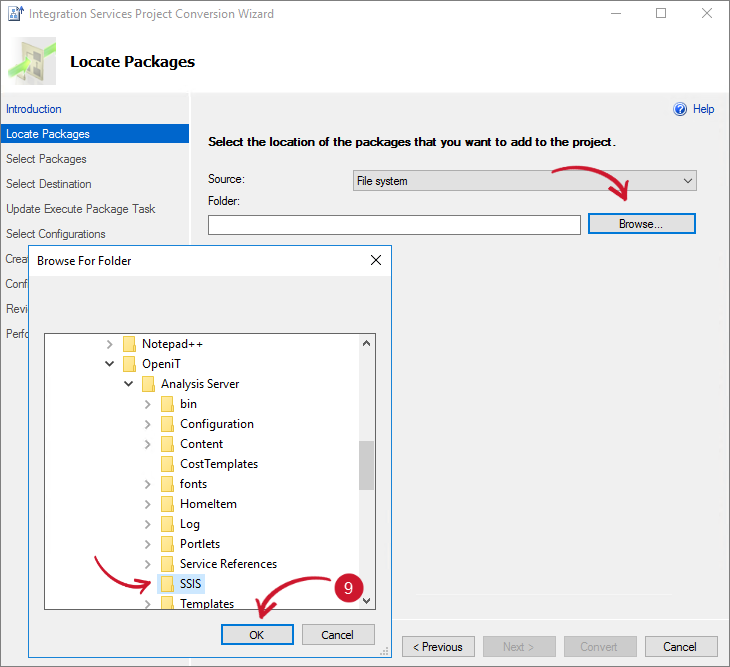 Analysis Server SSIS Packages Directory
-
Select all available packages.
MergeFileUsageSummaryData_v_1_1.dtsxMergeMeteredData_v1_1.dtsx
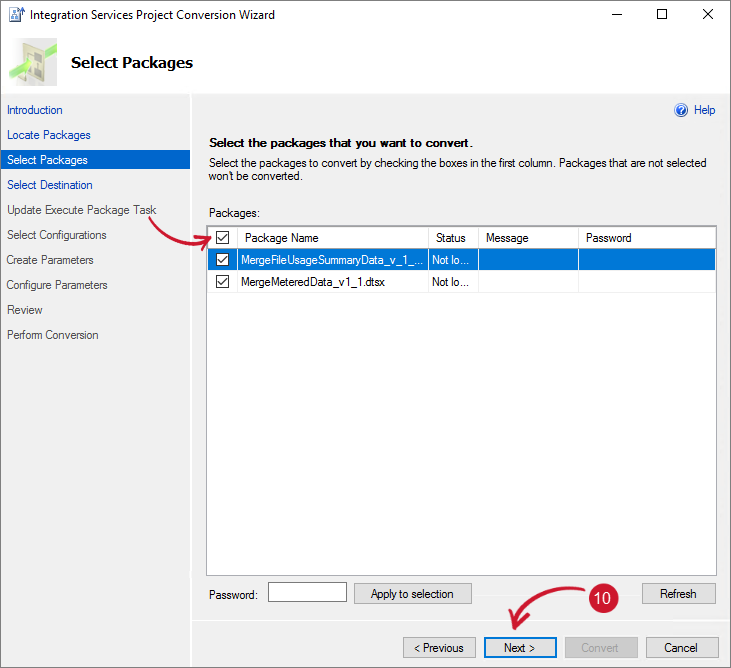 Analysis Server SSIS Packages
Click Next.
-
Name the project as SCCMtoOpeniT, and set the Protection Level to DontSaveSensitive. Click Next and skip the Update Execute Package Task.
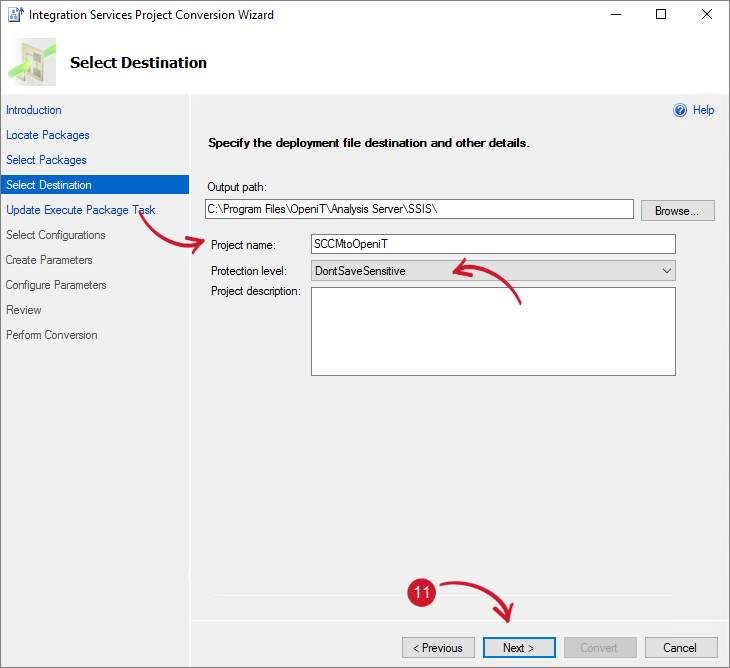 ASCCM Data Collection Project Name
-
Do not select anything in the Select Configurations option, and skip Create Parameters and Configure Parameters dialogs. Click Next.
-
Review the selections and click Convert.
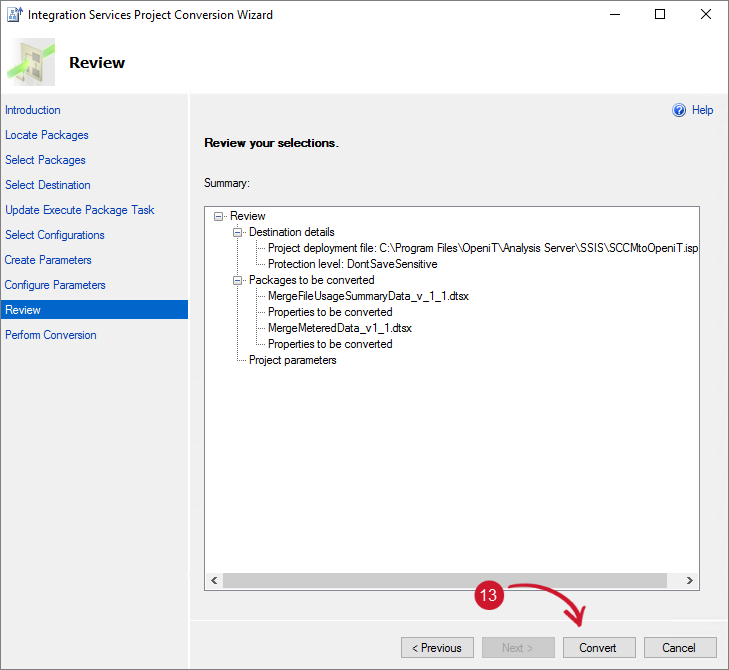 Review Selections
-
Wait until all the processes are successful. Click Close.
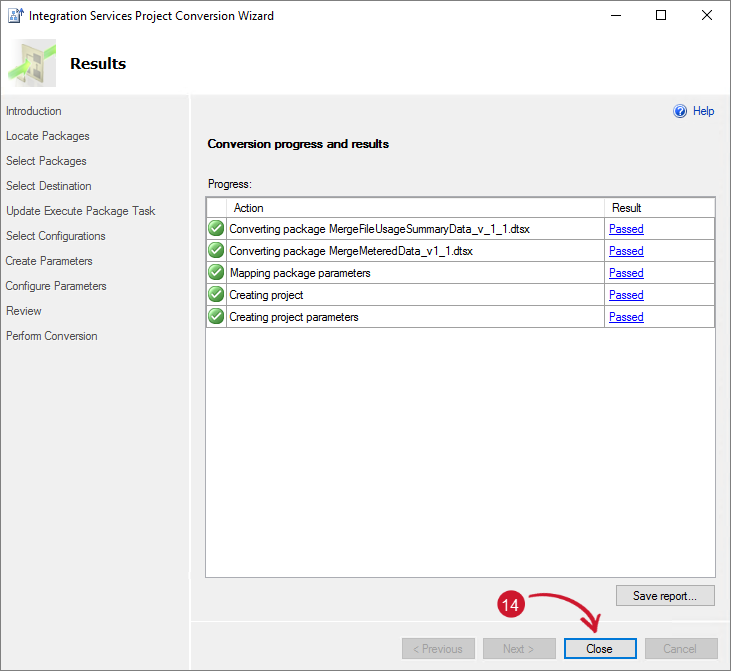 Project Creation Results
-
The Integration Services Deployment Wizard will appear. Click Next.
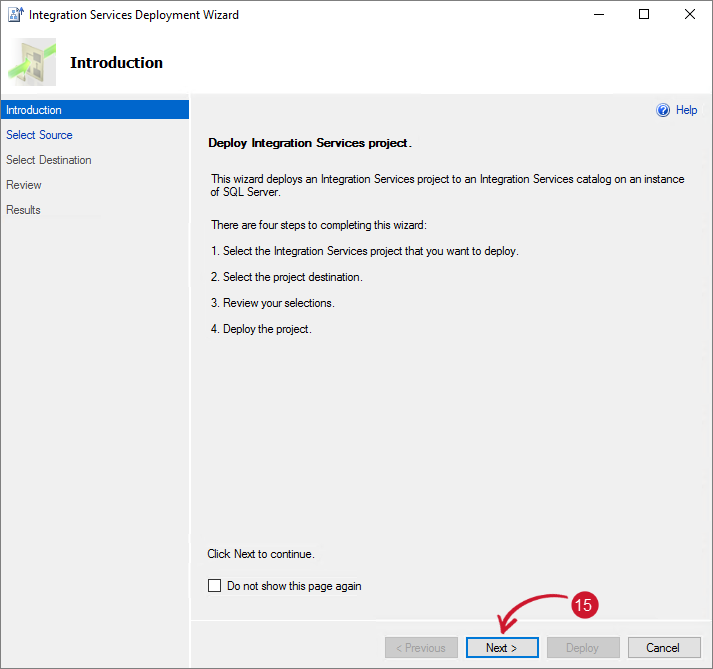 Integration Services Deployment Wizard
-
In the Select Deployment Target, choose SSIS in SQL Server. Click Next.
NOTEIf this dialog does not appear, please proceed to the next step.
-
In the Select Destination dialog, provide the Server Name where to deploy the project.
NOTEIn some instances, you must click a Connect button before you can proceed. If this is not applicable, please proceed to the next step.
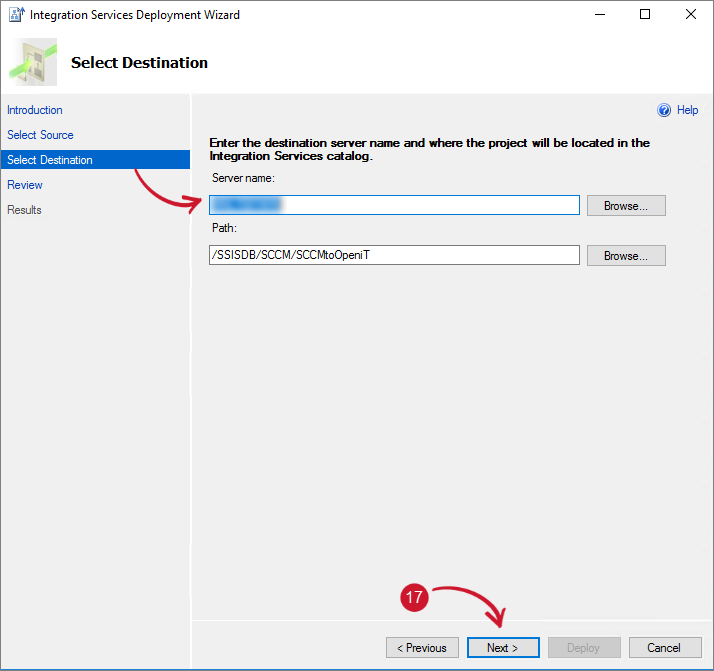 Integration Services Deployment Destination
Click Next.
-
Review the selections and click Deploy.
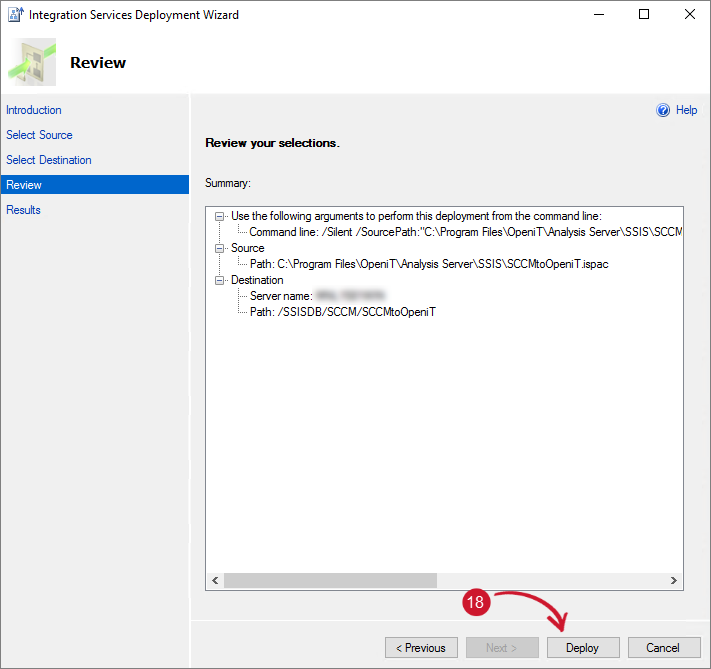 Review Integration Services Deployment
-
Wait until all the processes are successful. Once done, click Close.
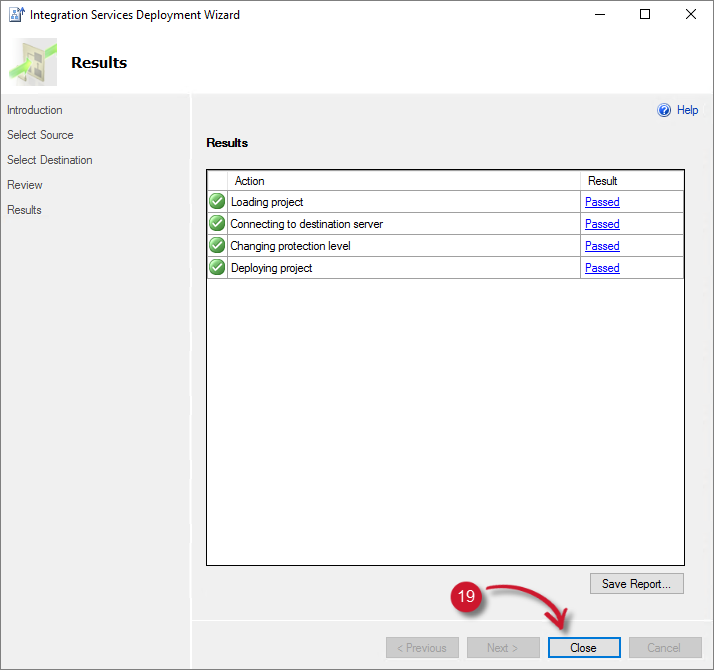 Integration Services Deployment Results
-
Refresh the Projects folder, and the SCCMtoOpeniT project should appear. Expand the SCCMtoOpeniT > Packages, and it should contain the two packages.
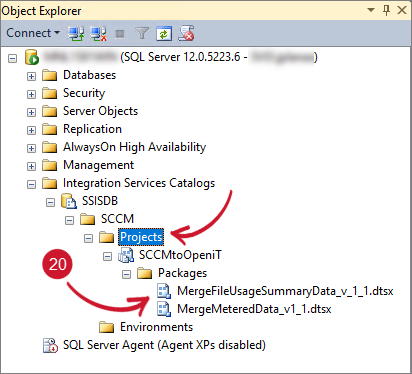 Integration Services Project
Configuring SSIS Packages through SSMS
A manual configuration is necessary to successfully set up the integration. This includes configuring of the connection strings and user accounts for database connection.
To configure the packages, follow these instructions:
-
Open SSMS running as Administrator, and connect to the server where the Open iT database is hosted.
NOTEIt is required to run as an Administrator since SQL Server Integration Services only allows an Administrator account to access its service.
-
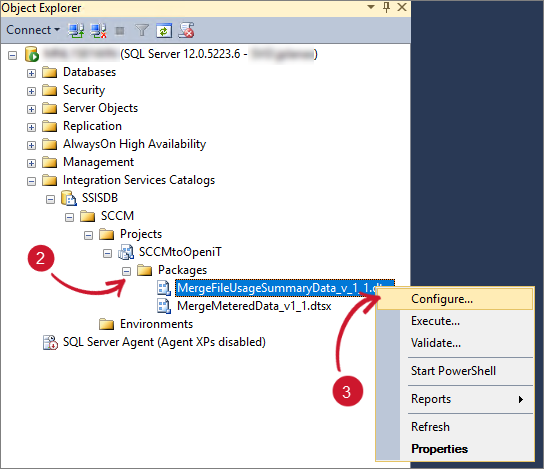
Once connected, expand Integrated Services Catalogs > SSISDB > Projects > SCCMtoOpeniT > Packages.
-
Right-click the package MergeFileUsageSummaryData_v_1_1.dtsx and choose Configure.
 Integrated Services Catalog Project
-
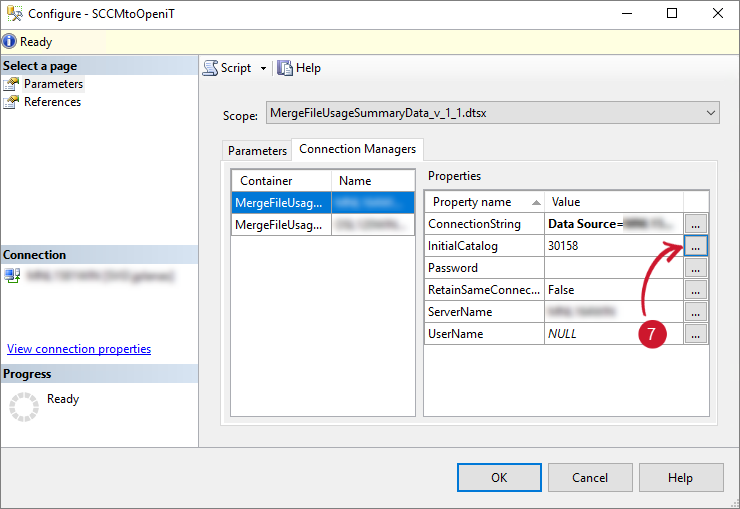
Go to the Connection Managers tab. Click the first container and configure the ConnectionString by clicking the ellipsis (...) button.
 Configuring SSIS Package - ConnectionString
-
The Set Parameter Value dialog will appear. Click the Edit value option. Copy the current connection string and paste it to the enabled text area.
-
Modify the following:
- Data Source - server name where Open iT database resides (e.g., Data Source=WIN-HOST04)
- Initial Catalog - database name used for Open iT (e.g., Initial Catalog=OpeniT)
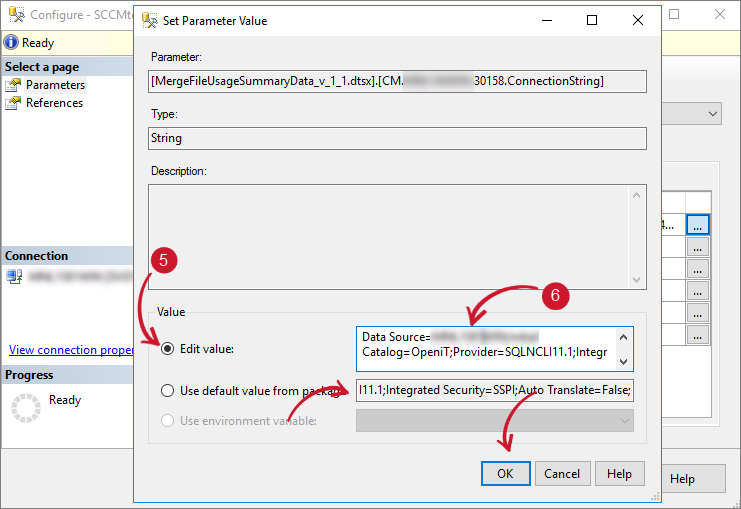 Configuring SSIS Package - Edit ConnectionString
Click OK.
-
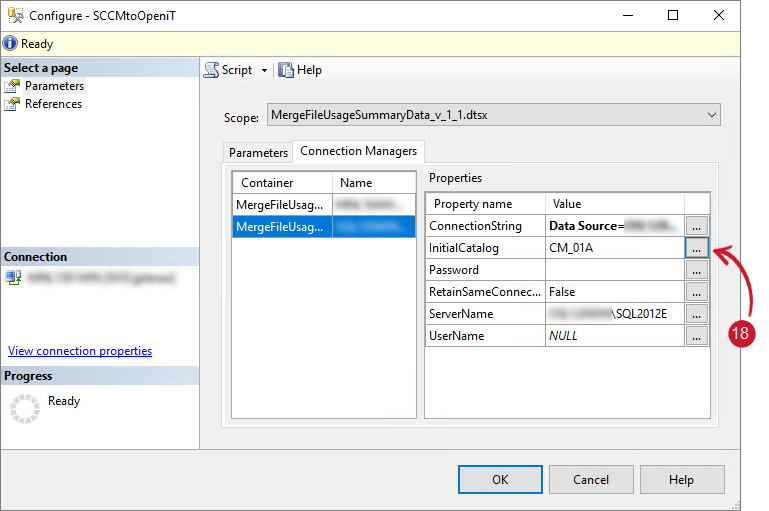
Click the ellipsis (...) button beside InitialCatalog.
 Configuring SSIS Package - Initial Catalog
-
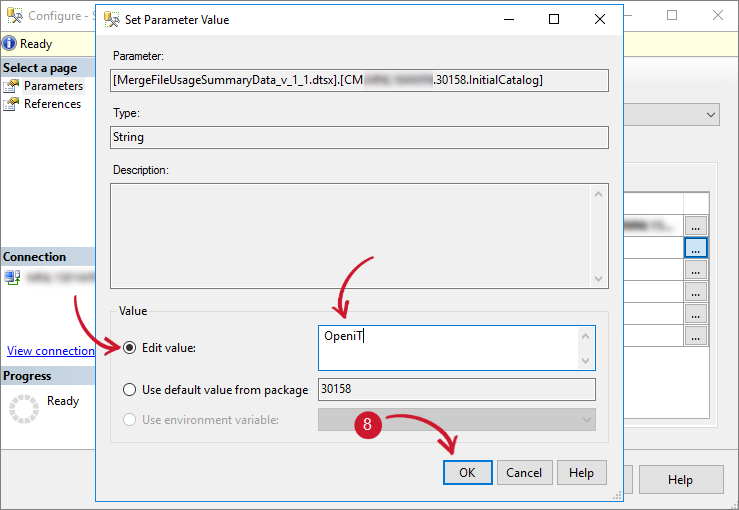
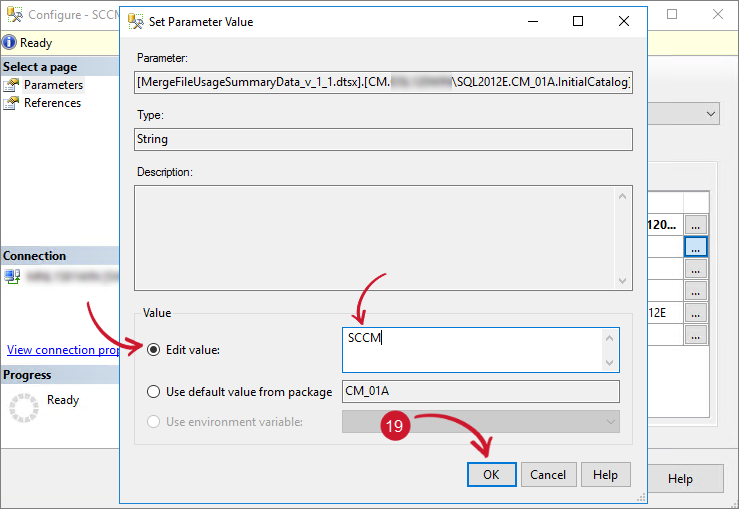
The Set Parameter Value dialog will appear. Click Edit Value and provide the database name of Open iT. Click OK.
 Configuring SSIS Package - Edit Initial Catalog
-
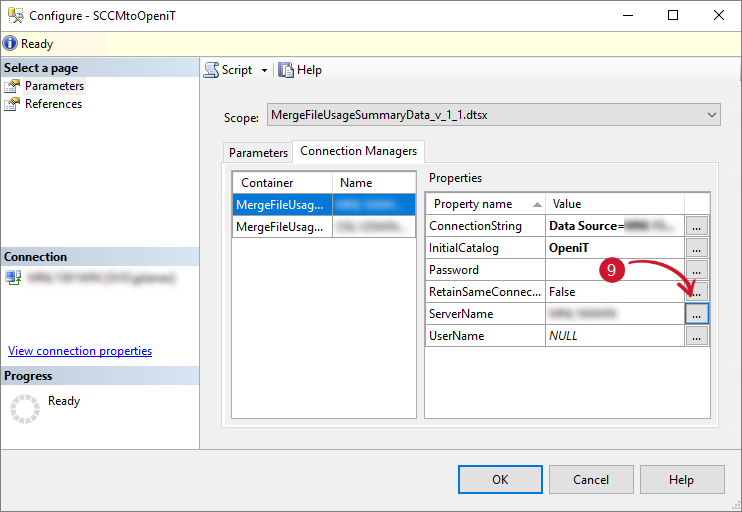
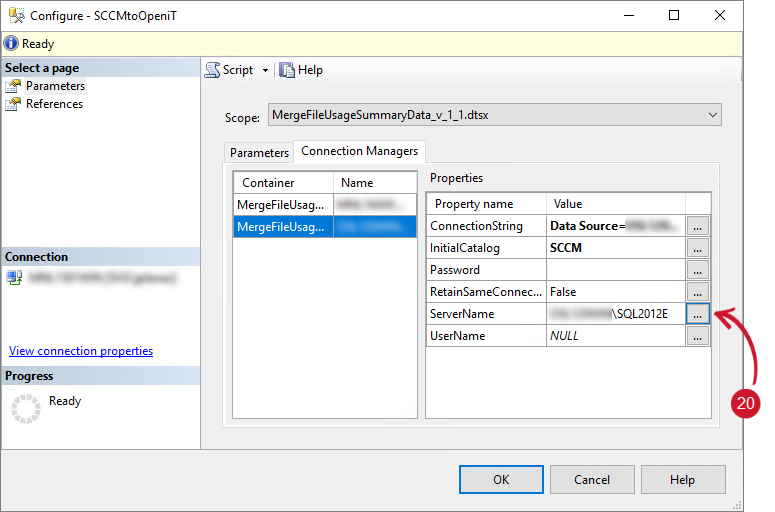
Click the ellipsis (...) button beside ServerName.
 Configuring SSIS Package - Server Name
-
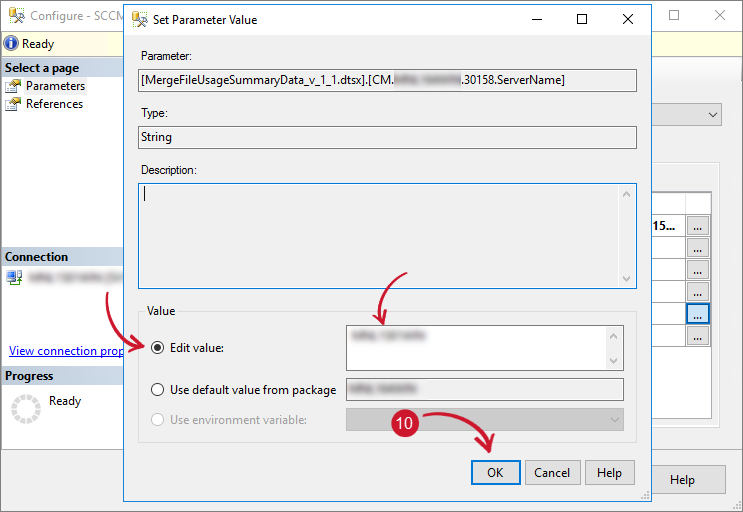
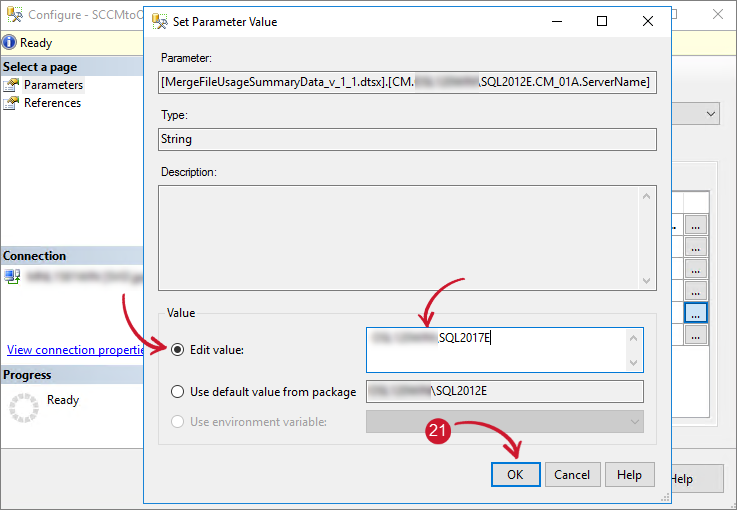
The Set Parameter Value dialog will appear. Click Edit Value and provide the server name where the Open iT database resides. Click OK.
 Configuring SSIS Package - Edit Server Name
-
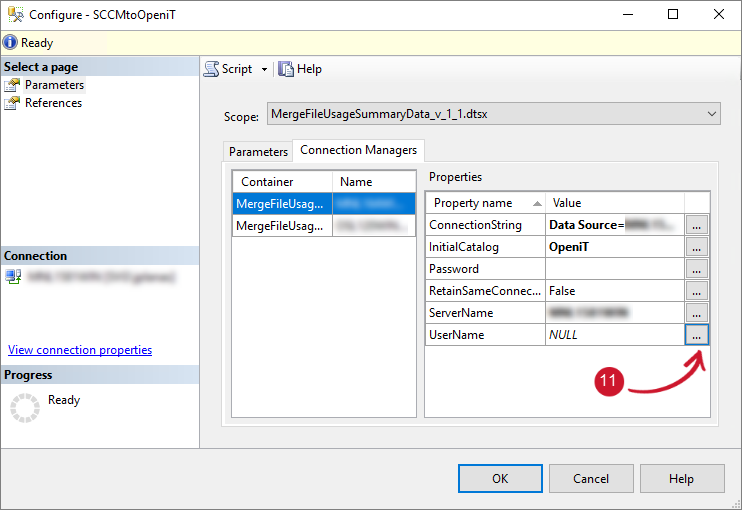
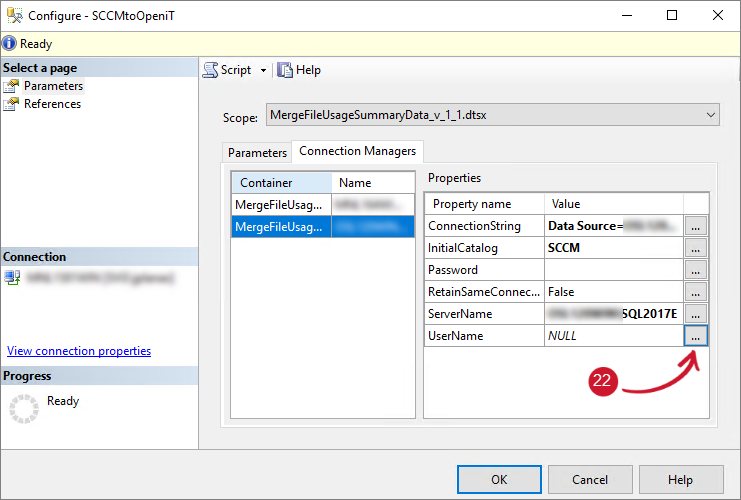
Click the ellipsis (...) button beside UserName.
 Configuring SSIS Package - User Name
-
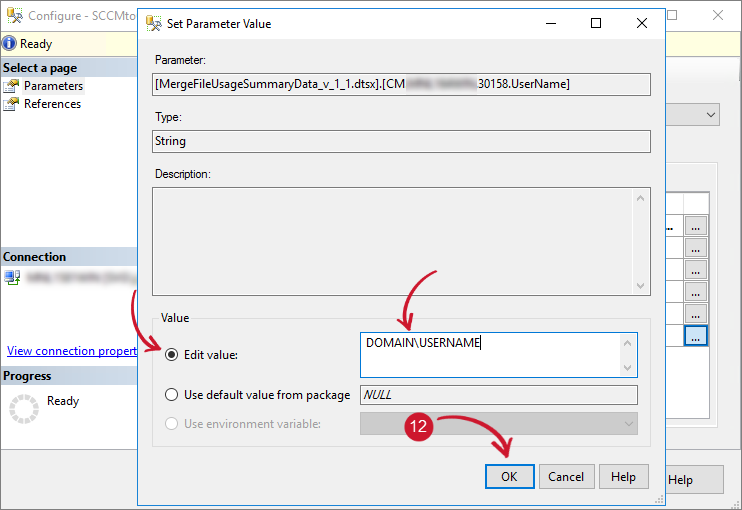
The Set Parameter Value dialog will appear. Click Edit Value and provide the Analysis Server Service Account username. Click OK.
 Configuring SSIS Package - Edit User Name
-
Click the ellipsis (...) button beside Password.
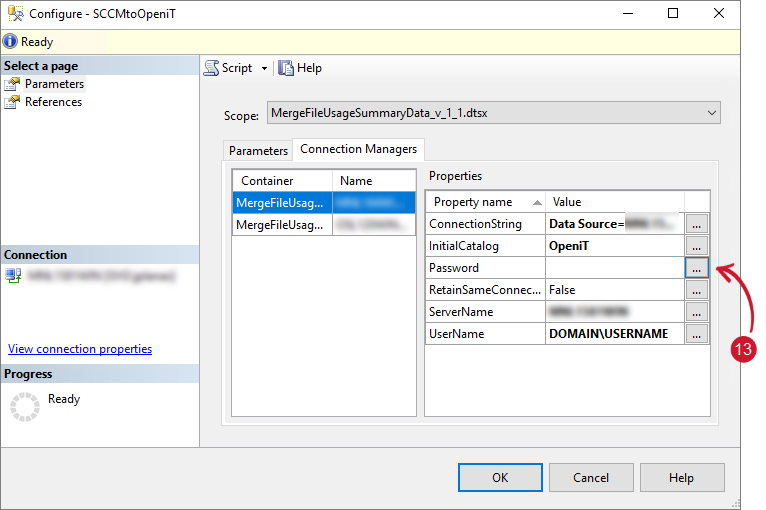 Configuring SSIS Package - Password
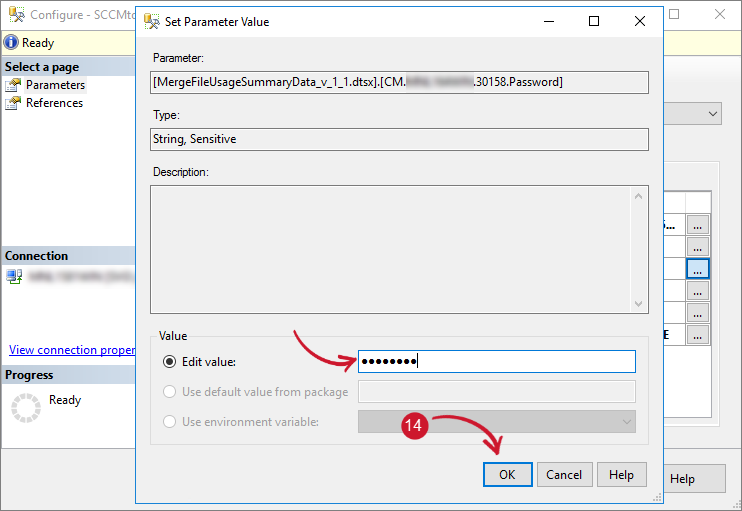
-
The Set Parameter Value dialog will appear. Click Edit Value and provide the Analysis Server Service Account password. Click OK.
 Configuring SSIS Package - Edit Password
-
Click the second container and configure the ConnectionString. Click the ellipsis (...) button.
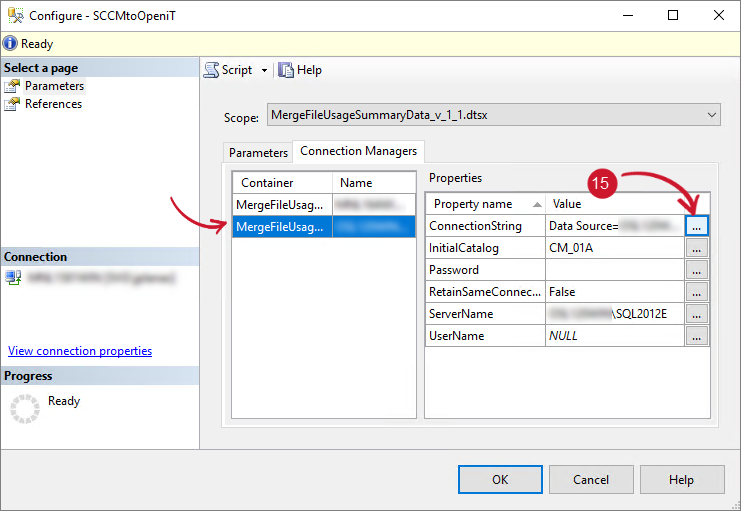 Configuring SSIS Package - SCCM ConnectionString
-
The Set Parameter Value dialog will appear. Click the Edit value option. Copy the current connection string and paste it to the enabled text area.
-
Modify the following:
- Data Source - server name where SCCM database resides (e.g., Data Source=WIN-HOST04)
- Initial Catalog - database name of SCCM (e.g., Initial Catalog=SCCM)
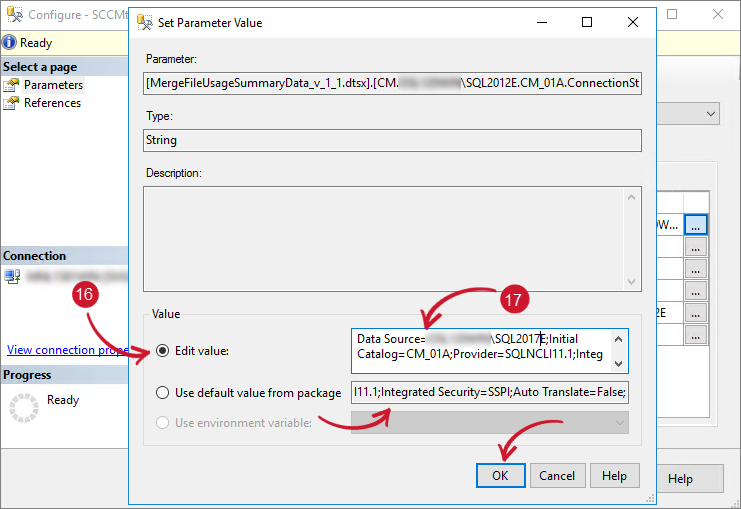 Configuring SSIS Package - Edit SCCM ConnectionString
Click OK.
-
Click the ellipsis (...) button beside Initial Catalog.
 Configuring SSIS Package - SCCM Initial Catalog
-
The Set Parameter Value dialog will appear. Click Edit Value and provide the database name of SCCM. Click OK.
 Configuring SSIS Package - Edit SCCM Initial Catalog
-
Click the ellipsis (...) button beside ServerName.
 Configuring SSIS Package - Server Name
-
The Set Parameter Value dialog will appear. Click Edit Value and provide the server name where the SCCM database resides. Click OK.
 Configuring SSIS Package - Edit Server Name
-
Click the ellipsis (...) button beside UserName.
 Configuring SSIS Package - SCCM User Name
-
The Set Parameter Value dialog will appear. Click Edit Value and provide the Analysis Server Service Account username. Click OK.
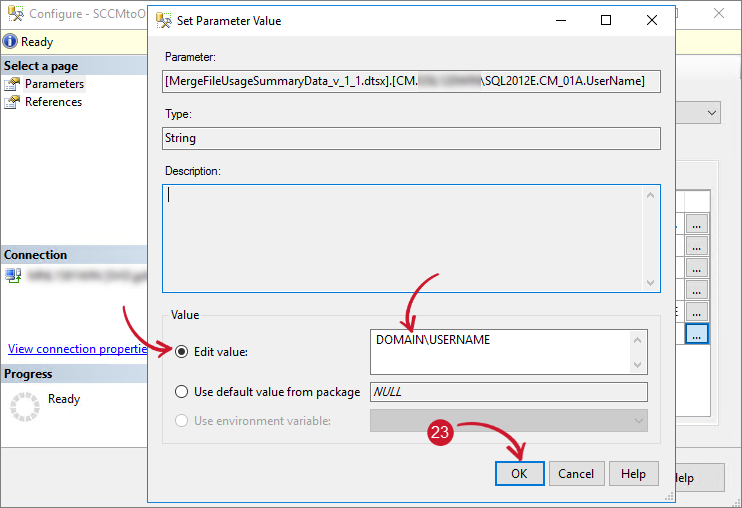 Configuring SSIS Package - Edit SCCM User Name
-
Click the ellipsis (...) button beside Password.
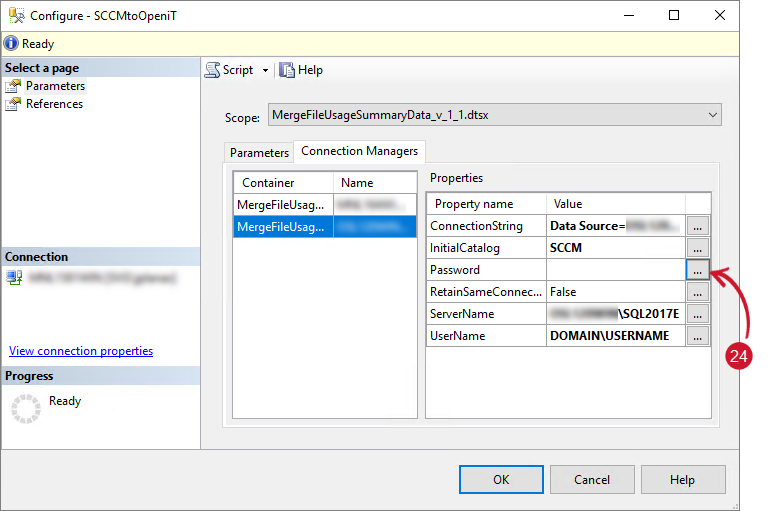 Configuring SSIS Package - SCCM Password
-
The Set Parameter Value dialog will appear. Click Edit Value and provide the Analysis Server Service Account password. Click OK.
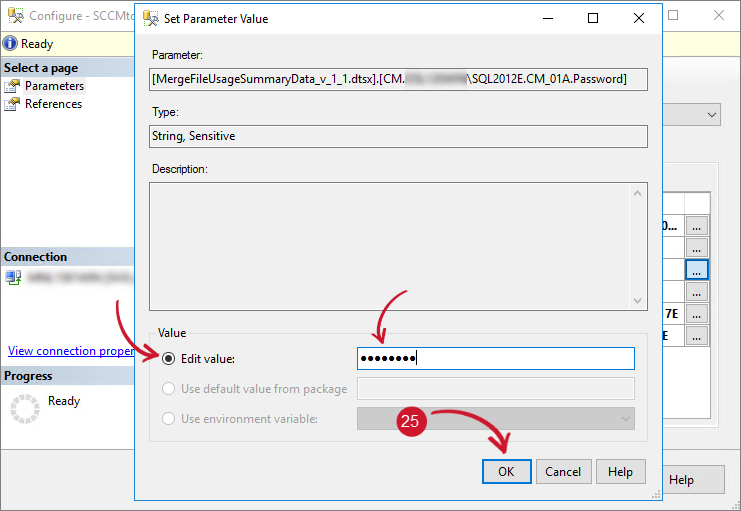 Configuring SSIS Package - Edit SCCM Password
-
Click OK to save the configurations in the package.
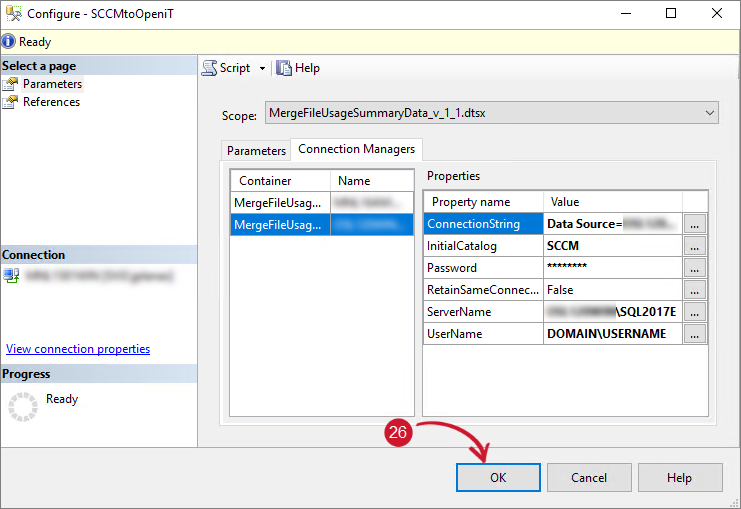 Configuring SSIS Package - Save Changes
NOTEDo these instructions on the other package MergeMeteredData_v1_1.dtsx.
 Configuring SSIS Package
Testing the Configurations
To test if the configurations are working fine, follow these instructions:
-
Open SSMS running as Administrator, and connect to the server where the Open iT database is hosted.
NOTEIt is required to run SSMS as an Administrator since SQL Server Integration Services only allows an Administrator account to access its service.
-
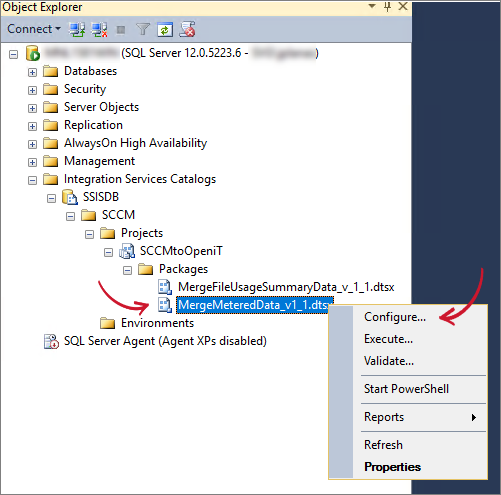
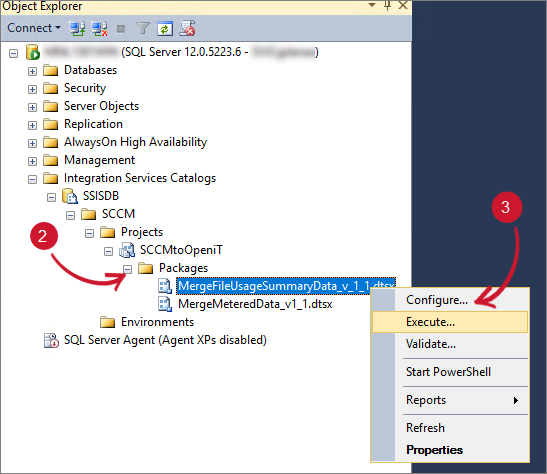
Once connected, expand Integration Services Catalogs > SSISDB > Projects > SCCMtoOpeniT > Packages.
-
Right-click the package MergeFileUsageSummaryData_v_1_1.dtsx. Choose Execute.
 Testing Package Configurations
-
The Execute Package dialog will appear. Click the Connection Managers tab, and review the connection string. Modify if necessary. Click OK.
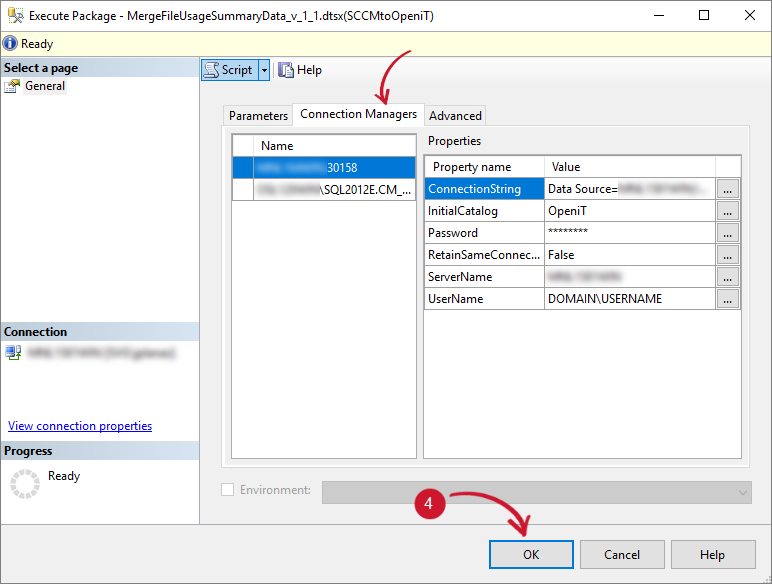 Execute Package
-
Wait until the process is finished. A message prompt will appear, click Yes to open the Overview Report.
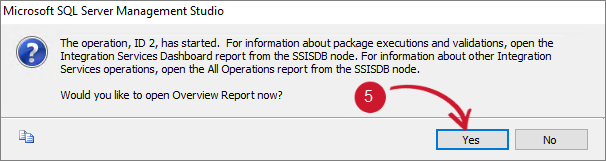 Show Execution Overview Report
-
The Overview Report will appear. Review the Execution Information and see the Status, which can be Failed or Success. More detailed information about the package execution is in the Execution Overview.
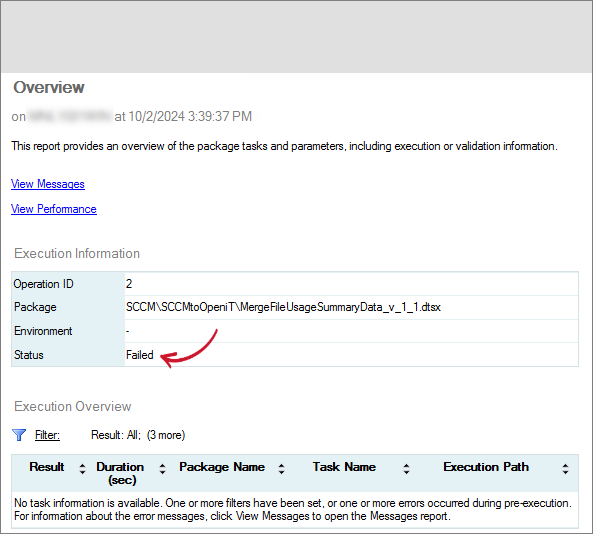 Execution Overview Report
warningDo these instructions on the other package MergeMeteredData_v1_1.dtsx.
 Testing Package Configurations
Creating Scheduled Jobs through SSMS
It is essential to create a scheduled jobs using the SQL Server Agent to automate data extraction daily, ensuring that the data processed by the Analysis Server is up-to-date.
To create a scheduled job, follow these instructions:
-
Open SSMS running as Administrator, and connect to the server where the Open iT database is hosted.
-
Right-click the SQL Server Agent. Click Start. Wait until the status of the service turns active.
-
Expand the SQL Server Agent and right-click the Jobs folder. Choose New Job.
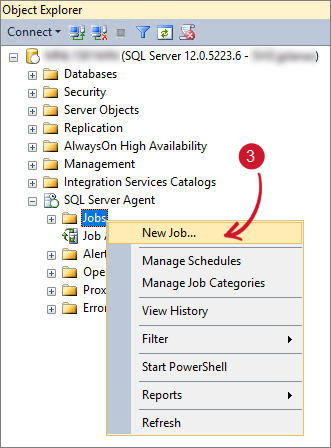 Creating Scheduled Jobs
-
Name the job as SCCMtoOpeniT. Choose Data Collector as Category.
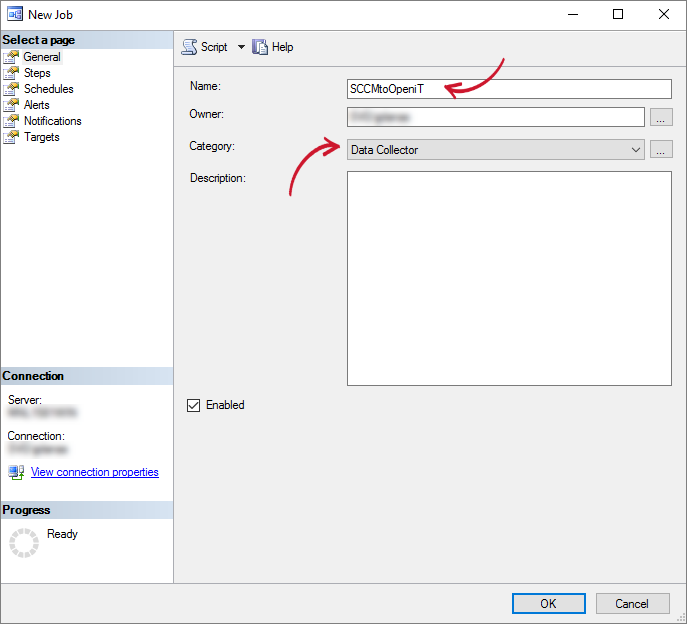 Scheduled Job Details
-
In the left pane, click Steps, then click New.
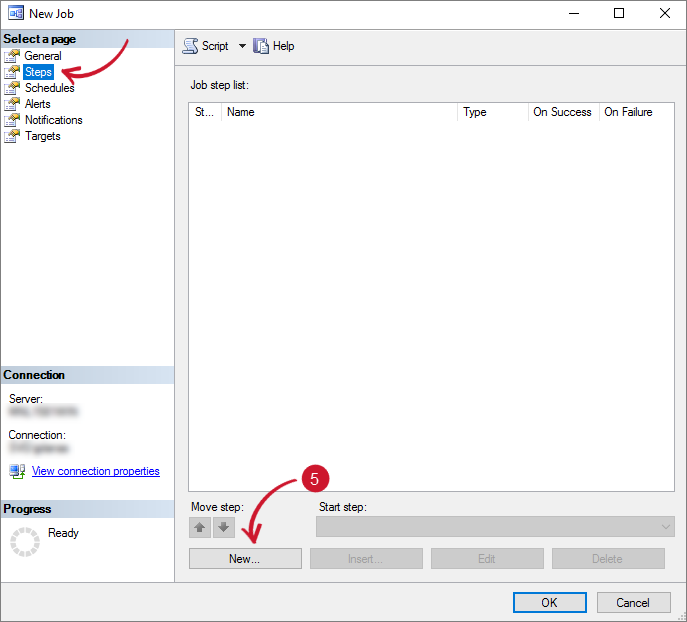 Scheduled Job New Step
-
The New Job Step dialog will appear. Provide the following details:
- Step Name - MergeFileUsageSummaryData
- Type - SQL Server Integration Services Package
- Package source - SSIS Catalogs
- Server - the server name where the SSIS package is uploaded
- Package - browse the package
MergeFileUsageSummaryData_v_1_1.dtsx
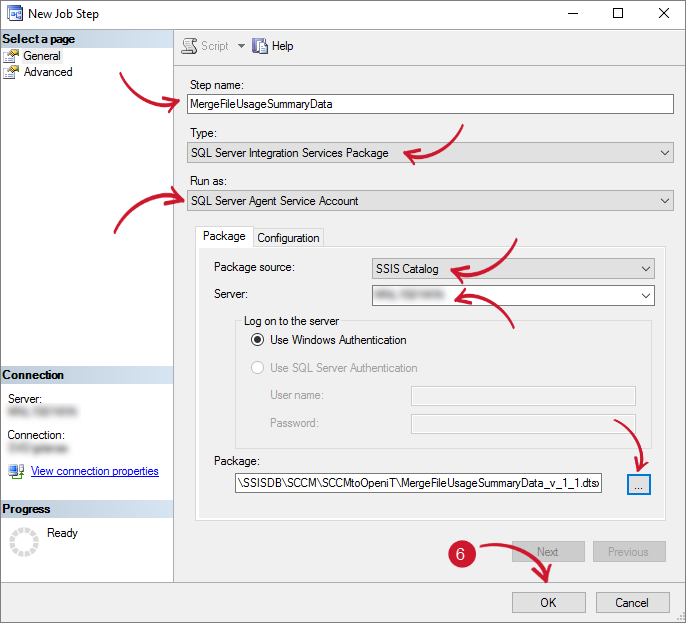 Scheduled Job Steps
Click OK.
-
Click New. The New Job Steps dialog will appear. Provide the following details:
- Step Name - MergeMeteredData
- Type - SQL Server Integration Services Package
- Run as - SQL Server Agent Service Account
- Package source - SSIS Catalogs
- Server - the server name where the SSIS package is uploaded
- Package - browse the package
MergeMeteredData_v1_1.dtsx
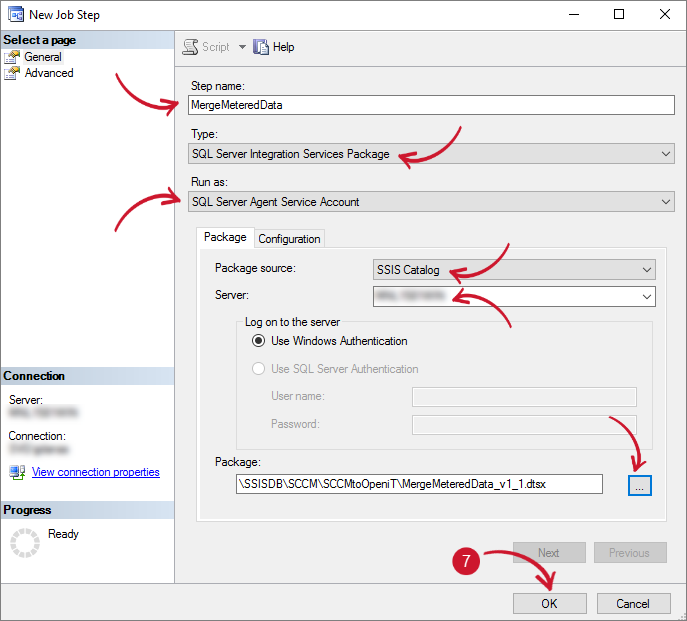 Scheduled Job Steps
Click OK.
-
In the left pane, click Schedules, then click New.
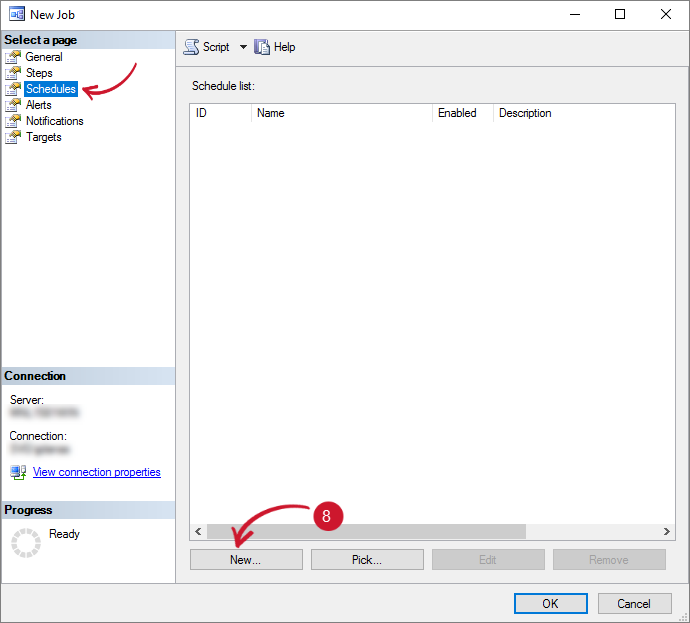 Scheduled Job Schedule
-
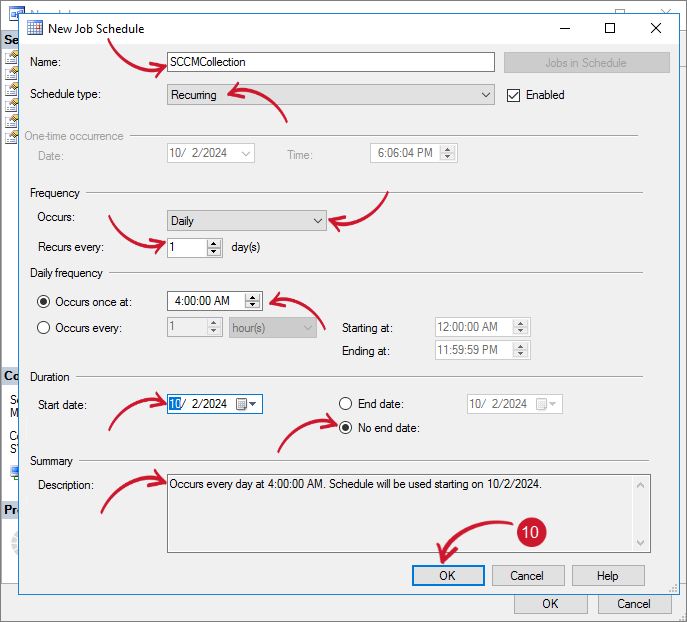
The New Schedule dialog will appear. Provide the following details:
- Name - SCCMCollection
- Schedule Type - Recurring
- Occurs - Daily
- Recurs every - 1 day
- Occurs once at - 4:00 AM
- Start Date - today
- End Date - No end date
warningThe job schedule should be before the daily execution of the Analysis Server ETL process. Please adjust accordingly.
Make sure that the SQL Server Agent service account has access to the SCCM server and database.
-
Review the Summary at the bottom of the dialog. Click OK.
 Scheduled Job Schedule Frequency
-
Click OK to save the configurations.
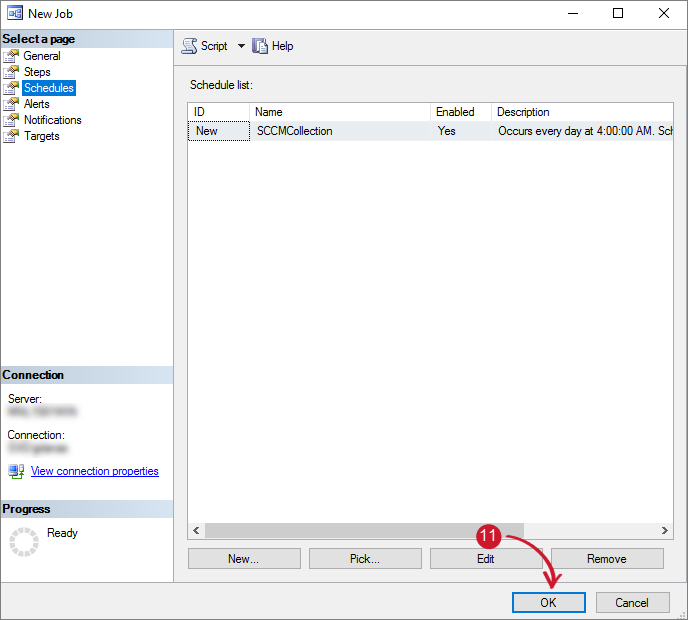 Save Scheduled Job Schedule
Testing the Scheduled Jobs
To make sure that the configured scheduled jobs are working fine, follow these instructions to test:
-
Open SSMS running as Administrator, and connect to the server where the Open iT database is hosted.
-
Expand the SQL Server Agent > Jobs and right-click the job SCCMtoOpeniT. Choose Start Job at Step.
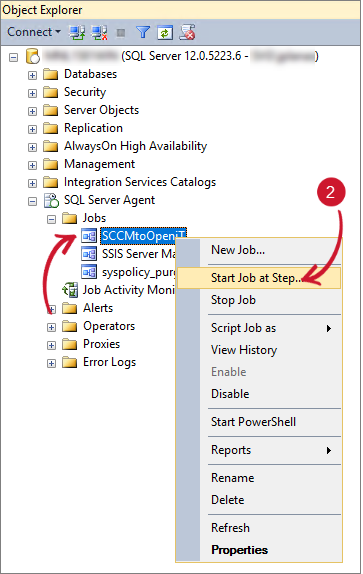 Testing the Scheduled Job
-
The Start Job dialog will appear. Click Start.
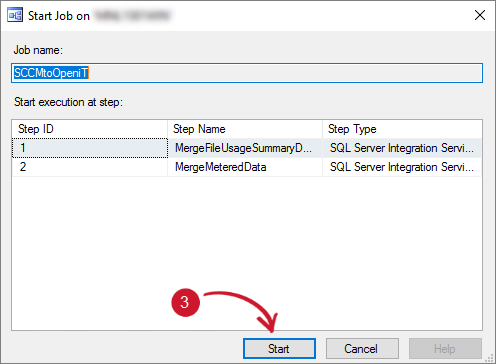 Start the Scheduled Job
-
Wait until the process succeeds. If the process fail, follow the instructions in the section Viewing the History Logs.
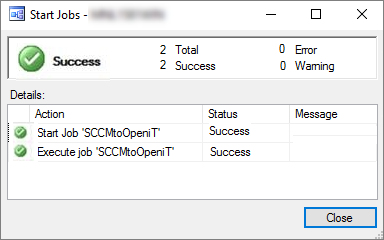 Scheduled Job Results
Viewing the History Logs
There will be times the job will fail. To see the history logs, follow these instructions:
-
Open SSMS running as Administrator, and connect to the server where the Open iT database is hosted.
-
Expand the SQL Server Agent > Jobs and right-click the job SCCMtoOpeniT. Choose View history.
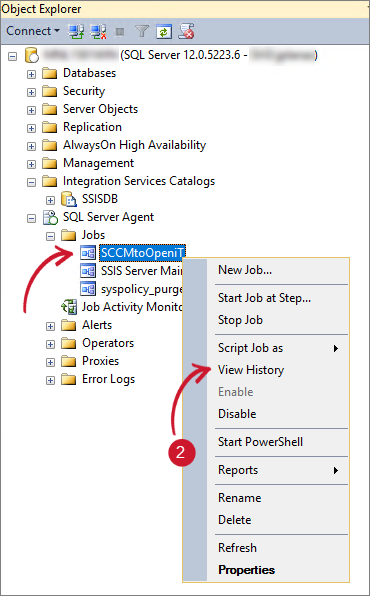 Viewing the History Logs
-
The Log File Viewer will appear. Under the list of Log File Summary, click an item to review the details.
-
Review details at the bottom of the dialog. Use the details to learn more about the execution.
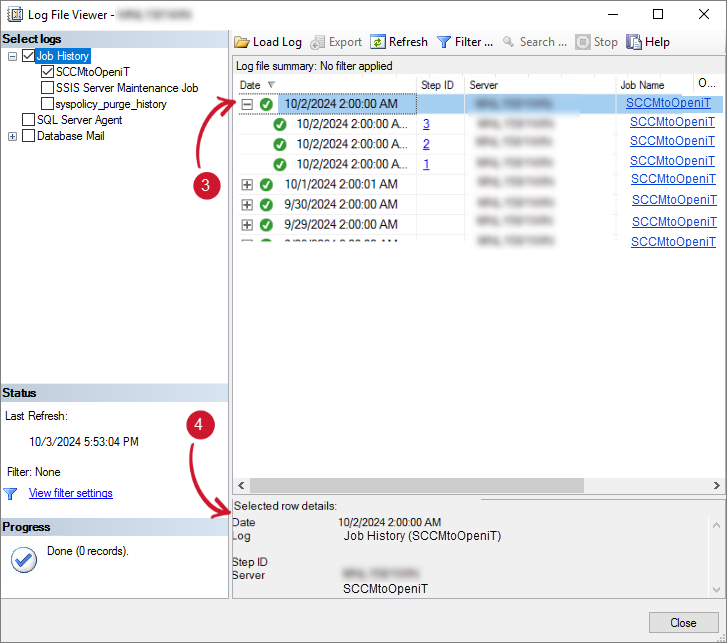 History Logs Details
Reporting SCCM Data in Analysis Server
Use these instructions to report the collected SCCM data in Analysis Server for analysis and inventory.
Application Level Report
To report, follow these instructions:
-
Open the Analysis Server web interface and navigate to the Analysis Page.
-
In the Pivot Field List, expand Measures.
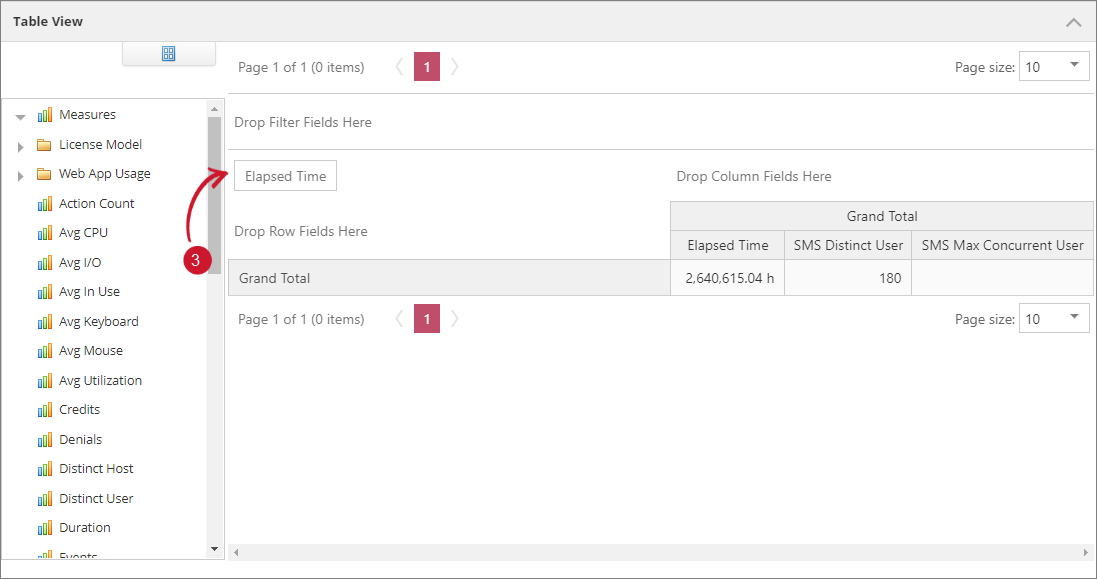
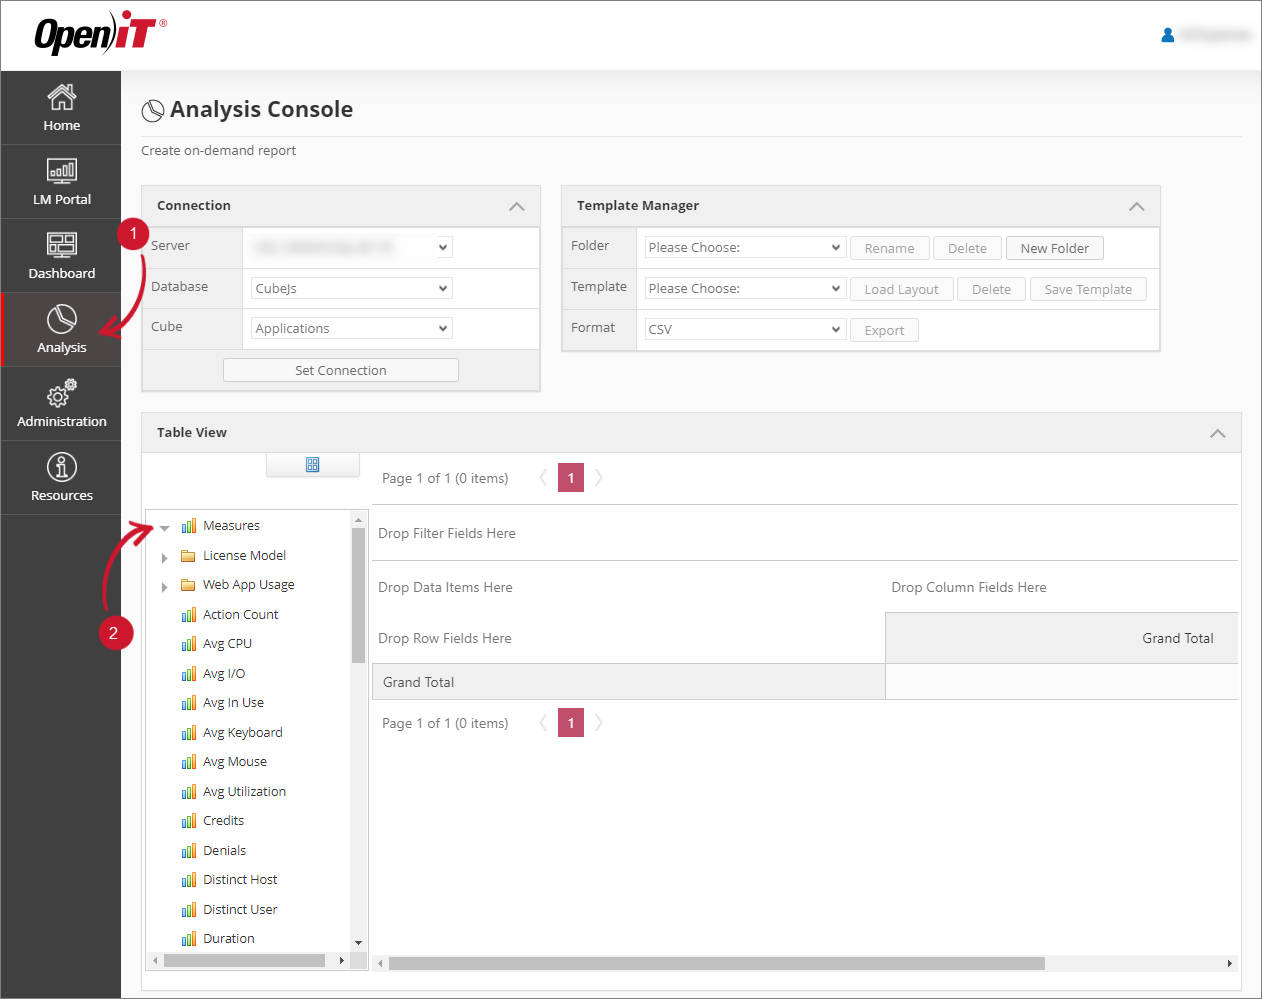 Report Table View
-
In the Pivot Field List, drag and drop Elapsed Time, SMS Distinct User, and SMS Max Concurrent User (one-by-one) into the Pivot Table (Drop Data Items Here).
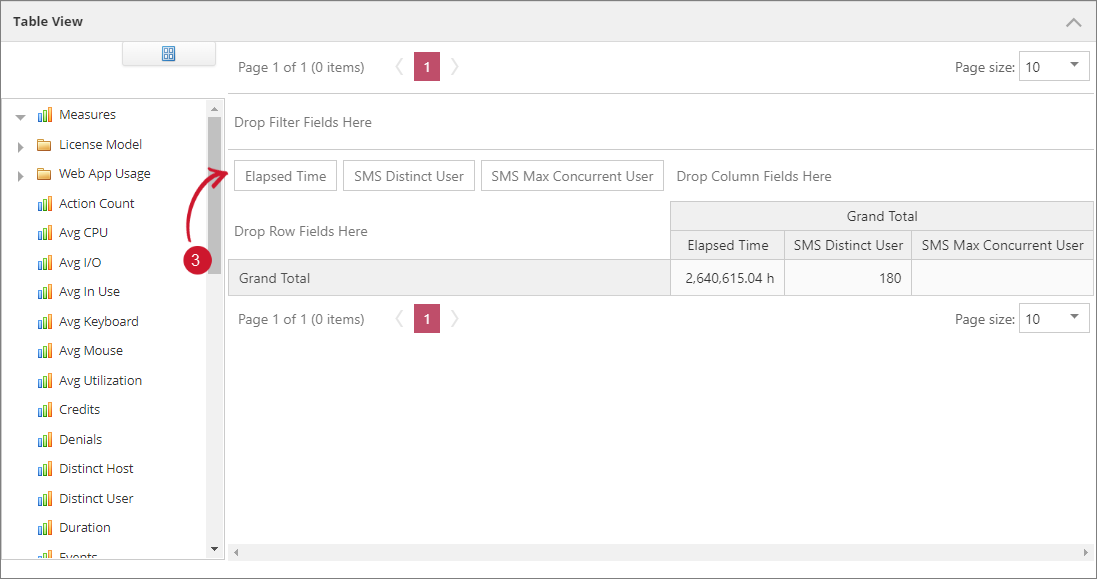 Report Measures
-
In the Pivot Field List, expand the Application dimension. Drag and drop the Application Hierarchy in the Pivot Table (Drop Rows Fields Here).
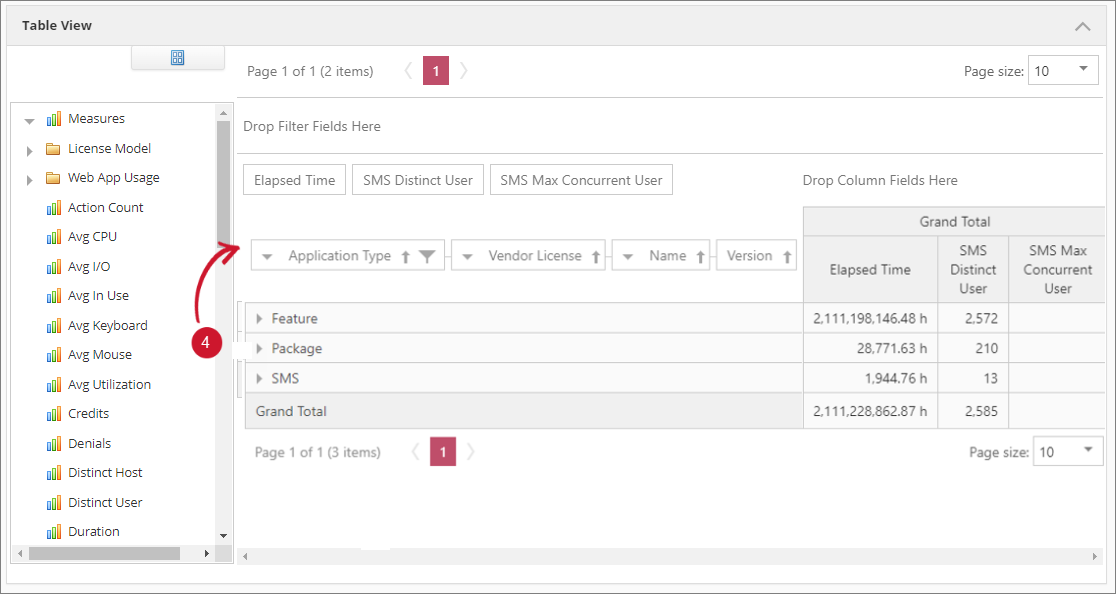 Report Applications
-
In the Pivot Field List, drag and drop the Application Type in the Pivot Table (Drop Filter Fields Here).
-
Filter the Application Type, choose only SMS, then click OK. This will filter the list of rows in the Pivot Table.
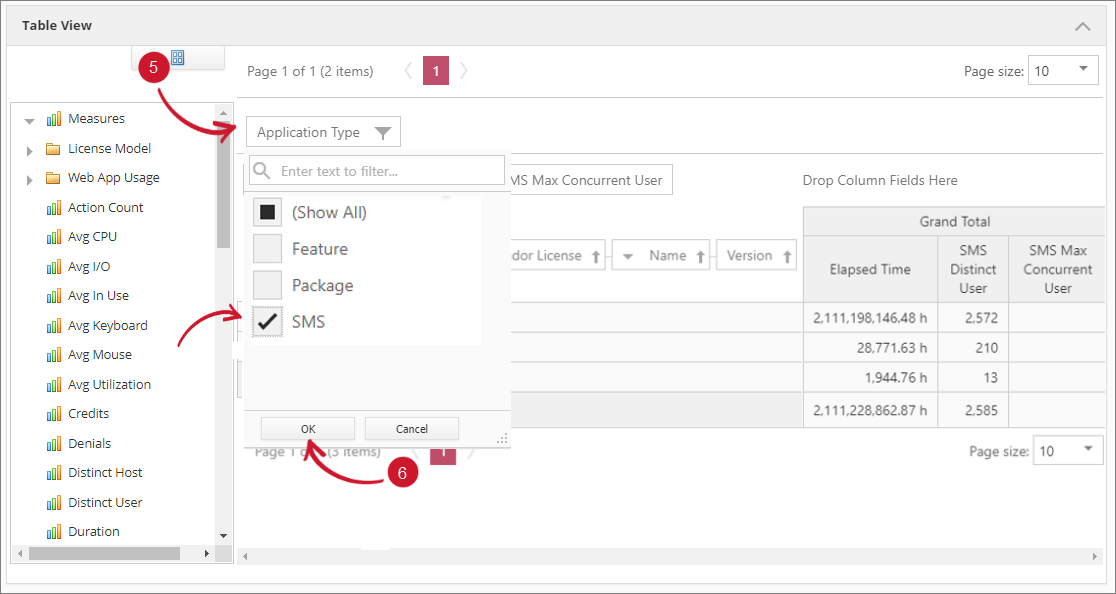 Report Filters
-
Expand the list of data in the Pivot Table. Application Type > Vendor License > Name > Version.
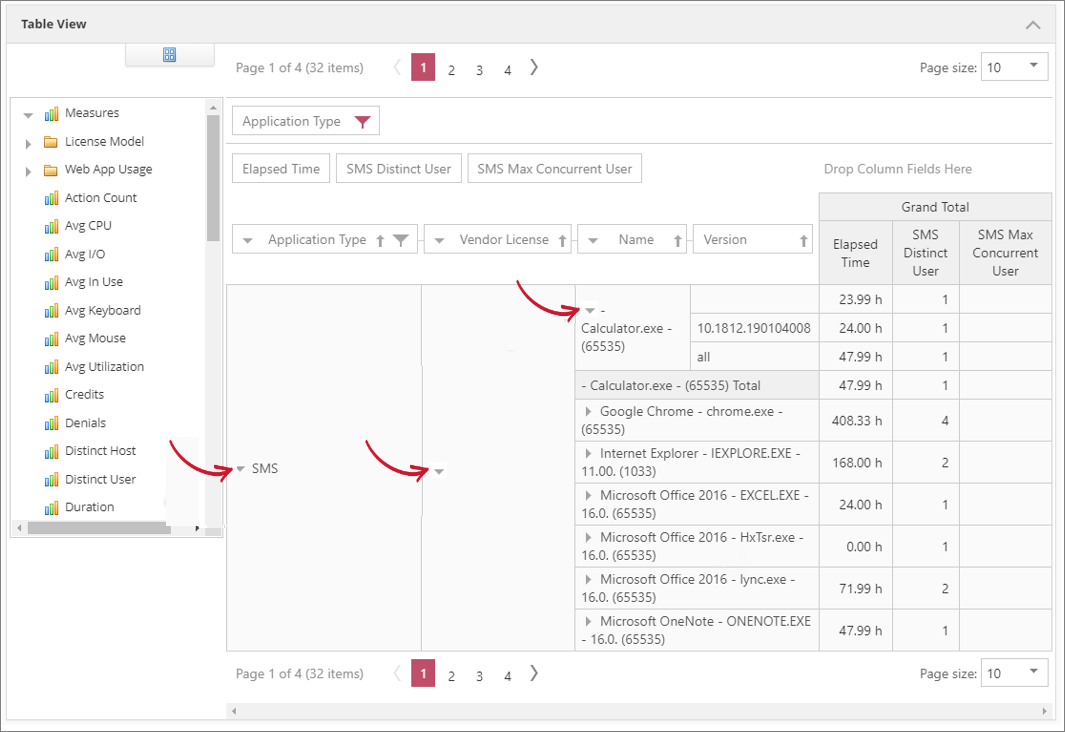 Application Level Report
The report shows how long the application was used and how many distinct users are using a certain application. It also gives details on how the maximum number of concurrent users are using a certain application.
User Level Report
To report, follow these instructions:
-
Open the Analysis Server web interface and navigate to the Analysis Page.
-
In the Pivot Field List, expand Measures.
Report Table View
-
In the Pivot Field List, drag and drop Elapsed Time into the Pivot Table (Drop Data Items Here).
 Report Measures
-
In the Pivot Field List, expand the Application dimension. Drag and drop the Application Hierarchy in the Pivot Table (Drop Rows Fields Here).
Report Applications
-
Drag the Application Type in the Pivot Table (Drop Filter Fields Here).
-
Filter the Application Type, choose only SMS, then click OK. This will filter the list of rows in the Pivot Table.
Report Filters
-
Expand the list of data in the Pivot Table. Application Type > Vendor License > Name > Version.
Application Level Report
-
In the Pivot Field List, expand the User dimension. Drag and drop the User Id classification beside the Version.
-
Expand a specific Version to see the list of users.
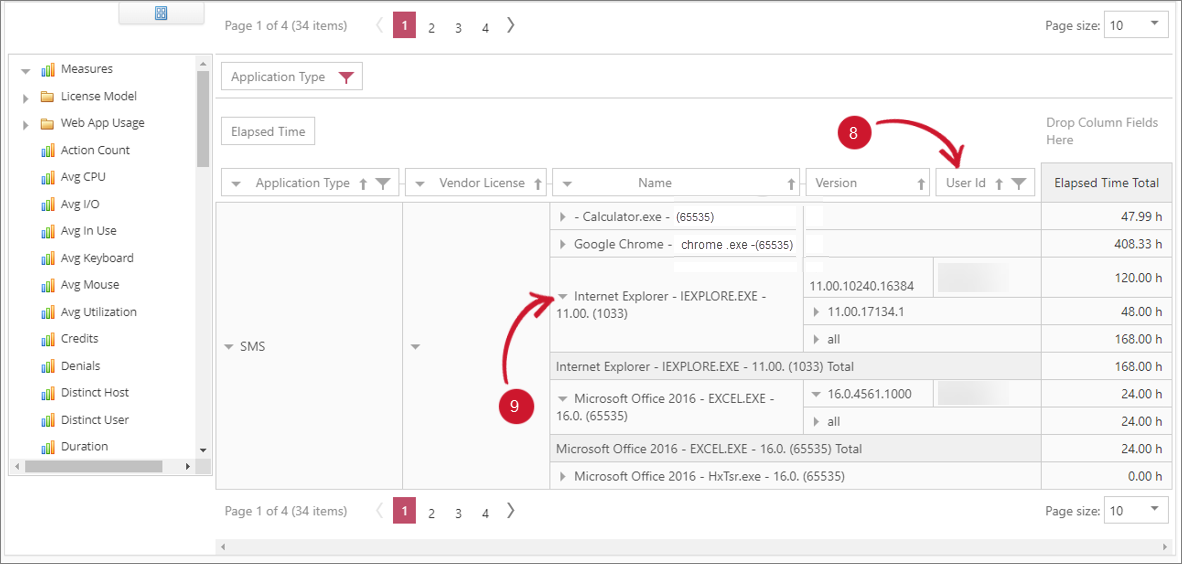 User Level Report
This report shows the list of users using a certain application and how long the user used the application.